


Often you need to store personalized information for each user of your application. For example, your application may require users to logon to a secure server for authentication. In this case, the user needs to supply his credentials, such as a login name and a password. The first time the user uses your application this information will be entered by the user, but subsequently it would be useful for your application to “remember” this information somewhere so that it can save the user the trouble of entering the same information every time he uses your application. To save this information, there are a couple of ways you could use – files, databases, etc. However, a much better way would be to use the SharedPreferences feature in Android. In this article, I will walk you through the steps to creating an Android application that makes use of this SharedPreferences feature.
Creating the Project
Using Eclipse, create a new project named UsingPreferences (see Figure 1).

Figure 1. Creating a new Android project
Create a new folder in the res folder and name it as xml. In this newly created folder, add a file and name it myapppreferences.xml (see Figure 2).

Figure 2. Adding a new XML file in the res/xml folder
Populate the myapppreferences.xml file as follows:
|
1 2 3 4 5 6 7 8 9 10 11 12 13 14 15 16 17 18 19 20 21 22 23 24 25 26 27 28 29 30 31 32 33 34 35 36 37 38 |
<?xml version="1.0" encoding="utf-8"?> <PreferenceScreen xmlns:android="http://schemas.android.com/apk/res/android"> <PreferenceCategory android:title="Category 1"> <CheckBoxPreference android:title="Checkbox" android:defaultValue="false" android:summary="True of False" android:key="checkboxPref" /> </PreferenceCategory> <PreferenceCategory android:title="Category 2"> <EditTextPreference android:summary="Enter a string" android:defaultValue="[Enter a string here]" android:title="Edit Text" android:key="editTextPref" android:name="EditText"/> <RingtonePreference android:summary="Select a ringtone" android:title="Ringtones" android:key="ringtonePref" android:name="Ringtone Preference" /> <PreferenceScreen android:title="Second Preference Screen" android:summary= "Click here to go to the second Preference Screen" android:key="secondPrefScreenPref" > <EditTextPreference android:summary="Enter a string" android:title="Edit Text (second Screen)" android:key="secondEditTextPref" android:name="EditText" /> </PreferenceScreen> </PreferenceCategory> </PreferenceScreen> |
The myapppreferences.xml file defines the list of preferences that you want to preserve in your application. For example, if you want to preserve a Boolean value, you could use the <CheckBoxPreference> element, which allows you to store a true or false value. Likewise, if you want to preserve some text values, you could use the <EditTextPreference> element, which allows you to store a string value. The android:key attribute specifies the key that you can programmatically reference in your code to set or retrieve the value of that particular preference.
Under the src/net.learn2develop.UsingPreferences package name, add a new Class file and name it AppPreferenceActivity.java. Populate it as follows:
|
1 2 3 4 5 6 7 8 9 10 11 12 13 |
package net.learn2develop.UsingPreferences; import android.os.Bundle; import android.preference.PreferenceActivity; public class AppPreferenceActivity extends PreferenceActivity { @Override public void onCreate(Bundle savedInstanceState) { super.onCreate(savedInstanceState); //--load the preferences from an XML file--- addPreferencesFromResource(R.xml.myapppreferences); } } |
Observe that the class extends the PreferenceActivity base class. The PreferenceActivity class is a specialized type of activity that displays a hierarchy of preferences to the user. In this case, you will load the list of preferences that you have defined in the myapppreferences.xml (defined as R.xml.myapppreferences) file.
In the AndroidManifest.xml file, add the new entry for the AppPreferenceActivity class:
|
1 2 3 4 5 6 7 8 9 10 11 12 13 14 15 16 17 18 19 20 21 22 23 24 25 26 27 28 |
<?xml version="1.0" encoding="utf-8"?> <manifest xmlns:android="http://schemas.android.com/apk/res/android" package="net.learn2develop.UsingPreferences" android:versionCode="1" android:versionName="1.0"> <uses-sdk android:minSdkVersion="10" /> <application android:icon="@drawable/icon" android:label="@string/app_name"> <activity android:name=".MainActivity" android:label="@string/app_name"> <intent-filter> <action android:name="android.intent.action.MAIN" /> <category android:name="android.intent.category.LAUNCHER" /> </intent-filter> </activity> <activity android:name=".AppPreferenceActivity" android:label="@string/app_name"> <intent-filter> <action android:name="net.learn2develop.AppPreferenceActivity" /> <category android:name="android.intent.category.DEFAULT" /> </intent-filter> </activity> </application> </manifest> |
In the main.xml file, add the following code in bold:
|
1 2 3 4 5 6 7 8 9 10 11 12 13 14 15 16 17 18 19 20 21 22 23 24 25 26 27 28 29 30 31 |
<?xml version="1.0" encoding="utf-8"?> <LinearLayout xmlns:android="http://schemas.android.com/apk/res/android" android:orientation="vertical" android:layout_width="fill_parent" android:layout_height="fill_parent" > <TextView android:layout_width="fill_parent" android:layout_height="wrap_content" android:text="@string/hello" /> <Button android:id="@+id/btnPreferences" android:text="Load Preferences Screen" android:layout_width="fill_parent" android:layout_height="wrap_content" /> <Button android:id="@+id/btnDisplayValues" android:text="Display Preferences Values" android:layout_width="fill_parent" android:layout_height="wrap_content" /> <EditText android:id="@+id/txtString" android:layout_width="fill_parent" android:layout_height="wrap_content" /> <Button android:id="@+id/btnModifyValues" android:text="Modify Preferences Values" android:layout_width="fill_parent" android:layout_height="wrap_content" /> </LinearLayout> |
The above creates the UI as shown in Figure 3.

Figure 3. Creating the UI for the activity
Add in the following statements to the MainActivity.java file:
|
1 2 3 4 5 6 7 8 9 10 11 12 13 14 15 16 17 18 19 20 21 22 23 24 25 26 27 28 |
package net.learn2develop.UsingPreferences; import android.app.Activity; import android.os.Bundle; import android.content.Intent; import android.content.SharedPreferences; import android.view.View; import android.widget.Button; import android.widget.EditText; import android.widget.Toast; public class MainActivity extends Activity { /** Called when the activity is first created. */ @Override public void onCreate(Bundle savedInstanceState) { super.onCreate(savedInstanceState); setContentView(R.layout.main); Button btnPreferences = (Button) findViewById(R.id.btnPreferences); btnPreferences.setOnClickListener(new View.OnClickListener() { public void onClick(View v) { Intent i = new Intent("net.learn2develop.AppPreferenceActivity"); startActivity(i); } }); } } |
That’s it! To test the application, press F11 in Eclipse to deploy the application onto an Android 2.3.3 emulator. Once the application is installed onto the emulator, you will see the application as shown in Figure 4.

Figure 4. Testing the application
Clicking on the Load Preferences Screen button will display the AppPreferenceActivity activity (see Figure 5).

Figure 5. Loading the preferences activity
You can click on the Checkbox item and the checkbox’s value will toggle between checked and unchecked. Observe the two categories – Category 1 and Category 2. Click on the Edit Text item and enter some values as shown in Figure 6. Click OK to dismiss the dialog.

Figure 6. Entering a string for a EditTextPreference
Clicking the Second Preference Screen item will navigate to the next screen (see Figure 7).

Figure 7. Displaying the second preference screen
To go back to the previous screen, click the Back button. To dismiss the preferences screen, you also click the Back button.
At this juncture, it is important to note that once you have modified the value of at least one of the preferences, a file will be created in the /data/data/net.learn2develop.UsingPreferences folder. To verify this, switch to the DDMS perspective in Eclipse and look into the File Explorer tab (see Figure 8), you will see an XML file named net.learn2develop.UsingPreferences_preferences.xml.

Figure 8. Examining the preference file created using the File Explorer
If you extract this file and examine its content, you will see something like the following:
|
1 2 3 4 |
<?xml version='1.0' encoding='utf-8' standalone='yes' ?> <map> <string name="editTextPref">Some values here...</string> </map> |
As you modify the values of the various preferences, their values would be saved in this XML file.
Programmatically Retrieving and Modifying the Preferences Values
In the previous section, you saw how the PreferenceActivity class allows developers to easily create preferences as well let users modify them during runtime. So how can you make use of these preferences in your application? The answer is through the SharedPreferences class.
MOdify the MainActivity.java class so that it contains the following code:
|
1 2 3 4 5 6 7 8 9 10 11 12 13 14 15 16 17 18 19 20 21 22 23 24 25 26 27 28 29 30 31 32 33 34 35 36 37 38 39 40 41 42 43 |
public class MainActivity extends Activity { /** Called when the activity is first created. */ @Override public void onCreate(Bundle savedInstanceState) { super.onCreate(savedInstanceState); setContentView(R.layout.main); Button btnPreferences = (Button) findViewById(R.id.btnPreferences); btnPreferences.setOnClickListener(new View.OnClickListener() { public void onClick(View v) { Intent i = new Intent("net.learn2develop.AppPreferenceActivity"); startActivity(i); } }); Button btnDisplayValues = (Button) findViewById(R.id.btnDisplayValues); btnDisplayValues.setOnClickListener(new View.OnClickListener() { public void onClick(View v) { SharedPreferences appPrefs = getSharedPreferences("net.learn2develop.UsingPreferences_preferences", MODE_PRIVATE); DisplayText(appPrefs.getString("editTextPref", "")); } }); Button btnModifyValues = (Button) findViewById(R.id.btnModifyValues); btnModifyValues.setOnClickListener(new View.OnClickListener() { public void onClick(View v) { SharedPreferences appPrefs = getSharedPreferences("net.learn2develop.UsingPreferences_preferences", MODE_PRIVATE); SharedPreferences.Editor prefsEditor = appPrefs.edit(); prefsEditor.putString("editTextPref", ((EditText) findViewById(R.id.txtString)).getText().toString()); prefsEditor.commit(); } }); } private void DisplayText(String str) { Toast.makeText(getBaseContext(), str, Toast.LENGTH_LONG).show(); } } |
In the first block of code, you first use the getSharedPreferences() method to obtain an instance of the SharedPreferences class. You do so by specifying the name of the XML file (in this case it is “net.learn2develop.UsingPreferences_preferences”, using the format: PackageName_preferences). To retrieve a string preference, you use the getString() method.
In the second block of code, you create a SharedPreferences.Editor object through the edit() method of the SharedPreferences object. To change the value of a string preference, use the putString() method. To save the changes to the preferences file, use the commit() method.
Press F11 to rerun the application on the Android emulator again. This time, clicking on the Display Preferences Values button will display the value shown in Figure 9.

Figure 9. Retrieving the value of a preference
To programmatically set it to some value, enter a string in the EditText view (see Figure x) and click the Modify Preferences Values button (see Figure 10).

Figure 10. Modifying the value of a preference
Now click on the Display Preferences Values button and observe that the new values is now saved (see Figure 11).

Figure 11. Verifying that the value of a preference has been changed
Changing the Default Name of the Preference File
Notice that by default the name of the preferences file saved on the device is net.learn2develop.UsingPreferences_preferences.xml, with the package name used as the prefix. However, sometimes it would be useful if you want to give the preference file a specific name instead of using the default name. In this case, you can do the following.
Modify the AppPreferenceActivity.java file so that it contains the following code:
|
1 2 3 4 5 6 7 8 9 10 11 12 13 14 15 16 17 18 |
package net.learn2develop.UsingPreferences; import android.os.Bundle; import android.preference.PreferenceActivity; import android.preference.PreferenceManager; public class AppPreferenceActivity extends PreferenceActivity { @Override public void onCreate(Bundle savedInstanceState) { super.onCreate(savedInstanceState); PreferenceManager prefMgr = getPreferenceManager(); prefMgr.setSharedPreferencesName("appPreferences"); //--load the preferences from an XML file--- addPreferencesFromResource(R.xml.myapppreferences); } } |
Here, you make use of the PreferenceManager class to set the shared preference file name to appPreferences.xml.
And so in the MainActivity.java file, instead of specifying this:
|
1 2 3 |
SharedPreferences appPrefs = getSharedPreferences("net.learn2develop.UsingPreferences_preferences", MODE_PRIVATE); |
You could use the following:
|
1 2 |
SharedPreferences appPrefs = getSharedPreferences("appPreferences", MODE_PRIVATE); |
When you rerun the application and make changes to the preferences, you will notice that the appPreferences.xml file will now be created (see Figure 12).
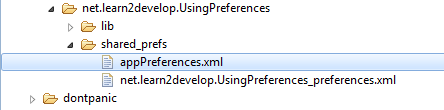
Figure 12. The new preferences file created using the specified new name
Summary
In this article, you have seen how the PreferenceActivity class allows users to easily view and modify preferences values in your Android application. You have also seen how to programmatically retrieve and modify values so that you can make use of them from within your application.


Leave a Reply