In the previous article, we saw how to develop a new type of application known as the Split View-based application on the iPad. And one of the new views introduced for the iPad is the PopoverView, which you had a quick glimpse of it in action in the previous article. In this article, I will show you how you can use the PopoverView in your iPad application, not just in a Split View-based application.
Getting Started with the PopoverView
The iPhone SDK 3.2 includes a new view known as the PopoverView. The PopoverView is a view designed specifically for use on the iPad and it is used to display information in a popover window. The PopoverView displays the content of a view controller, and hence anything that can be displayed in a view controller can be displayed by the PopoverView.
In this section, you will see how to use the PopoverView in your iPad application. You will use the PopoverView to display a list of movies represented by a Table View.
Using Xcode, create a View-based Application (iPad) project and name it PopOverExample1.
Right-click on the Classes folder in Xcode and select Add -> New File…. (see Figure 1).
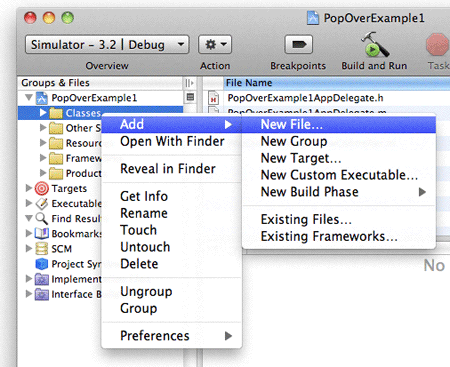
Figure 1. Adding new files to the project
Select the Cocoa Touch Class item and then select the UIViewController subclass template. Click Next (see Figure 2). Ensure that all the options for the UIViewController subclass item are selected.
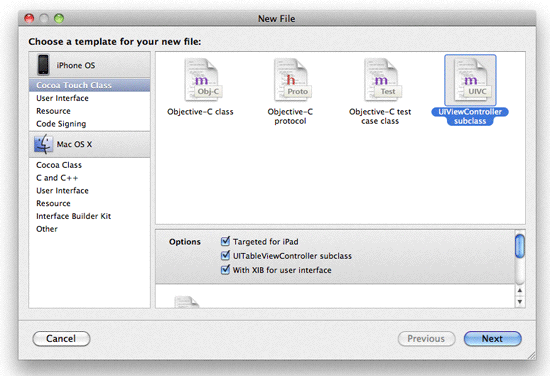
Figure 2. Adding a UIViewController subclass item
Name the new class MoviesViewController.m.
In the MoviesViewController.h file, code the following:
|
1 2 3 4 5 6 7 8 |
#import <UIKit/UIKit.h> @interface MoviesViewController : UITableViewController { //---add this--- NSMutableArray *listOfMovies; } @end |
In the MoviesViewController.m file, code the following:
|
1 2 3 4 5 6 7 8 9 10 11 12 13 14 15 16 17 18 19 20 21 22 23 24 25 26 27 28 29 30 31 32 33 34 35 36 37 38 39 40 41 42 43 44 45 46 47 48 49 50 51 52 53 54 55 56 57 58 59 60 61 62 63 64 65 66 67 68 69 70 71 72 73 74 75 76 77 78 79 |
#import "MoviesViewController.h" //---add this--- #import "PopOverExample1ViewController.h" #import "PopOverExample1AppDelegate.h" @implementation MoviesViewController - (void)viewDidLoad { //---add this--- //---initialize the array--- listOfMovies = [[NSMutableArray alloc] init]; [listOfMovies addObject:@"Training Day"]; [listOfMovies addObject:@"Remember the Titans"]; [listOfMovies addObject:@"John Q."]; [listOfMovies addObject:@"The Bone Collector"]; [listOfMovies addObject:@"Ricochet"]; [listOfMovies addObject:@"The Siege"]; [listOfMovies addObject:@"Malcolm X"]; [listOfMovies addObject:@"Antwone Fisher"]; [listOfMovies addObject:@"Courage Under Fire"]; [listOfMovies addObject:@"He Got Game"]; [listOfMovies addObject:@"The Pelican Brief"]; [listOfMovies addObject:@"Glory"]; [listOfMovies addObject:@"The Preacher's Wife"]; [super viewDidLoad]; self.clearsSelectionOnViewWillAppear = NO; } - (NSInteger)numberOfSectionsInTableView:(UITableView *)tableView { // Return the number of sections. //---add this--- return 1; } - (NSInteger)tableView:(UITableView *)tableView numberOfRowsInSection:(NSInteger)section { // Return the number of rows in the section. //---add this--- return [listOfMovies count]; } // Customize the appearance of table view cells. - (UITableViewCell *)tableView:(UITableView *)tableView cellForRowAtIndexPath:(NSIndexPath *)indexPath { static NSString *CellIdentifier = @"Cell"; UITableViewCell *cell = [tableView dequeueReusableCellWithIdentifier:CellIdentifier]; if (cell == nil) { cell = [[[UITableViewCell alloc] initWithStyle:UITableViewCellStyleDefault reuseIdentifier:CellIdentifier] autorelease]; } // Configure the cell... //---add this--- cell.textLabel.text = [listOfMovies objectAtIndex:indexPath.row]; return cell; } - (void)tableView:(UITableView *)tableView didSelectRowAtIndexPath:(NSIndexPath *)indexPath { //---add this--- PopOverExample1AppDelegate *appDelegate = [[UIApplication sharedApplication] delegate]; appDelegate.viewController.detailItem = [listOfMovies objectAtIndex:indexPath.row]; } - (void)dealloc { //---add this--- [listOfMovies release]; [super dealloc]; } |
Essentially, the MoviesViewController class displays a list of movie titles using a Table View. The list of movie titles is stored in the listOfMovies array.
When the item in the Table View is selected, you will display the name of the movie selected in the View window [that is hosting the PopoverView, and hence the Table View] using the detailItem property (which you will define in the PopOverExample1ViewController.m file):
|
1 2 3 4 5 6 7 8 9 10 |
- (void)tableView:(UITableView *)tableView didSelectRowAtIndexPath:(NSIndexPath *)indexPath { PopOverExample1AppDelegate *appDelegate = [[UIApplication sharedApplication] delegate]; appDelegate.viewController.detailItem = [listOfMovies objectAtIndex:indexPath.row]; } |
Double-click the PopOverExample1ViewController.xib file to edit it in Interface Builder.
Populate the View window with the following views (see also Figure 3):
- Toolbar
- Bar Button Item
- Round Rect Button
- Label
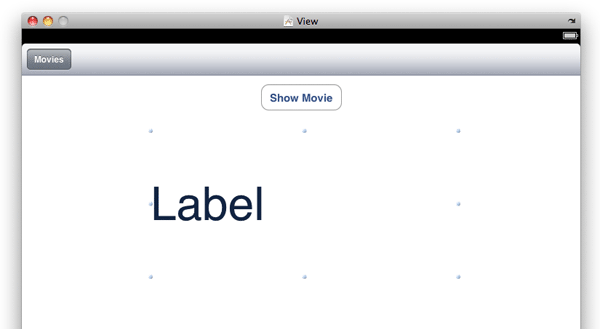
Figure 3. Populating the View window
In the PopOverExample1ViewController.h file, code the following:
|
1 2 3 4 5 6 7 8 9 10 11 12 13 14 15 16 17 18 19 20 21 22 |
#import <UIKit/UIKit.h> @interface PopOverExample1ViewController : UIViewController <UIPopoverControllerDelegate> { //---add this--- //---add this--- UIPopoverController *popoverController; IBOutlet UIButton *btn; IBOutlet UILabel *movieSelected; id detailItem; } //---add this--- @property (nonatomic, retain) UIPopoverController *popoverController; @property (nonatomic, retain) UIButton *btn; @property (nonatomic, retain) UILabel *movieSelected; @property (nonatomic, retain) id detailItem; -(IBAction) showMovies:(id) sender; -(IBAction) btnShowMovies:(id) sender; @end |
Here, you implement the UIPopoverControllerDelegate protocol so that you can handle the events raised by the PopoverView. You will use an instance of the UIPopoverController class to display a PopoverView.
Back in Interface Builder, perform the following actions:
- Control-click the File’s Owner item and drag it over the Label view. Select
movieSelected - Control-click the File’s Owner item and drag it over the Round Rect Button. Select
btn - Control-click the Bar Button Item and drag it over the File’s Owner item. Select
showMovies - Control-click the Bar Button Item and drag it over the File’s Owner item. Select
btnShowMovies
In the PopOverExample1ViewController.m file, code the following:
|
1 2 3 4 5 6 7 8 9 10 11 12 13 14 15 16 17 18 19 20 21 22 23 24 25 26 27 28 29 30 31 32 33 34 35 36 37 38 39 40 41 42 43 44 45 46 47 48 49 50 51 52 53 54 55 56 57 58 59 60 61 62 63 64 65 66 67 68 69 70 71 72 73 74 75 76 77 78 79 80 81 82 83 84 85 86 87 88 89 90 91 92 93 94 95 96 97 98 99 100 101 102 103 |
#import "PopOverExample1ViewController.h" //---add this--- #import "MoviesViewController.h" @implementation PopOverExample1ViewController //---add this--- @synthesize btn, movieSelected; @synthesize popoverController; @synthesize detailItem; -(IBAction) showMovies:(id) sender { if (self.popoverController == nil) { MoviesViewController *movies = [[MoviesViewController alloc] initWithNibName:@"MoviesViewController" bundle:[NSBundle mainBundle]]; UIPopoverController *popover = [[UIPopoverController alloc] initWithContentViewController:movies]; popover.delegate = self; [movies release]; self.popoverController = popover; [popover release]; } [self.popoverController presentPopoverFromBarButtonItem:sender permittedArrowDirections:UIPopoverArrowDirectionAny animated:YES]; } -(IBAction) btnShowMovies:(id) sender { if (self.popoverController == nil) { MoviesViewController *movies = [[MoviesViewController alloc] initWithNibName:@"MoviesViewController" bundle:[NSBundle mainBundle]]; UIPopoverController *popover = [[UIPopoverController alloc] initWithContentViewController:movies]; popover.delegate = self; [movies release]; self.popoverController = popover; [popover release]; } CGRect popoverRect = [self.view convertRect:[btn frame] fromView:[btn superview]]; popoverRect.size.width = MIN(popoverRect.size.width, 100); [self.popoverController presentPopoverFromRect:popoverRect inView:self.view permittedArrowDirections:UIPopoverArrowDirectionAny animated:YES]; } - (void)setDetailItem:(id)newDetailItem { if (detailItem != newDetailItem) { [detailItem release]; detailItem = [newDetailItem retain]; //---update the view--- movieSelected.text = [detailItem description]; } if (popoverController != nil) { [popoverController dismissPopoverAnimated:YES]; } } //---called when the user clicks outside the popover view--- - (BOOL)popoverControllerShouldDismissPopover:(UIPopoverController *)popoverController { NSLog(@"popover about to be dismissed"); return YES; } //---called when the popover view is dismissed--- - (void)popoverControllerDidDismissPopover: (UIPopoverController *)popoverController { NSLog(@"popover dismissed"); } - (void)dealloc { //---add this--- [popoverController release]; [btn release]; [detailItem release]; [movieSelected release]; [super dealloc]; } |
In this class, I show two ways in which you can display a PopoverView. The first way is to click on a Bar Button Item view. This is the most common way to display a PopoverView. To display a PopoverView, you first create an instance of the view controller that you want to display in the PopoverView. In this case, it is the MoviesViewController class:
|
1 2 3 4 |
MoviesViewController *movies = [[MoviesViewController alloc] initWithNibName:@"MoviesViewController" bundle:[NSBundle mainBundle]]; |
You then create an instance of the UIPopoverController class and initialize it with the view controller you want to display. You will also need to set the delegate property to self so that all events fired by the PopoverView can be handled in the current view controller:
|
1 2 3 4 5 6 7 8 |
UIPopoverController *popover = [[UIPopoverController alloc] initWithContentViewController:movies]; popover.delegate = self; [movies release]; self.popoverController = popover; [popover release]; |
To display the PopoverView, use the presentPopoverFromBarButtonItem:permittedArrowDirections:animated: method from the UIPopoverController object:
|
1 2 3 4 |
[self.popoverController presentPopoverFromBarButtonItem:sender permittedArrowDirections:UIPopoverArrowDirectionAny animated:YES]; |
The second way to display a PopoverView is when you click on a Round Rect button. In this case, you display it using the presentPopoverFromRect:inView:permittedArrowDirections:animated: method:
|
1 2 3 4 5 |
[self.popoverController presentPopoverFromRect:popoverRect inView:self.view permittedArrowDirections:UIPopoverArrowDirectionAny animated:YES]; |
Notice that for this method, you need to specify the exact position and size of the PopoverView to display:
|
1 2 3 |
CGRect popoverRect = [self.view convertRect:[btn frame] fromView:[btn superview]]; popoverRect.size.width = MIN(popoverRect.size.width, 100); |
The setDetailItem: method allows the movie that is selected in the PopoverView to be displayed in the current View window:
|
1 2 3 4 5 6 7 8 9 10 11 12 13 14 15 |
- (void)setDetailItem:(id)newDetailItem { if (detailItem != newDetailItem) { [detailItem release]; detailItem = [newDetailItem retain]; //---update the view--- movieSelected.text = [detailItem description]; } if (popoverController != nil) { [popoverController dismissPopoverAnimated:YES]; } } |
When an item is selected, you would need to dismiss the PopoverView programmatically – you can use the dismissPopoverAnimated: method of the UIPopoverController object. If not, the PopoverView will be automatically dismissed when the user touches the area outside the PopoverView. When a PopoverView dismissed, there are two events that will be fired:
|
1 2 3 4 5 |
//---called when the user clicks outside the popover view--- -(BOOL)popoverControllerShouldDismissPopover:(UIPopoverController *)popoverController; //---called when the popover view is dismissed--- -(void)popoverControllerDidDismissPopover:(UIPopoverController *)popoverController; |
To test the application, press Command-R to test the application on the iPad Simulator. Figure 4 shows the PopoverView when you click on the Movies and Show Movie buttons:
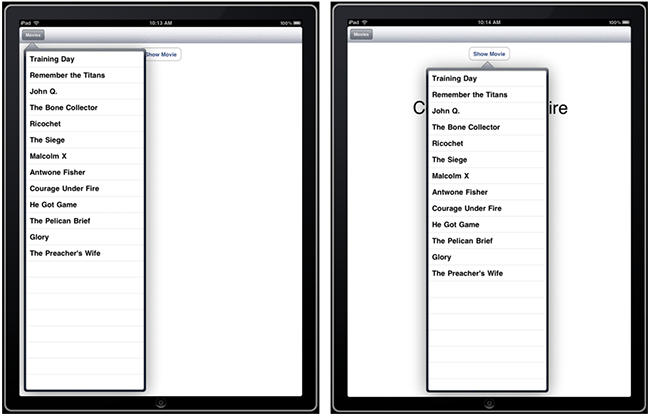
Figure 4. Displaying the PopoverView
Displaying a Navigation Controller within a PopoverView
As shown in the previous section, you displayed the content of the UITableViewController class inside a PopoverView. The Table view is commonly associated with a navigation controller, thereby allowing users to drill down the list of items. A good example is the Bookmark button in Mobile Safari (see figure 5).
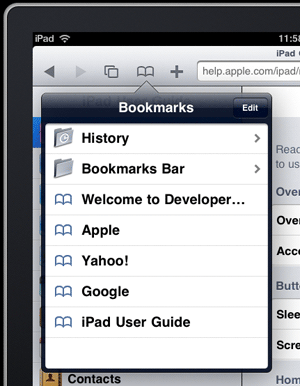
Figure 5. The Bookmarks PopoverView on the Mobile Safari
In this section, you will learn how to display a navigation controller within the PopoverView.
Using Xcode, create a View-based Application (iPad) project and name it PopOverExample2.
Right-click on the Classes folder in Xcode and select Add->New File….: Select the Cocoa Touch Class item and then select the UIViewController subclass template. Ensure that all the three options for creating the UIViewController subclass item are selected. Name the new class BookMarksViewController.m.
Add another UIViewController subclass item and name it HistoryViewController.m.
In the BookMarksViewController.h file, add in the following code:
|
1 2 3 4 5 6 7 |
#import <UIKit/UIKit.h> @interface BookMarksViewController : UITableViewController { NSMutableArray *bookMarksItems; //---add this--- } @end |
In the BookMarksViewController.m file, add in the following code:
|
1 2 3 4 5 6 7 8 9 10 11 12 13 14 15 16 17 18 19 20 21 22 23 24 25 26 27 28 29 30 31 32 33 34 35 36 37 38 39 40 41 42 43 44 45 46 47 48 49 50 51 52 53 54 55 56 57 58 59 60 61 62 63 64 65 66 67 68 69 70 71 72 73 74 75 76 77 78 79 80 81 82 83 84 85 |
#import "BookMarksViewController.h" #import "HistoryViewController.h" @implementation BookMarksViewController - (void)viewDidLoad { //---add this--- //---initialize the array--- bookMarksItems = [[NSMutableArray alloc] init]; [bookMarksItems addObject:@"History"]; [bookMarksItems addObject:@"Bookmarks Bar"]; [bookMarksItems addObject:@"Apple"]; [bookMarksItems addObject:@"Yahoo!"]; [bookMarksItems addObject:@"Google"]; [bookMarksItems addObject:@"iPad User Guide"]; [super viewDidLoad]; self.clearsSelectionOnViewWillAppear = NO; } - (NSInteger)numberOfSectionsInTableView:(UITableView *)tableView { // Return the number of sections. //---add this--- return 1; } - (NSInteger)tableView:(UITableView *)tableView numberOfRowsInSection:(NSInteger)section { // Return the number of rows in the section. //---add this--- return [bookMarksItems count]; } // Customize the appearance of table view cells. - (UITableViewCell *)tableView:(UITableView *)tableView cellForRowAtIndexPath:(NSIndexPath *)indexPath { static NSString *CellIdentifier = @"Cell"; UITableViewCell *cell = [tableView dequeueReusableCellWithIdentifier:CellIdentifier]; if (cell == nil) { cell = [[[UITableViewCell alloc] initWithStyle:UITableViewCellStyleDefault reuseIdentifier:CellIdentifier] autorelease]; } // Configure the cell... //---add this--- cell.textLabel.text = [bookMarksItems objectAtIndex:indexPath.row]; if (indexPath.row <= 1) cell.accessoryType = UITableViewCellAccessoryDisclosureIndicator; return cell; } - (void)tableView:(UITableView *)tableView didSelectRowAtIndexPath:(NSIndexPath *)indexPath { //---add this--- switch (indexPath.row) { case 0: { HistoryViewController *historyViewController = [[HistoryViewController alloc] initWithNibName:@"HistoryViewController" bundle:nil]; [self.navigationController pushViewController:historyViewController animated:YES]; [historyViewController release]; break; } case 1: break; } } - (void)dealloc { //---add this--- [bookMarksItems release]; [super dealloc]; } |
Basically, this class displays a Table view with a list of items, such as History, Bookmarks Bar, Apple, etc. When an item is selected (specifically, the first item in the Table view), it will use the pushViewController: method of the navigation controller to navigate to the HistoryViewController object.
In the HistoryViewController.h file, add the following code:
|
1 2 3 4 5 6 7 |
#import <UIKit/UIKit.h> @interface HistoryViewController : UITableViewController { NSMutableArray *historyItems; //---add this--- } @end |
In the HistoryViewController.m file, add the following code:
|
1 2 3 4 5 6 7 8 9 10 11 12 13 14 15 16 17 18 19 20 21 22 23 24 25 26 27 28 29 30 31 32 33 34 35 36 37 38 39 40 41 42 43 44 45 46 47 48 49 50 51 52 53 54 55 56 |
#import "HistoryViewController.h" @implementation HistoryViewController - (void)viewDidLoad { //---add this--- //---initialize the array--- historyItems = [[NSMutableArray alloc] init]; [historyItems addObject:@"Google"]; [historyItems addObject:@"Apple"]; [historyItems addObject:@"Developer Learning Solutions"]; [super viewDidLoad]; self.clearsSelectionOnViewWillAppear = NO; } - (NSInteger)numberOfSectionsInTableView:(UITableView *)tableView { // Return the number of sections. //---add this--- return 1; } - (NSInteger)tableView:(UITableView *)tableView numberOfRowsInSection:(NSInteger)section { // Return the number of rows in the section. //---add this--- return [historyItems count]; } // Customize the appearance of table view cells. - (UITableViewCell *)tableView:(UITableView *)tableView cellForRowAtIndexPath:(NSIndexPath *)indexPath { static NSString *CellIdentifier = @"Cell"; UITableViewCell *cell = [tableView dequeueReusableCellWithIdentifier:CellIdentifier]; if (cell == nil) { cell = [[[UITableViewCell alloc] initWithStyle:UITableViewCellStyleDefault reuseIdentifier:CellIdentifier] autorelease]; } // Configure the cell... //---add this--- cell.textLabel.text = [historyItems objectAtIndex:indexPath.row]; return cell; } - (void)dealloc { //---add this--- [historyItems release]; [super dealloc]; } |
Like the BookMarksViewController class, this class also displays a list of items – Google, Apple, and Developer Learning Solutions.
Double-click on the PopOverExample2ViewController.xib file to edit it in Interface Builder.
Add the following views to the View window (see also Figure 6):
- Toolbar
- Bar Button Item (set its Identifier property to Bookmarks)
- PopOverExample2ViewController.h
- btnShowBookmarks
- PopOverExample2ViewController.m
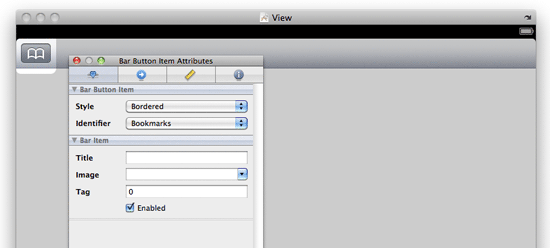
Figure 6. Populating the View window
In the
file, add the following code:
|
1 2 3 4 5 6 7 8 9 10 11 12 |
#import <UIKit/UIKit.h> @interface PopOverExample2ViewController : UIViewController <UIPopoverControllerDelegate> { //---add this--- UIPopoverController *popoverController; } //---add this--- @property (nonatomic, retain) UIPopoverController *popoverController; -(IBAction) btnShowBookmarks:(id) sender; @end |
Back in Interface Builder, control-click and bookmark Bar Button item to the File’s Owner item. Select
.
In the
file, add the following code:
|
1 2 3 4 5 6 7 8 9 10 11 12 13 14 15 16 17 18 19 20 21 22 23 24 25 26 27 28 29 30 31 32 33 34 35 36 37 38 39 40 41 42 43 44 45 46 47 |
#import "PopOverExample2ViewController.h" //---add this--- #import "BookMarksViewController.h" @implementation PopOverExample2ViewController //---add this--- @synthesize popoverController; -(IBAction) btnShowBookmarks:(id) sender { if (self.popoverController == nil) { BookMarksViewController *bookMarksViewController = [[BookMarksViewController alloc] initWithNibName:@"BookMarksViewController" bundle:[NSBundle mainBundle]]; bookMarksViewController.navigationItem.title = @"Bookmarks"; UINavigationController *navController = [[UINavigationController alloc] initWithRootViewController:bookMarksViewController]; UIPopoverController *popover = [[UIPopoverController alloc] initWithContentViewController:navController]; popover.delegate = self; [bookMarksViewController release]; [navController release]; self.popoverController = popover; [popover release]; } [self.popoverController presentPopoverFromBarButtonItem:sender permittedArrowDirections:UIPopoverArrowDirectionAny animated:YES]; } - (void)dealloc { //---add this--- [popoverController release]; [super dealloc]; } |
The important part of the code above is the following:
|
1 2 3 4 5 6 7 8 |
bookMarksViewController.navigationItem.title = @"Bookmarks"; UINavigationController *navController = [[UINavigationController alloc] initWithRootViewController:bookMarksViewController]; UIPopoverController *popover = [[UIPopoverController alloc] initWithContentViewController:navController]; |
The above block of code uses a UINavigationController object to display the BookMarksViewController object. The UINavigationController object is then displayed by the PopoverViewController object.
Press Command-R to test the application on the iPad Simulator. You can now navigate the list shown in the Bookmarks PopoverView (see Figure 7).
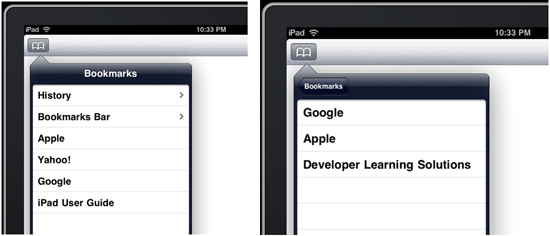
Figure 7. Displaying the navigation controller in the PopoverView
Summary
In this article, you had a good look at the new PopoverView available for the iPad. The PopoverView is a very versatile view that you can use to display context-sensitive options for your application. Use the comments below to share with us how you are using the PopoverView.