


In our last article, we created the basis of a messaging system, allowing us to receive inbound messages using keywords and shortcodes. We’ve also previously seen how we can send SMS messages. It’s time to bring everything together and create a simple messaging system that can process inbound SMS messages and send back responses to those messages.
The Current System
Our inbound messaging system (see the Receiving SMS Messages via Shortcodes & Keywords article) currently consists of:
- A simple SQL Server database
- A “listener” ASP.NET Web page
- An Inbound SMS Message class
As it stands, the system can receive inbound SMS messages and delivery receipts. The key part we are missing is the ability to send a response message back to the person who sent in the inbound response. That’s what we’re going to add here. This will cause the code to change quite a bit, so we won’t show the previous code here; please refer to the other articles if you want to see this.
Why Do We Need To Respond?
You might ask yourself why bother sending a response? Well, courtesy first of all. If you’ve advertised a keyword mechanism and one of your customers (or potential customers) has made the effort to use it, the least you can do is acknowledge their message. Secondly, perception; most people expect to receive a reply of some sort when they send in a SMS message to a keyword/shortcode. Imagine you entered a competition via SMS. You would expect to receive a message back confirming your entry, wouldn’t you?
It’s always best to respond to user queries. This lets the user know the system is working and can also be used to direct them to a Web site, which can possibly be used to entice them to use more of your services or products. Don’t leave the user sitting around wondering whether their SMS message arrived!
Planning Our System
We need to change both parts of the system to improve our functionality. We must:
- Change the database structure
- Change the ASP.NET listener and classes
What You Need
This example is developed using a SQL Server database (any version from 2000 onwards) and a simple C# ASP.NET Web site. So you’ll need a version of SQL Server (the free SQL Server Express Edition will do the trick) and a tool which allows you to create an ASP.NET Web site (Visual Studio Express could be used here, this is also free).
If you want to test the system in anger, you’ll need an account with an aggregator or SMS provider (see here for more information on this), and at least one keyword with that aggregator. We’re using iTagg in this example, but there are lots more aggregators and SMS providers – Mdev, Oxygen8, and Tanla are just a couple of examples.
The Database
We’ll start off by creating the database. In our previous articles, this consisted of one table, which we used to store messages. It also contained a couple of stored procedures, which inserted messages into the table and updated messages with delivery receipt information.
To be able to support a proper inbound/outbound SMS mechanism, we need to add:
- The ability to send back a response message to inbound messages
- The ability to identify the keyword to which the inbound message was received, and then send back a response specifically for that keyword
Assume we had two keywords – mobiforge and deviceatlas. If our system only supported one response, the message sent back would always be the same. If the response was set up as follows:
Thanks for contacting mobiForge! To see great articles discussing all aspects of mobile development, visit http://mobiforge.com now!
Then we would be confusing users who have texted in to the deviceatlas keyword. It’s natural to assume they would expect to receive a response along these lines:
DeviceAtlas is the premier mobile device detection database. To find out more, visit us at http://deviceatlas.com today.
To support this functionality, we’ll need to amend the database as follows:
- Add a KeywordResponses table, which will store keyword details and details of the response message to send
- Modify the Messages table, so it is linked to the KeywordResponses table
- Modify the usp_InsertMessage stored procedure, so it can identify the keyword to which the message has been sent, and returns the response to send
- Add a stored procedure to return keyword details when an inbound message is received
Here’s an updated script, with all of those changes:
-- MobiforgeMessageDemo database
-- Supports storage of response message details
-- Supports storage and retrieval of messages sent/received

USE master

-- Delete the database if it already exists so we can recreate
IF EXISTS(SELECT [name] FROM sys.databases
	    WHERE [name] = 'MobiforgeMessageDemo')
 BEGIN
	DROP DATABASE MobiforgeMessageDemo
 END

GO

-- Create the database
CREATE DATABASE MobiforgeMessageDemo

GO

USE MobiforgeMessageDemo

-- The keyword responses table stores keyword details, and
-- the contents of the message we will send back
CREATE TABLE KeywordResponses
(
 -- Identity just automatically assigns a unique number to a new keyword, starting from 1
 KeywordID				INT IDENTITY(1,1) PRIMARY KEY,
 Keyword				VARCHAR(25),
 Shortcode				VARCHAR(12),
 SendResponse			BIT,
 -- An originator can be 11 characters in length, or 12 if using a mobile number
 ResponseOriginator		VARCHAR(12),
 -- An SMS message can contain up to 160 characters
 ResponseMessageBody		VARCHAR(160)
)

-- Add the Messages table
CREATE TABLE [Messages]
(
 -- Added so we can link the KeywordResponse and Messages tables together
 KeywordID				INT,
 AggregatorMessageID		VARCHAR(40),
 InboundMessage			BIT,
 Originator				VARCHAR(12),
 Recipient				VARCHAR(12),
 MessageDate			DATETIME	DEFAULT GETDATE(),
 MessageBody			VARCHAR(160),
 MessageDelivered			BIT		DEFAULT 0,
 CONSTRAINT pk_messages PRIMARY KEY (KeywordID, AggregatorMessageID)
)

GO

-- Create relationship between KeywordResponses and Messages
ALTER TABLE [Messages]
	ADD CONSTRAINT fk_KeywordResponses_Messages FOREIGN KEY (KeywordID)
		REFERENCES KeywordResponses (KeywordID)
		ON UPDATE CASCADE
		ON DELETE CASCADE

GO

-- Returns details for the specified keyword, including
-- whether we should send a message back and the message details if so
CREATE PROCEDURE usp_SelectKeywordDetails
@Keyword				VARCHAR(25),
@Shortcode				VARCHAR(12)
AS
BEGIN

SET NOCOUNT ON

SELECT KeywordID, Keyword, Shortcode, SendResponse,
	   ResponseOriginator, ResponseMessageBody
FROM KeywordResponses
WHERE Keyword = @Keyword AND Shortcode = @Shortcode

SET NOCOUNT OFF

END

GO

-- Stored procedure to insert a message
CREATE PROCEDURE usp_InsertMessage
@KeywordID				INT,
@AggregatorMessageID	VARCHAR(40),
@InboundMessage			BIT,
@Originator				VARCHAR(12),
@Recipient				VARCHAR(12),
@MessageBody			VARCHAR(160),
@MessageDate			DATETIME = NULL
AS
BEGIN

SET NOCOUNT ON

-- Set message date to NOW if we don't have a date/time
IF (@MessageDate IS NULL)
 BEGIN
	SET @MessageDate = GETDATE();
 END

-- Insert the message with the keyword ID
INSERT INTO [Messages]
(KeywordID, AggregatorMessageID, InboundMessage, Originator,
 Recipient, MessageBody)
VALUES
(@KeywordID, @AggregatorMessageID, @InboundMessage, @Originator,
 @Recipient, @MessageBody)

SET NOCOUNT OFF

END

GO

-- Stored procedure to update a message's delivery status
CREATE PROCEDURE usp_MarkMessageAsDelivered
@AggregatorMessageID		VARCHAR(40)
AS
BEGIN

SET NOCOUNT ON

-- iTagg pass message IDs with a -3 when sending messages,
-- but do not pass the -3 in delivery receipts. So we check
-- if we can find the message first, and if we can't we append
-- a -3 to the end of the ID
IF NOT EXISTS (SELECT AggregatorMessageID
		   FROM [Messages]
		   WHERE AggregatorMessageID = @AggregatorMessageID)
BEGIN

	SET @AggregatorMessageID += '-3'

END

UPDATE [Messages]
	SET MessageDelivered = 1
WHERE AggregatorMessageID = @AggregatorMessageID

END
Run this script in SQL Server Management Studio to create the database. In the screenshot below, I’ve inserted two records into the KeywordResponses table to support the mobiforge and deviceatlas keywords I was discussing earlier.

Figure 1 – Configuring keywords in the database
You can see that each record stores the name of the keyword, along with the shortcode on which the keyword is located. There’s a SendResponse flag, which denotes whether a response should be sent or not; and finally there’s a ResponseOriginator and a ResponseMessageBody. These two values determine what message is sent, and who it appears to be sent from.
We now have support for multiple keywords in our database. Hurrah! Now we just need to update the ASP.NET side of things.
ASP.NET Changes
On the ASP.NET side of things, we’d previously created a site that had:
- An ASPX page that acts as a listener, waiting for messages to be received from the aggregator (the intermediary company we use to send and receive SMS messages through – see here for more information)
- A simple iTaggDeliveryReceipt class, to handle delivery receipts
- A simple InboundSmsMessage class, to handle inbound SMS messages
We’ll change the site so it has the following:
- An ASPX page that acts as a listener. This will handle both the inbound messages and the delivery receipt notifications
- A simple iTaggDeliveryReceipt class
- A KeywordResponse class, to represent the keywords and their associated response
- A SmsMessage class, which represents both inbound and outbound SMS messages
We’ll assume we’re starting from scratch, and no previous project exists.
Creating the ASP.NET Web Site
Open up Visual Studio. From the File menu, choose New, then Web Site. Call the Web site MobiforgeDemo and click OK. You’ll have a variety of options depending upon the version of Visual Studio used; ensure you create an ASP.NET Empty Web Application.

Figure 2 –Creating an empty ASP.NET Web Site
Once the project is created, your Solution Explorer (this is usually displayed on the right-hand side of the screen) will look something like this (if you’re using Visual Studio 2010):

Figure 3 – Solution Explorer after Web Site creation
Let’s add in the classes first. Right-click on MobiforgeDemo and choose Add -> New Item from the pop-up menu. Choose Class, and set the file name as iTaggDeliveryReceipt.cs. Then click Add to create the class.

Figure 4 – Adding a class
Repeat the process two more times, setting the file name as:
- KeywordResponse.cs
- SmsMessage.cs
Finally, we need to add the listener Web page. Select the Add -> New Item option from the pop-up menu again, but this time choose Web Form. Name the form listener.aspx and click Add.
Solution Explorer will now look like this:

Figure 5 –The final Solution Explorer
We now have all the building blocks in place, and we can start adding code.
iTaggDeliveryReceipt Class
Let’s add the code for the iTaggDeliveryReceipt class first. This processes delivery receipt XML sent to our system from iTagg and updates the database accordingly. Double-click on iTaggDeliveryReceipt.cs in Solution Explorer, and replace the code there with the following:
using System;
using System.Collections.Generic;
using System.Xml;
using System.Web;

/// <summary>
/// Represents an iTagg delivery receipt
/// </summary>
public class iTaggDeliveryReceipt
{
    private string _version = string.Empty;             // The iTagg delivery receipt version
    private string _msisdn = string.Empty;              // The mobile number the message was delivered to
    private string _submissionRef = string.Empty;       // The iTagg message ID
    private string _status = string.Empty;              // Message delivery status
    private string _reason = string.Empty;              // Message success/failure reason
    private string _timestamp = string.Empty;           // Time/date message was delivered
    private string _retry = string.Empty;               // Denotes whether message should be retried

    // Public accessors
    public string Version
    {
        get { return _version; }
        set { _version = value; }
    }

    public string Msisdn
    {
        get { return _msisdn; }
        set { _msisdn = value; }
    }

    public string SubmissionRef
    {
        get { return _submissionRef; }
        set { _submissionRef = value; }
    }

    public string Status
    {
        get { return _status; }
        set { _status = value; }
    }

    public string Reason
    {
        get { return _reason; }
        set { _reason = value; }
    }

    public string Timestamp
    {
        get { return _timestamp; }
        set { _timestamp = value; }
    }

    public string Retry
    {
        get { return _retry; }
        set { _retry = value; }
    }

    /// <summary>
    /// Accepts XML parameter as string and populates class properties
    /// </summary>
    /// <param name="XmlInput"></param>
    public iTaggDeliveryReceipt(string XmlInput)
    {
        try
        {
            // Create XML document
            XmlDocument doc = new XmlDocument();
            doc.LoadXml(XmlInput);

            // Use XPATH to obtain values
            _version = _returnNodeValue(doc, "/itagg_delivery_receipt/version");
            _msisdn = _returnNodeValue(doc, "/itagg_delivery_receipt/msisdn");
            _submissionRef = _returnNodeValue(doc, "/itagg_delivery_receipt/submission_ref");
            _status = _returnNodeValue(doc, "/itagg_delivery_receipt/status");
            _reason = _returnNodeValue(doc, "/itagg_delivery_receipt/reason");
            _timestamp = _returnNodeValue(doc, "/itagg_delivery_receipt/timestamp");
            _retry = _returnNodeValue(doc, "/itagg_delivery_receipt/retry");
        }
        catch (Exception ex)
        {
            HttpContext.Current.Trace.Warn("Error processing receipt: " + ex.Message);
        }
    }

    /// <summary>
    /// Returns the actual value for the specified node
    /// </summary>
    /// <param name="document"></param>
    /// <param name="xpathQuery"></param>
    /// <returns></returns>
    private string _returnNodeValue(XmlDocument document, string xpathQuery)
    {
        string nodeValue = string.Empty;

        if (document != null)
        {
            XmlNode node = document.SelectSingleNode(xpathQuery);

            if (node != null && !string.IsNullOrEmpty(node.InnerText))
            {
                nodeValue = node.InnerText;
            }
        }

        return nodeValue;
    }
}
The code is pretty simple. We start off by defining a bunch of private properties and public accessors. Once this is done we define a constructor to accept and process the XML sent to us by iTagg. This constructor calls a private method that returns a value for the specified XPATH query.
SmsMessage Class
We need a mechanism that allows us to represent SMS messages in the database. This mechanism should allow us to:
- Represent the properties of an SMS message
- Store messages in the database, whether they are inbound or outbound
We’ll create the SmsMessage class for this very purpose. Open SmsMessage.cs and enter this code.
using System;
using System.Collections.Generic;
using System.Web;
using System.Data;
using System.Data.SqlClient;


/// <summary>
/// Summary description for InboundSmsMessage
/// </summary>
public class SmsMessage
{
    private string _aggregatorMessageID = string.Empty;     // The aggregator message ID
    private string _originator = string.Empty;              // The message originator
    private string _recipient = string.Empty;               // The message recipient
    private DateTime _messageDate = DateTime.MinValue;      // Date/time the message was received
    private string _messageBody = string.Empty;             // The message body
    private int _keywordID = 0;                             // Stores the keyword ID the message was sent via or received on
    private bool _inboundMessage = false;                   // Determines whether a message is an inbound message or not (true if inbound)

    // Public accessors
    public string AggregatorMessageID
    {
        get { return _aggregatorMessageID; }
        set { _aggregatorMessageID = value; }
    }

    public string Originator
    {
        get { return _originator; }
        set { _originator = value; }
    }

    public string Recipient
    {
        get { return _recipient; }
        set { _recipient = value; }
    }

    public DateTime MessageDate
    {
        get { return _messageDate; }
        set { _messageDate = value; }
    }

    public string MessageBody
    {
        get { return _messageBody; }
        set { _messageBody = value; }
    }

    public int KeywordID
    {
        get { return _keywordID; }
        set { _keywordID = value; }
    }

    public bool InboundMessage
    {
        get { return _inboundMessage; }
        set { _inboundMessage = value; }
    }

    /// <summary>
    /// Accepts Input Stream parameter as a string and populates class properties
    /// This is used for inbound messages
    /// </summary>
    /// <param name="InputStream"></param>
	public SmsMessage(string InputStream)
	{
        // Added to process responses
        // Set the inbound message property to true
        _inboundMessage = true;

        // Obtain the parameter values by splitting on the ampersand
        string[] parameters = InputStream.Split(new char[] { '&' });

        // And now we can loop around the parameters and process each value
        // Note that we don't process every value iTagg send to us as we don't need them all
        for (int i = 0; i < parameters.Length; i++)
        {
            // Separate parameter name and value
            string[] parameterValues = parameters[i].Split(new char[] { '=' });

            // Should have two values
            if (parameterValues.Length == 2)
            {
                // Assign the value to the appropriate class property
                switch (parameterValues[0])
                {
                    case "source":
                        _originator = parameterValues[1];
                        break;

                    case "dest":
                        _recipient = parameterValues[1];
                        break;

                    case "dtime":
                        // Length should be 12
                        // 4 digits for YYYY
                        // 2 digits for MM
                        // 2 digits for DD
                        // 2 digits for HH
                        // 2 digits for MM
                        if (parameterValues[1].Length == 12)
                        {
                            int year = Convert.ToInt32(parameterValues[1].Substring(0, 4));
                            int month = Convert.ToInt32(parameterValues[1].Substring(4, 2));
                            int day = Convert.ToInt32(parameterValues[1].Substring(6, 2));
                            int hour = Convert.ToInt32(parameterValues[1].Substring(8, 2));
                            int minute = Convert.ToInt32(parameterValues[1].Substring(10, 2));

                            DateTime dateToProcess = new DateTime(year, month, day, hour, minute, 0);
                            _messageDate = dateToProcess;
                        }
                        break;

                    case "message":
                        _messageBody = parameterValues[1];
                        break;

                    case "message_id":
                        _aggregatorMessageID = parameterValues[1];
                        break;
                }
            }
        }
	}

    /// <summary>
    /// Used by outbound messages - constructs a message from specific values
    /// </summary>
    /// <param name="AggregatorMessageID"></param>
    /// <param name="Originator"></param>
    /// <param name="Recipient"></param>
    /// <param name="MessageBody"></param>
    public SmsMessage(int KeywordID, string AggregatorMessageID, string Originator, string Recipient, string MessageBody)
    {
        _keywordID = KeywordID;
        _aggregatorMessageID = AggregatorMessageID;
        _originator = Originator;
        _recipient = Recipient;
        _messageBody = MessageBody;
    }

    /// <summary>
    /// Inserts the message into the database
    /// </summary>
    public void WriteMessageToDatabase()
    {
        // Only process if we have valid data
        if (_aggregatorMessageID != string.Empty && _keywordID > 0)
        {
            // Ensure current date is set if no value specified
            if (_messageDate == DateTime.MinValue)
            {
                _messageDate = DateTime.Now;
            }

            SqlConnection conn = new SqlConnection(
                "Data Source=DBSERVER;Initial Catalog=MobiforgeMessageDemo;Integrated Security=true");

            SqlCommand cmd = new SqlCommand("usp_InsertMessage", conn);
            cmd.CommandType = CommandType.StoredProcedure;

            // Set the parameters
            cmd.Parameters.Add(new SqlParameter("@KeywordID", _keywordID));
            cmd.Parameters.Add(new SqlParameter("@AggregatorMessageID", _aggregatorMessageID));
            cmd.Parameters.Add(new SqlParameter("@InboundMessage", _inboundMessage));
            cmd.Parameters.Add(new SqlParameter("@Originator", _originator));
            cmd.Parameters.Add(new SqlParameter("@Recipient", _recipient));
            cmd.Parameters.Add(new SqlParameter("@MessageBody", _messageBody));
            cmd.Parameters.Add(new SqlParameter("@MessageDate", _messageDate));

            conn.Open();
            cmd.ExecuteNonQuery();
            conn.Close();
        }
    }

}
The first part of the code listing defines the properties – message body, originator, recipient etc. Then we have two constructors. The first constructs a message from an Input Stream. This is used to create inbound message objects, as iTagg will deliver an input stream to our listener page when they receive an inbound SMS message on our behalf. The second is used to construct outbound messages and accepts a defined set of parameters that we can use to create the SmsMessage object.
The last method in the listing is WriteMessageToDatabase. This calls the usp_InsertMessage stored procedure to insert the message into the database. When instantiating the connection, ensure you replace DBSERVER with the name of your SQL Server.
KeywordResponse Class
The last class we’ll create is KeywordResponse. This is another simple class that will:
- Define a set of properties to define a keyword response
- Create a keyword response from an inbound message, by reading details from the database
- Have the ability to send the response SMS message
Open up the KeywordResponse.cs file, and add in the code below:
using System;
using System.Collections.Generic;
using System.Web;
using System.Data.SqlClient;
using System.Data;

/// <summary>
/// Represents an outbound keyword response
/// </summary>
public class KeywordResponse
{
    private int _keywordID;
    private bool _sendResponse;
    private string _responseOriginator;
    private string _responseMessageBody;

    // Public accessors
    public int KeywordID
    {
        get { return _keywordID; }
        set { _keywordID = value; }
    }

    public bool SendResponse
    {
        get { return _sendResponse; }
        set { _sendResponse = value; }
    }

    public string ResponseOriginator
    {
        get { return _responseOriginator; }
        set { _responseOriginator = value; }
    }

    public string ResponseMessageBody
    {
        get { return _responseMessageBody; }
        set { _responseMessageBody = value; }
    }

    /// <summary>
    /// Accepts Input Stream parameter as a string and populates class properties
    /// </summary>
    /// <param name="InputStream"></param>
	public KeywordResponse(string InputStream)
	{
        // Obtain the parameter values by splitting on the ampersand
        string[] parameters = InputStream.Split(new char[] { '&' });

        // Temporary placeholders
        string keyword = string.Empty;
        string shortcode = string.Empty;

        // And now we can loop around the parameters and process each value
        // Note that we don't process every value iTagg send to us as we don't need them all
        for (int i = 0; i < parameters.Length; i++)
        {
            // Separate parameter name and value
            string[] parameterValues = parameters[i].Split(new char[] { '=' });

            // Should have two values
            if (parameterValues.Length == 2)
            {
                // Assign the value to the appropriate class property
                switch (parameterValues[0])
                {
                    case "dest":
                        shortcode = parameterValues[1];
                        break;

                    case "matched_keyword":
                        keyword = parameterValues[1];
                        break;
                }
            }
        }

        // We now check if we have the inbound values - if we do, we call the database to
        // obtain the keyword properties
        if (!string.IsNullOrEmpty(shortcode) && !string.IsNullOrEmpty(keyword))
        {
            _readKeywordFromDatabase(shortcode, keyword);
        }
	}

    /// <summary>
    /// Returns keyword message data from the database
    /// </summary>
    /// <param name="shortcode"></param>
    /// <param name="keyword"></param>
    private void _readKeywordFromDatabase(string shortcode, string keyword)
    {
        SqlConnection conn = new SqlConnection(
                "Data Source=DBSERVER;Initial Catalog=MobiforgeMessageDemo;Integrated Security=true");

        SqlCommand cmd = new SqlCommand("usp_SelectKeywordDetails", conn);
        cmd.CommandType = CommandType.StoredProcedure;

        // Set the parameters
        cmd.Parameters.Add(new SqlParameter(@"Keyword", keyword));
        cmd.Parameters.Add(new SqlParameter("@Shortcode", shortcode));

        conn.Open();

        SqlDataReader dr = cmd.ExecuteReader();

        while (dr.Read())
        {
            _keywordID = (int)dr["KeywordID"];
            _sendResponse = (bool)dr["sendResponse"];
            _responseOriginator = (string)dr["ResponseOriginator"];
            _responseMessageBody = (string)dr["ResponseMessageBody"];
        }

        conn.Close();
    }

    // Sends the keyword response message to the specified recipient
    public void SendSmsMessage(string Recipient)
    {
        // Initialise the Web request
        System.Net.WebClient webClient = new System.Net.WebClient();

        // Prepare the HTTP POST data
        // Change the user name as appropriate
        // Change the password as appropriate
        // Type is set to text for SMS - could also be set to binary
        // Route is set to 4 - this is the iTagg budget route. Other routes are 7 (for UK) and 8 (for Global)
        string postData = "usr=USERNAME&pwd=PASSWORD&from= " +
            _responseOriginator + "&to=" + Recipient +
            "&type=text&route=4&txt=" + _responseMessageBody;

        webClient.Headers.Add("Content-Type", "application/x-www-form-urlencoded");

        // Make the request to iTagg
        string result = webClient.UploadString("https://secure.itagg.com/smsg/sms.mes", postData);

        //// Parse the response returned by iTagg to obtain message ID
        string[] iTaggResponse = result.Split(new char[] { '|' });
        string iTaggMessageID = string.Empty;

        // If a valid response was received, store the message ID
        // In a real system we'd implement a much more robust mechanism for parsing responses
        if (iTaggResponse.Length == 5 && iTaggResponse[2] == "submission referencen0")
        {
            // Remove new line tag
            iTaggMessageID = iTaggResponse[4].Replace("n", string.Empty);
        }
        else
        {
            // We would add code to handle errors here
        }

        if (!string.IsNullOrEmpty(iTaggMessageID))
        {
            // Create a message and write it to the database
            SmsMessage message = new SmsMessage(_keywordID, iTaggMessageID, _responseOriginator, Recipient, _responseMessageBody);
            message.WriteMessageToDatabase();
        }
    }
}
We begin by defining four properties:
- Keyword ID – The internal keyword identifier; we use this to easily identify keywords within the database.
- Send Response – A Boolean value, which determines whether we send a response back when an inbound message is received. If this is true, we send the response.
- Response Originator – Response Message Body
These are the values sent back to the person who sent the inbound SMS message. The Response Originator determines who the message was sent from; the Response Message Body represents the content of the message.
Next up we define our constructor. This accepts an Input Stream, which in this case is the HTTP POST string passed to us by iTagg. We then pull out the parts of this Input Stream that allow us to identify the keyword to which the message was sent.
Our next method is _readKeywordFromDatabase. This is called by the constructor to pull out the keyword response details from the database we created earlier. This is a private method and cannot be called outside of the class.
Last up we have SendSmsMessage. This is a public method and is used to send the response SMS message back to the original sender via iTagg. You’ll note at the end of this method we create a SmsMessage object and write it to the database – this creates a record of the message we’ve just sent in the database.
When instantiating the connection in readKeywordFromDatabase, ensure you replace DBSERVER with the name of your SQL Server. Also, ensure you set the correct user name and password for your iTagg account in the SendSmsMessage method.
Listener.aspx
The last piece of the puzzle is the listener page. This page will be called when an inbound message or delivery receipt arrives, and will contain code to process the inbound message/delivery receipt. This page will perform the following processing:
- Determine whether the data being passed by iTagg is a delivery receipt or an inbound message
- If the data represents a delivery receipt, the database is updated
- If the data represents an inbound message, we obtain the keyword details, write the message to the database, and then send back a response SMS message (if the keyword is configured to do so)
There are four key methods defined here to do our work:
- Page_Load – This is the standard ASP.NET page load event. This is the first event called. It calls DeliveryReceiptReceived to determine what type of message has been received, and then calls the appropriate processing method.
- DeliveryReceiptReceived – Returns true if a delivery receipt has been received. If an inbound SMS message was received, it returns false.
- ProcessDeliveryReceipt – Processes a delivery receipt. The message ID is identified and the appropriate message in the database is updated.
- ProcessInboundSmsMessage – Processes an inbound SMS message. The sending of the outbound response SMS message is performed here.
Here’s the code, type or paste it into listener.aspx.cs:
using System;
using System.Collections.Generic;
using System.Data.SqlClient;
using System.Data;
using System.Web;
using System.Web.UI;
using System.Web.UI.WebControls;
using System.IO;

public partial class listener : System.Web.UI.Page
{
    protected void Page_Load(object sender, EventArgs e)
    {
        try
        {
            // Check if some POST data was passed
            if (Request.InputStream != null)
            {
                StreamReader sr = new StreamReader(Request.InputStream);

                // Convert the POST stream to a string
                // We remove the xml= tag at the front, otherwise the XML will not parse
                // NOTE - "xml" is only passed if we receive a delivery receipt
                string inputStream = sr.ReadToEnd().Replace("xml=", string.Empty);

                if (deliveryReceiptReceived(inputStream))
                {
                    processDeliveryReceipt(inputStream);
                }
                else
                {
                    processInboundSmsMessage(inputStream);
                }
            }
        }
        catch (Exception ex)        // Output the error details
        {
            Response.Write("Error occurred whilst processing: " +
                            ex.Message);
            Trace.Write("Error occurred whilst processing: " +
                            ex.Message);
        }
    }

    /// <summary>
    /// Determines whether we should process a delivery receipt or an inbound SMS message
    /// </summary>
    /// <param name="inputStream">The data to check</param>
    /// <returns></returns>
    private bool deliveryReceiptReceived(string inputStream)
    {
        // Assume we're processing an inbound SMS message
        bool deliveryReceiptReceived = false;

        // If the input stream contains a delivery receipt XML element,
        // return delivery receipt
        if (inputStream.Contains("itagg_delivery_receipt"))
        {
            deliveryReceiptReceived = true;
        }

        return deliveryReceiptReceived;
    }

    /// <summary>
    /// Process the inbound delivery receipt and add it to the database
    /// </summary>
    /// <param name="inputStream"></param>
    private void processDeliveryReceipt(string inputStream)
    {
        // Create a delivery receipt
        iTaggDeliveryReceipt dr =
            new iTaggDeliveryReceipt(inputStream);

        // Write out the delivery receipt details to the trace
        Trace.Write("iTagg DR data: " + inputStream);

        Trace.Write("DR submission ref: " + dr.SubmissionRef);
        Trace.Write("DR status: " + dr.Status);

        // Only process if the status is "delivered"
        if (dr.Status == "Delivered")
        {
            // Try and update the database
            SqlConnection conn = new SqlConnection(
                "Data Source=DBSERVER;Initial Catalog=MobiforgeMessageDemo;Integrated Security=true");

            SqlCommand cmd = new SqlCommand("usp_MarkMessageAsDelivered", conn);
            cmd.CommandType = CommandType.StoredProcedure;

            // Make sure we set the aggregator message ID
            cmd.Parameters.Add(new SqlParameter("@AggregatorMessageID", dr.SubmissionRef));

            conn.Open();
            cmd.ExecuteNonQuery();
            conn.Close();

            // Show we updated the database in the trace
            Trace.Write("Successfully updated database.");
        }
        else        // A different status has been received, so we output a message to show this
        {
            Response.Write("Message was not delivered. Status: " + dr.Status + "<BR>");
        }

        // Write out a confirmation message at the end
        Response.Write("OK");
    }


    /// <summary>
    /// Processes an inbound SMS message and adds it to the database
    /// </summary>
    /// <param name="inputStream"></param>
    private void processInboundSmsMessage(string inputStream)
    {
        // Create a keyword response

        // Create an inbound SMS message
        SmsMessage message = new SmsMessage(inputStream);

        // Write out the SMS details to the trace
        Trace.Write("iTagg SMS data: " + inputStream);

        // Only process if we have valid data
        if (message.AggregatorMessageID != string.Empty)
        {
            // Obtain keyword details
            KeywordResponse keyword = new KeywordResponse(inputStream);

            Trace.Write("Message body received: " + message.InboundMessage);
            Trace.Write("Keyword message received on: " + keyword.KeywordID);

            // If we found the keyword, process the inbound message
            if (keyword.KeywordID > 0)
            {
                SmsMessage inboundMessage = new SmsMessage(inputStream);
                inboundMessage.KeywordID = keyword.KeywordID;
                inboundMessage.WriteMessageToDatabase();

                // And now, we send the response - if required
                if (keyword.SendResponse)
                {
                    Trace.Warn("Send response is true - about to send response");

                    keyword.SendSmsMessage(inboundMessage.Originator);
                }
            }
        }

        // Write out a confirmation message at the end
        Response.Write("OK");
    }
}
Compile the application – it should build without any issues (make sure you change DBSERVER to the name of your SQL Server). Deploy it to IIS as you would any other application. We’re almost ready to roll!
Configuring iTagg
Assuming you have set up a keyword with iTagg, you now need to tell iTagg to direct any messages sent to this keyword to your new Web site. Let’s assume the Web site URL is:
https://mobiforge.com/mobiforgedemo/listener.aspx
You need to log on to the ITagg control panel, and set up the keyword URL. We also need to set up the delivery receipt URL.
To set these URLs up, point your browser at www.itagg.com. Log on to the control panel. After doing this, a screen should appear listing your keywords.
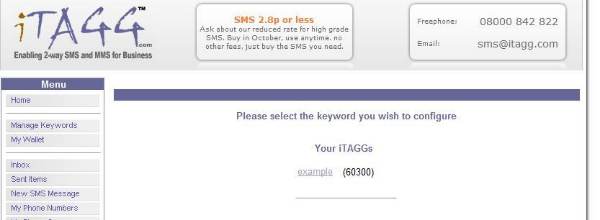
Figure 6 – The iTagg control panel
Click on the keyword and set the URL. This should be set to the URL you have published the Web site to. Make sure you add the listener.aspx part. Click OK to save.

Figure 7 – iTagg URL configuration
Nearly ready – we just need to set up delivery receipts. In the menu on the left, click on the Delivery Receipts option. When the screen appears, set the URL to the same as that you’ve just specified for the keyword.

Figure 8 – Setting the iTagg Delivery Receipt URL
Click Update to save. You’re done!
Testing The System
All that is left to do now is test the system. So grab your phone and type in your keyword! If your keyword is mobiforge, send mobiforge to 60300. Please don’t try this – it isn’t a live example! If you’d like to try out a real company that’s using iTagg, try texting thebestof to 60300.

Figure 9 – Sending an SMS message
Once you’ve sent your message, wait for a few seconds and you should receive a response back:

Figure 10 – Receiving an SMS message
Let’s check out the database. We should have two messages in there; the inbound message we’ve just sent, and the outbound message the system has just sent.

Figure 11 – The database after message sending and receiving
Note the Delivered column in the table; the outbound message is showing true in the column, which tells us our delivery receipt processing is working too (the inbound messages will always display false). Hurrah!
Summary
So there we are – a complete messaging system in a few easy steps! Remember that you don’t have to use iTagg – you are free to use any messaging provider you wish. The system we’ve just built isn’t robust – it needs more error handling, for example – but it gives you the basis to go on and create a fully automated, inbound and outbound SMS messaging system. Have fun sending – and receiving!


