


Users of iPhone are no stranger to the built-in SMS application that displays your messages using cute little bubbles (see Figure 1).
However, this innovative UI feature is not exposed to the iPhone developers – you have to create it yourself if you want to have the same look-and-feel of the SMS application. Creating this UI – which I will call the Bubble UI, allow you to represent information in a conversational style. A good application of this is when you are creating a chat application. Messages exchanged between two persons can be shown in message bubbles.
In this article, I will walk you through the steps to create an UI that is similar to the SMS application.

Figure 1.The SMS application on the iPhone
Preparing the Images
First, you will need the image representing the bubble. I have an image as shown in Figure 2.
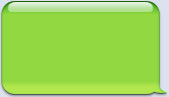
Figure 2.The message bubble
However, observe the message bubbles in the SMS application – they have varying sizes depending on the amount of text it is showing. Hence, your message bubble needs to be able to expand or contract as needed. The easiest way to do this without affecting the aspect of the image is to break it into nine smaller image fragments, as shown in Figure 3.
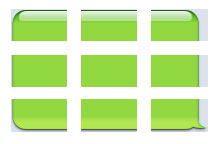
Figure 3.Breaking up the message bubble into 9 smaller fragments
If you want to expand the height of the bubble, simply stretch the middle row of images vertically (see left of Figure x). If you want to expand the width of the bubble, simply stretch the middle column of the images horizontally (see right of Figure 4).
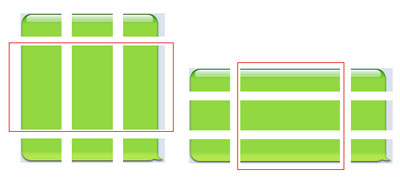
Figure 4.Expanding the message bubble vertically and horizontally
Text to be displayed in the message bubble could then be overlayed on top of the image.
Note that to save some work you can simply stretch the entire bubble image instead of breaking it into nine smaller images. This depends on the type of images you want to use for the bubble. If your image is simply a rectangle, stretching the entire image is probably easier.
Creating the Project
Now that you know the tricks to creating the message bubbles, let’s create the project and put it to work.
Launch Xcode and create a new View-based Application (iPhone) project and name it BubbleUI. Create a new group under the Resources folder in your project and name it Icons. Drag and drop the nine images that you have prepared earlier into the Icons folder (see Figure 5).

Figure 5.Adding the images to the Resources/Icons folder
Double-click on the BubbleUIViewController.xib file to edit it in Interface Builder. Populate the View window with the following views (see also Figure 6):
- Text Field
- Round Rect Button
- Table View
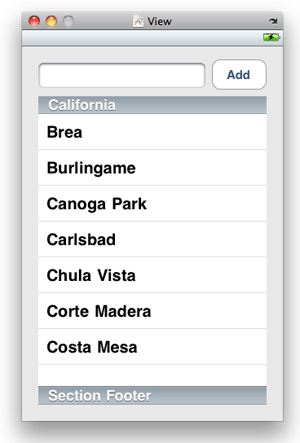
Figure 6.Populating the View window with the various views
I chose the Table View as the container to store all the messages bubbles. This is because the Table View allows scrolling and users can easily scroll through all the messages easily. Also, each message bubble will occupy a single row in the Table View. This is possible because you can customize each row in a Table View to occupy a specific height.
View the Attributes Inspector window for the Table View and set the attributes as shown in Figure 7.

Figure 7.Setting the attributes of the Table View
Setting the background color of the Table View to light blue (RGB value of 219, 226, 237) is to match the background color of my bubble image. Setting the Separator attribute of the Table View will hide the line that separates each row, making it look less like a Table View.
Next, set the background color of the View window to match that of the Table View (see Figure 8).

Figure 8.Setting the attributes of the View window
In the BubbleUIViewController.h file, add the following statements:
#import <UIKit/UIKit.h>

@interface BubbleUIViewController : UIViewController {
    //---add this---
    IBOutlet UITextField *itemName;
    IBOutlet UITableView *tableView;
    //--------------
}

//---add this---
@property (nonatomic, retain) UITextField *itemName;
@property (nonatomic, retain) UITableView *tableView;

-(IBAction) doneEditing:(id) sender;
-(IBAction) btnAdd:(id) sender;
//--------------

@end
Back in Interface Builder, right-click on the Table View and connect the dataSource and delegate outlets to the File’s Owner item. Also, connect the tableView outlet to the Table View. Figure 9 shows the connection.

Figure 9.Connecting the outlets of the Table View
Next, connect the Did End On Exit event of the Text Field view to the doneEditing: action (see Figure 10). Also connect it to the itemName outlet.

Figure 10.Connecting the Text Field’s outlets and actions
Finally, connect the Touch Up Inside event of the Round Rect Button to the btnAdd: action (See Figure 11).

Figure 11.Connecting the action to the Add button
In the BubbleUIViewController.m file, add in the following code. First, add in the following statements to declare some variables and constants:
#import "BubbleUIViewController.h"

@implementation BubbleUIViewController

//---add this---
@synthesize itemName;
@synthesize tableView;

NSMutableArray *listOfMessages;
NSMutableArray *dateOfMessages;

static CGFloat const FONTSIZE = 14.0;
static int const DATELABEL_TAG = 1;
static int const MESSAGELABEL_TAG = 2;
static int const IMAGEVIEW_TAG_1 = 3;
static int const IMAGEVIEW_TAG_2 = 4;
static int const IMAGEVIEW_TAG_3 = 5;
static int const IMAGEVIEW_TAG_4 = 6;
static int const IMAGEVIEW_TAG_5 = 7;
static int const IMAGEVIEW_TAG_6 = 8;
static int const IMAGEVIEW_TAG_7 = 9;
static int const IMAGEVIEW_TAG_8 = 10;
static int const IMAGEVIEW_TAG_9 = 11;

int bubbleFragment_width, bubbleFragment_height;
int bubble_x, bubble_y;
//--------------
Define the doneEditing: action as follows:
-(IBAction) doneEditing9id) sender {
    [sender resignFirstResponder];
}
In the viewDidLoad method, initialize the various variables and arrays:
- (void)viewDidLoad {

    //---add this---
    //---location to display the bubble fragment---
    bubble_x = 10;
    bubble_y = 20;

    //---size of the bubble fragment---
    bubbleFragment_width = 56;
    bubbleFragment_height = 32;

    //---contains the messages---
    listOfMessages = [[NSMutableArray alloc] init];

    //---contains the date for each message---
    dateOfMessages = [[NSMutableArray alloc] init];

    //---add a message---
    [listOfMessages addObject:@"Hello there!"];
    [dateOfMessages addObject:[NSString stringWithFormat:@"%@",[NSDate date]]];
    //--------------

    [super viewDidLoad];
}
Set the number of sections for the Table View to 1:
- (NSInteger)numberOfSectionsInTableView:(UITableView *)tableView {
    return 1;
}
The listOfMessages array will contain the number of messages you want to display. Hence, you will use its count as the number of rows for the Table View:
- (NSInteger)tableView:(UITableView *)tableView
 numberOfRowsInSection:(NSInteger)section {
    return [listOfMessages count];
}
For simplicity, all the message bubbles in this article will have a fixed width. Specifically, its width will be 3 times the width of each bubble fragment. All the text to be displayed will be constrained to this width (with a total left and right margin of 25 pixels). Hence the next step is to be able to calculate the overall height of a Label view that will be used to display a string of text. To do so, you will define the following method:
//---calculate the height for the message---
-(CGFloat) labelHeight:(NSString *) text {
    CGSize maximumLabelSize = CGSizeMake((bubbleFragment_width * 3) - 25,9999);
    CGSize expectedLabelSize = [text sizeWithFont:[UIFont systemFontOfSize: FONTSIZE]
                                constrainedToSize:maximumLabelSize
                                    lineBreakMode:UILineBreakModeWordWrap];
    return expectedLabelSize.height;
}
The above method takes in a string and calculates the height of a Label view that will display the string within a specific width.
As each row in the Table View will display a message bubble, each of varying heights, the next step is to set the height of each row in the Table View. You do so via the following method:
//---returns the height for the table view row---
- (CGFloat)tableView:(UITableView *)tableView
heightForRowAtIndexPath:(NSIndexPath *)indexPath {

    int labelHeight = [self labelHeight:[listOfMessages
                          objectAtIndex:indexPath.row]];
    labelHeight -= bubbleFragment_height;
    if (labelHeight<0) labelHeight = 0;

    return (bubble_y + bubbleFragment_height * 2 + labelHeight) + 5;
}
The most challenging is the part where you add the bubble to the Table View. Let’s see the code first and then I will explain it in parts. Here is the full method:
- (UITableViewCell *)tableView:(UITableView *)tableView
         cellForRowAtIndexPath:(NSIndexPath *)indexPath {

    static NSString *CellIdentifier = @"Cell";

    //---add this---
    UILabel* dateLabel = nil;
    UILabel* messageLabel = nil;
    UIImageView *imageView_top_left = nil;
    UIImageView *imageView_top_middle = nil;
    UIImageView *imageView_top_right = nil;

    UIImageView *imageView_middle_left = nil;
    UIImageView *imageView_middle_right = nil;
    UIImageView *imageView_middle_middle = nil;

    UIImageView *imageView_bottom_left = nil;
    UIImageView *imageView_bottom_middle = nil;
    UIImageView *imageView_bottom_right = nil;
    //--------------

    UITableViewCell *cell = [tableView
        dequeueReusableCellWithIdentifier:CellIdentifier];

    if (cell == nil) {
        cell = [[[UITableViewCell alloc] initWithFrame:CGRectZero
                                       reuseIdentifier:CellIdentifier]
                                       autorelease];

        //---add this---
        //---date---
        dateLabel = [[[UILabel alloc] init] autorelease];
        dateLabel.tag = DATELABEL_TAG;
        [cell.contentView addSubview: dateLabel];

        //---top left---
        imageView_top_left = [[[UIImageView alloc] init] autorelease];
        imageView_top_left.tag = IMAGEVIEW_TAG_1;
        [cell.contentView addSubview: imageView_top_left];

        //---top middle---
        imageView_top_middle = [[[UIImageView alloc] init] autorelease];
        imageView_top_middle.tag = IMAGEVIEW_TAG_2;
        [cell.contentView addSubview: imageView_top_middle];

        //---top right---
        imageView_top_right = [[[UIImageView alloc] init] autorelease];
        imageView_top_right.tag = IMAGEVIEW_TAG_3;
        [cell.contentView addSubview: imageView_top_right];

        //---middle left---
        imageView_middle_left = [[[UIImageView alloc] init] autorelease];
        imageView_middle_left.tag = IMAGEVIEW_TAG_4;
        [cell.contentView addSubview: imageView_middle_left];

        //---middle middle---
        imageView_middle_middle = [[[UIImageView alloc] init] autorelease];
        imageView_middle_middle.tag = IMAGEVIEW_TAG_5;
        [cell.contentView addSubview: imageView_middle_middle];

        //---middle right---
        imageView_middle_right = [[[UIImageView alloc] init] autorelease];
        imageView_middle_right.tag = IMAGEVIEW_TAG_6;
        [cell.contentView addSubview: imageView_middle_right];

        //---bottom left---
        imageView_bottom_left = [[[UIImageView alloc] init] autorelease];
        imageView_bottom_left.tag = IMAGEVIEW_TAG_7;
        [cell.contentView addSubview: imageView_bottom_left];

        //---bottom middle---
        imageView_bottom_middle = [[[UIImageView alloc] init] autorelease];
        imageView_bottom_middle.tag = IMAGEVIEW_TAG_8;
        [cell.contentView addSubview: imageView_bottom_middle];

        //---bottom right---
        imageView_bottom_right = [[[UIImageView alloc] init] autorelease];
        imageView_bottom_right.tag = IMAGEVIEW_TAG_9;
        [cell.contentView addSubview: imageView_bottom_right];

        //---message---
        messageLabel = [[[UILabel alloc] init] autorelease];
        messageLabel.tag = MESSAGELABEL_TAG;
        [cell.contentView addSubview: messageLabel];

        //---set the images to display for each UIImageView---
        imageView_top_left.image =
            [UIImage imageNamed:@"bubble_top_left.png"];
        imageView_top_middle.image =
            [UIImage imageNamed:@"bubble_top_middle.png"];
        imageView_top_right.image =
            [UIImage imageNamed:@"bubble_top_right.png"];

        imageView_middle_left.image =
            [UIImage imageNamed:@"bubble_middle_left.png"];
        imageView_middle_middle.image =
            [UIImage imageNamed:@"bubble_middle_middle.png"];
        imageView_middle_right.image =
            [UIImage imageNamed:@"bubble_middle_right.png"];

        imageView_bottom_left.image =
            [UIImage imageNamed:@"bubble_bottom_left.png"];
        imageView_bottom_middle.image =
            [UIImage imageNamed:@"bubble_bottom_middle.png"];
        imageView_bottom_right.image =
            [UIImage imageNamed:@"bubble_bottom_right.png"];

    } else {
        //---reuse the old views---
       dateLabel = (UILabel*)[cell.contentView viewWithTag: DATELABEL_TAG];
       messageLabel = (UILabel*)[cell.contentView viewWithTag: MESSAGELABEL_TAG];

        imageView_top_left =
            (UIImageView*)[cell.contentView viewWithTag: IMAGEVIEW_TAG_1];
        imageView_top_middle =
            (UIImageView*)[cell.contentView viewWithTag: IMAGEVIEW_TAG_2];
        imageView_top_right =
            (UIImageView*)[cell.contentView viewWithTag: IMAGEVIEW_TAG_3];

        imageView_middle_left =
            (UIImageView*)[cell.contentView viewWithTag: IMAGEVIEW_TAG_4];
        imageView_middle_middle =
            (UIImageView*)[cell.contentView viewWithTag: IMAGEVIEW_TAG_5];
        imageView_middle_right =
            (UIImageView*)[cell.contentView viewWithTag: IMAGEVIEW_TAG_6];

        imageView_bottom_left =
            (UIImageView*)[cell.contentView viewWithTag: IMAGEVIEW_TAG_7];
        imageView_bottom_middle =
            (UIImageView*)[cell.contentView viewWithTag: IMAGEVIEW_TAG_8];
        imageView_bottom_right =
            (UIImageView*)[cell.contentView viewWithTag: IMAGEVIEW_TAG_9];
    }

    //---calculate the height for the label---
    int labelHeight = [self labelHeight:[listOfMessages objectAtIndex:indexPath.row]];
    labelHeight -= bubbleFragment_height;
    if (labelHeight<0) labelHeight = 0;

    //---you can customize the look and feel for the date for each message here---
    dateLabel.frame = CGRectMake(0.0, 0.0, 200, 15.0);
    dateLabel.font = [UIFont boldSystemFontOfSize: FONTSIZE];
    dateLabel.textAlignment = UITextAlignmentLeft;
    dateLabel.textColor = [UIColor darkGrayColor];
    dateLabel.backgroundColor = [UIColor clearColor];

    //---top left---
    imageView_top_left.frame =
        CGRectMake(bubble_x, bubble_y, bubbleFragment_width, bubbleFragment_height);
    //---top middle---
    imageView_top_middle.frame =
        CGRectMake(bubble_x + bubbleFragment_width, bubble_y,
                   bubbleFragment_width, bubbleFragment_height);
    //---top right---
    imageView_top_right.frame =
        CGRectMake(bubble_x + (bubbleFragment_width * 2), bubble_y,
                   bubbleFragment_width, bubbleFragment_height);
    //---middle left---
    imageView_middle_left.frame =
        CGRectMake(bubble_x, bubble_y + bubbleFragment_height,
                   bubbleFragment_width, labelHeight);
    //---middle middle---
    imageView_middle_middle.frame =
        CGRectMake(bubble_x + bubbleFragment_width, bubble_y + bubbleFragment_height,
                   bubbleFragment_width, labelHeight);
    //---middle right---
    imageView_middle_right.frame =
        CGRectMake(bubble_x + (bubbleFragment_width * 2),
                   bubble_y + bubbleFragment_height,
                   bubbleFragment_width, labelHeight);
    //---bottom left---
    imageView_bottom_left.frame =
        CGRectMake(bubble_x, bubble_y + bubbleFragment_height + labelHeight,
                   bubbleFragment_width, bubbleFragment_height );
    //---bottom middle---
    imageView_bottom_middle.frame =
        CGRectMake(bubble_x + bubbleFragment_width,
                   bubble_y + bubbleFragment_height + labelHeight,
                   bubbleFragment_width, bubbleFragment_height);
    //---bottom right---
    imageView_bottom_right.frame =
        CGRectMake(bubble_x + (bubbleFragment_width * 2),
                   bubble_y + bubbleFragment_height + labelHeight,
                   bubbleFragment_width, bubbleFragment_height );

    //---you can customize the look and feel for each message here---
    messageLabel.frame =
        CGRectMake(bubble_x + 10, bubble_y + 5,
                  (bubbleFragment_width * 3) - 25,
                  (bubbleFragment_height * 2) + labelHeight - 10);

    messageLabel.font = [UIFont systemFontOfSize:FONTSIZE];
    messageLabel.textAlignment = UITextAlignmentCenter;
    messageLabel.textColor = [UIColor darkTextColor];
    messageLabel.numberOfLines = 0; //---display multiple lines---
    messageLabel.backgroundColor = [UIColor clearColor];
    messageLabel.lineBreakMode = UILineBreakModeWordWrap;

    dateLabel.text = [dateOfMessages objectAtIndex:indexPath.row];
    messageLabel.text = [listOfMessages objectAtIndex:indexPath.row];
    //--------------

    return cell;
}
This method looks lengthy, but it is actually very straightforward. The following pseudo code explains how it works:
    if (cell == nil) {
        //---create and instantiate all the Label and UIImageView views---
        //---then add them to the cell---

    } else {
        //---reuse the old views previously added to the cell---
    }
    //---customize the size, font, etc of all the views in the cell---
Basically, you create UIImageView and Label views to form the bubble to display the text. In this example, there are nine UIImageView, each representing a fragment of the bubble. These views are added to the cell, which is an instance of the UITableViewCell class. When the user flicks the Table View, all the rows that are bounced off the screen are now reused, hence when you add a view to the cell, you attach a tag to it, like this:
messageLabel.tag = MESSAGELABEL_TAG;
When you want to reuse the view, you retrieve it like this:
messageLabel = (UILabel*)[cell.contentView viewWithTag: MESSAGELABEL_TAG];
When the user taps the Add button, you will add the message to the listOfMessages array and then reload the Table View. You will also add the current date and time to the dateOfMessages array:
//---add a message to the table view---
-(IBAction) btnAdd:(id) sender {
    [listOfMessages addObject:itemName.text];
    [dateOfMessages addObject:[NSString stringWithFormat:@"%@",[NSDate date]]];
    [self.tableView reloadData];
}
Finally, release the two arrays in the dealloc method:
- (void)dealloc {
    [listOfMessages release];
    [dateOfMessages release];
    [super dealloc];
}
Press Command-R to test the application on the iPhone Simulator. Figure 12 shows how the application looks like.
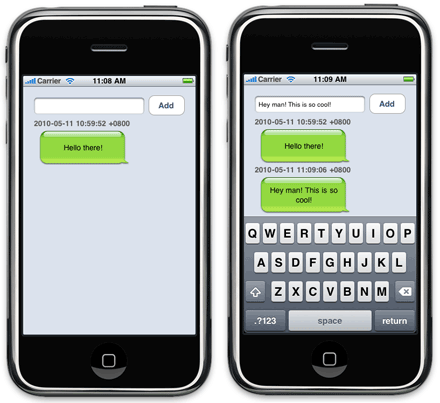
Figure 12.Testing the application
Summary
In this article, you have learned how to build the SMS-type of UI. You can adapt the code covered in this article to include bubbles of different colors, shapes and sizes. Most importantly, it makes your application much more interesting and easier to use.


