As an addendum to our previous article about the role of Swift in iOS app development, we now take a look at how Swift and Objective-C can be used together in iOS apps. Despite Apple’s intention to replace the Objective-C language using Swift, it is not practical in the short term simply due to the fact that developers are deeply entrenched in Objective-C. Rather than force Swift down the developer’s throat, Apple has made it easy to allow Objective-C to interoperate with Swift. In this article, I run through a couple of simple examples to illustrate first how you can use Swift within an Objective-C project, and then how to include Objective-C within a Swift project.
Using Swift in Objective-C projects
Since there are literally millions of iOS projects written based on Objective-C, it is appropriate that I start with an Objective-C project.
For this section, assume that you have an iOS project named ObjCProject written in Objective-C.
Assume that you want to add new features to your project. Rather than continue writing in Objective-C, you want to harness the new features in Swift and code your new features in Swift. To do so, add a new Swift File to your project (see Figure 1).
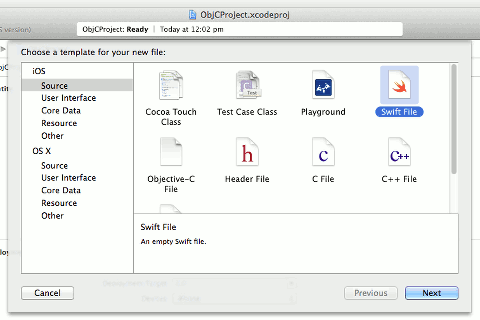
Figure 1. Adding a Swift file to the project
Name the class as MyClass and save the file. Once you do that, you will be prompted to add an Objective-C bridging header (see Figure 2). This file is to allow your Swift code to access Objective-C code. You won’t need it for now, but do add this file to the project.
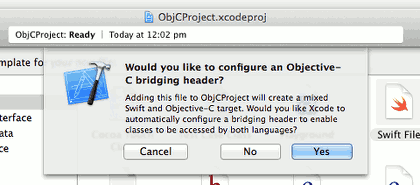
Figure 2. Xcode will add a bridging header file to your project
Your project should now have two additional files (see Figure 3).
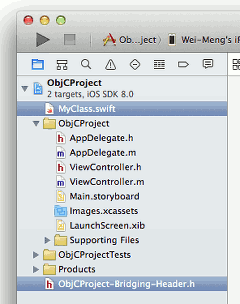
Figure 3. The two files added to the project
As mentioned, the Xcode adds the ObjCProject-Bridging-Header.h file to your project. What it also does behind the scenes is set the value of the Objective-C Bridging Header setting item to this file (see Figure 4).
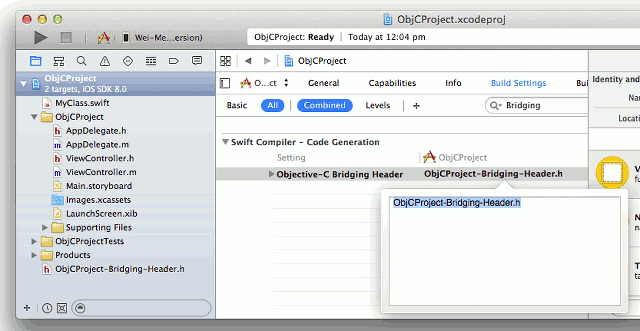 Figure 4. Xcode sets the Bridging Header setting for you automatically
Populate the MyClass.swift class as follows so that it contains a property and a method:
        import Foundation

        @objc class MyClass: NSObject {
            var property:String = ""
            func method() {
                println(self.property)
            }
        }
Note that if you want your Swift classes to be callable in Objective-C, you need to prefix the class name using the @objc tag.
In the ViewController.m file, add the following code in bold to the viewDidLoad() method to call the class that you have just created using Swift:
        #import "ViewController.h"
        #import "ObjCProject-Swift.h"

        @interface ViewController ()

        @end

        @implementation ViewController

        - (void)viewDidLoad {
            [super viewDidLoad];

            //---calling Swift code---
            MyClass *myClass = [[MyClass alloc] init];
            myClass.property = @"Hello, Swift!";
            [myClass method];
        }
Note that you need to import the following header:
#import "ObjCProject-Swift.h"
This header has the following format:
#import "<project_name>-Swift.h"
You need to import this header even though you do not see it in your Xcode project.
Run the application and you should see the following output in the Output window:
Hello, Swift!
Using Objective-C in Swift projects
Now that you have managed to call the Swift class from within Objective-C, let’s now see how a Swift class can call your Objective-C code. Add two files to the project – one .h and one .m, as shown in Figure 5.
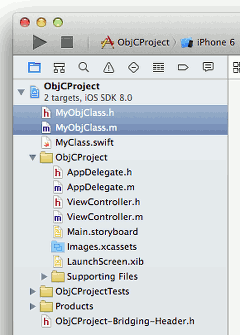
Figure 5. Adding Objective-C files to the project
Add the following code in bold to the MyObjClass.h file:
        #import <Foundation/Foundation.h>

        @interface MyObjClass: NSObject
        @property (strong, nonatomic) NSString *property;
        - (void) method;

        @end
Add the following code in bold to the MyObjClass.m file:
        #import <Foundation/Foundation.h>
        #import "MyObjClass.h"

        @implementation MyObjClass
        - (void) method {
            NSLog(@"In method now");
        }

        @end
In order for your Objective-C class to be callable from Swift, you need to import the header file for the MyObjClass class in the ObjCProject-Bridging-Header.h file (see Figure 6):
#import "MyObjClass.h"
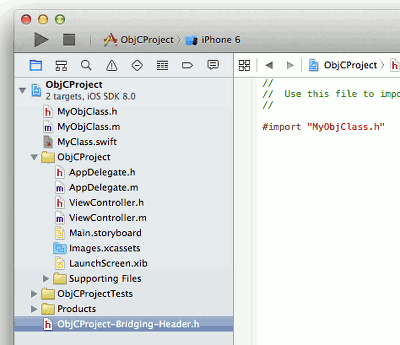
Figure 6. Importing the Objective-C class header
In the MyClass.swift file, add the following code in bold so that you can call the property and method in MyObjClass:
        import Foundation

        @objc class MyClass: NSObject {
            var property:String = ""
            func method() {
                println(self.property)

                 //---calling Objective-C code---

                // create an instance of the class
                var myObjClass:MyObjClass = MyObjClass()

                // set its property
                myObjClass.property = "Calling ObjC code!"

                // call its method
                myObjClass.method()

                // retrieve its property
                println(myObjClass.property)
            }
        }
Run the application and you should see the following:
Hello, Swift!

2014-10-25 12:50:22.784 ObjCProject[8608:371510] In method now

Calling ObjC code!
Conclusion
Although Apple has provided a much more developer-friendly language in Swift, due to the huge number of apps writter in, and developers committed to, Objective-C, it must maintain compatibility with this legacy language. Therefore Swift projects must support Objective-C and vice-versa. To demonstrate how Apple achieves interoperability, we first we outlined how to build an Objective-C project which imports Swift code, and following that we demonstrated how to build a Swift project which makes use of Objective-C code.


Leave a Reply