


So far, much mobile developer attention has been fixated on the iPhone SDK released by Apple to build native iPhone applications. This is understandable, since with the SDK you can write native iPhone apps that take full advantage of the capabilities provided by the device, such as accessing the accelerometer, the camera, as well as obtain geographical locations using Core Location.
However, building Web applications for the iPhone has advantages too. For example, there is no need to wait for approval from Apple, as in the case of hosting the applications in AppStore. Also, the tools provided by Apple makes it very easy to build Web applications that look just like native iPhone applications. And when it comes to developers’ skill-sets, developing Web applications is far easier than building native applications – all you need is some Javascript skill and you are ready to go!
In this article, I will take you through the Dashcode tool provided by Apple (part of the iPhone SDK; hence you need to download it first) to build compelling Web applications for the iPhone.
Trying Out the Various Templates
When you first launch Dashcode (the easiest way to launch it is through Spotlight), you will see that Dashcode has already created some templates for you to build your Web applications quickly (see Figure 1).
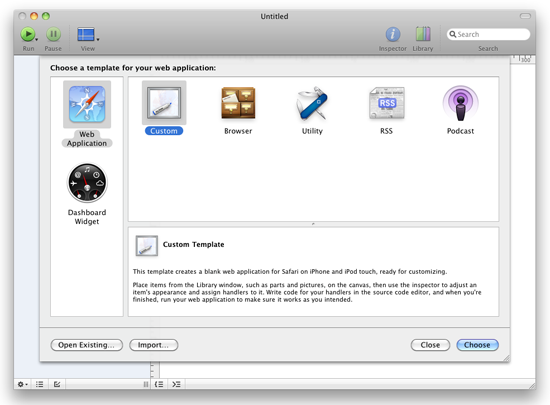
Figure 1: The various templates provided by Dashcode
The best way to learn is to select each template (other than the Custom template) and examine the content of each application. When you have selected a template, examine their contents and press Command-r to test the application on the iPhone Simulator. Go ahead and have fun with each template. When you have enough fun and get yourself acquainted with the environment, come back and we shall create an iPhone Web application from scratch and you will see how each part is built.
Building the UI
Alright, now that you are back, create a new Custom project In Dashcode. Notice that by default, Dashcode created a content and a footer parts for you (see Figure 2). Parts are the various views that you seen on your Web applications, such as buttons, text, etc. For this section, you will create a simple currency convertor Web application for the iPhone.

Figure 2: The parts in the Custom template
Select each of these parts and press the delete key. We shall delete these two parts and add our own parts manually.
Using the Library (Window’Show Library), drag-and-drop a Stack Layout part to the design surface (see Figure 3).

Figure 3: Using the Library to drag and drop parts onto your application
Expand the stackLayout part and you should see that it contains two subviews – view1 and view2. Select view1 and change its size to 320px by 356px (see Figure 4) via the Inspector window (Window’Show Inspector). Do the same for view2.

Figure 4: Changing the size for view1 and view2 via the Inspector window
Double-click on view1 and rename it as mainScreen. Do the same for view2 and rename it as settings (see Figure 5).

Figure 5: Renaming the two subviews
In the Library, drag-and-drop the Rounded Rectangle Shape part onto the mainScreen view (see Figure 6).

Figure 6: Adding the Rounded Rectangle Shape part to the subview
It its Inspector window, select the Fill & Stroke tab and in the Style tab select Gradient fill (see Figure 7) and select two colors.
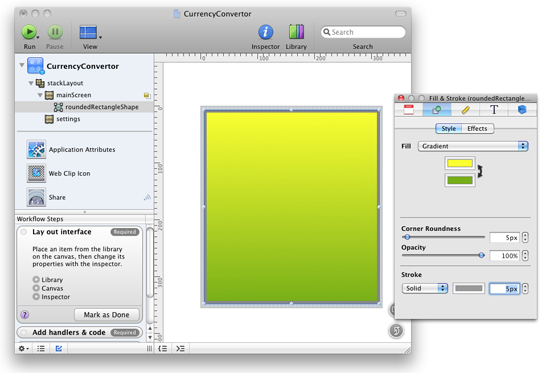
Figure 7: Using the gradient fill to fill the part
Select the Effects tab and check the Glass and Recess checkboxes (see Figure 8).

Figure 8: Adding glass effect to the part
Select the Metrics tab and select the Absolute layout (see Figure 9).

Figure 9: Using absolute layout for parts positioning
Add the following parts to the Rounded Rectangle Shape part (see Figure 10) and name them as shown:
- Text
- TextField
- Pop-up Menu
- Push Button

Figure 10: Adding additional parts to the subview
Select the settings subview and repeat the same steps you have performed above. Figure 11 shows the parts added to the settings subview.

Figure 11: Populating the settings subview
You are now ready to view the application on the iPhone Simulator. Press Command-r to view the application on the iPhone Simulator (see Figure 12). Notice that the application is hosted by mobile Safari on the iPhone.

Figure 12: Viewing the application on the iPhone Simulator
Notice that you can only see the mainScreen subview. To see the settings subview, you need to write some code to navigate to it from the mainScreen subview.
Coding the Application
So you are now ready to write some code. With the mainScreen subview selected, right-click on the Settings button and select Events’onclick (see Figure 13).

Figure 13: Creating an event handler for the onclick event
You will be asked to name the event handler for this event. Name it as shown in Figure 14.

Figure 14: Naming the handler for the event
Notice that the code editor now appears at the bottom of the designer (see Figure 15).

Figure 15: The code editor where you can add your code
Enter the following code:
	function btnSettings_ClickHandler(event)
	{
		var views = document.getElementById('stackLayout');
		var settings = document.getElementById('settings');
		if (views && views.object && settings) {
			views.object.setCurrentView(settings);
		}
	}
Select the settings subview and right-click on the Save Settings button and select Events’onclick. Name the handler as btnSave_ClickHandler. Enter the following code:
	function btnSave_ClickHandler(event)
	{
		var views = document.getElementById('stackLayout');
		var front = document.getElementById('mainScreen');
		if (views && views.object && front) {
			views.object.setCurrentView(front, true);
		}
	}
Test the application again by pressing Command-r. This time, you will be able to navigate to the settings view by tapping on the Settings button in the mainScreen subview (see Figure 16).

Figure 16: Tapping on the Settings button navigates to the settings subview
Database Access
So far, your application displays two screens where you can perform some currency conversion as well as set the exchange rates for the different currencies. For simplicity, I am going to assume that you are converting the currencies into Singapore Dollars (SGD). All the exchange rates would be based on the SGD as the base currency.
To allow the users to store their own exchange rates, you will make use of the local database feature as defined in HTML 5 (which is supported by Mobile Safari). Doing so allows users of your application to store the exchange rate locally on their iPhones.
In the main.js file, add the following lines of code for performing database operations:
	var database = null;                           // The client-side database
	var DB_tableName = "CurrencyKeyValueTable";    // database name

	// Function: initDB() - Init and create the local database, if possible
	function initDB()
	{
		try {
			if (window.openDatabase) {
				database = openDatabase("ExchangeRatesDB", "1.0",
										"Exchange Rates Database", 1000);
				if (database) {
					database.transaction(function(tx) {
						tx.executeSql("SELECT COUNT(*) FROM " + DB_tableName, [],
						function(tx, result) {
							loadRates();
						},
						function(tx, error) {
							// Database doesn't exist. Let's create one.
							tx.executeSql("CREATE TABLE " + DB_tableName +
							" (id INTEGER PRIMARY KEY," +
							"  key TEXT," +
							"  value TEXT)", [], function(tx, result) {
								initRates();
								loadRates ();
							});
						});
					});
				}
			}
		} catch(e) {
			database = null;
		}
	}

	// Function: initRates() - Initialize the default exchange rates
	function initRates()
	{
		if (database) {
			database.transaction(function (tx) {
				tx.executeSql("INSERT INTO " + DB_tableName +
					" (id, key, value) VALUES (?, ?, ?)", [0, 'USD', 1.44]);
				tx.executeSql("INSERT INTO " + DB_tableName +
					" (id, key, value) VALUES (?, ?, ?)", [1, 'EUR', 2.05]);
				tx.executeSql("INSERT INTO " + DB_tableName +
					" (id, key, value) VALUES (?, ?, ?)", [2, 'AUS', 1.19]);
			});
		}
	}

	// Function: loadRates() - Load the currency exchange rates from DB
	function loadRates()
	{
		var element;
		var popUpElement = document.getElementById('popupConvertTo');

		if (database) {
			database.transaction(function(tx) {
				tx.executeSql("SELECT key, value FROM " + DB_tableName, [],
				function(tx, result) {
					for (var i = 0; i < result.rows.length; ++i) {
						var row = result.rows.item(i);
						var key = row['key'];
						var value = row['value'];

						//---populate the pop-up menu part---
						popUpElement.options[i].text = key;
						popUpElement.options[i].value = value;

						if (key == 'USD') {
							element = document.getElementById('txtUSD');
						}
						else {
							if (key == 'EUR') {
								element = document.getElementById('txtEUR');
							}
							else if (key == 'AUS') {
								element = document.getElementById('txtAUS');
							}
						}
						element.value = value;
					}
				},
				function(tx, error) {
					showError('Failed to retrieve stored information from database - ' +
						error.message);
				});
			});
		}
		else {
			loadDefaultRates();
		}
	}

	// Function: saveRates() - Save the currency exchange rates into DB
	function saveRates()
	{
		if (database) {
			var elementUSD = document.getElementById('txtUSD');
			var elementEUR = document.getElementById('txtEUR');
			var elementAUS = document.getElementById('txtAUS');

			database.transaction(function (tx) {
				tx.executeSql("UPDATE " + DB_tableName + " SET key = 'USD',
					value = ? WHERE id = 0", [elementUSD.value]);
				tx.executeSql("UPDATE " + DB_tableName + " SET key = 'EUR',
					value = ? WHERE id = 1", [elementEUR.value]);
				tx.executeSql("UPDATE " + DB_tableName + " SET key = 'AUS',
					value = ? WHERE id = 2", [elementAUS.value]);
			});
		}
		loadRates();
	}

	// Function: deleteTable() - Delete currency exchange table from DB
	function deleteTable()
	{
		try {
			if (window.openDatabase) {
				database = openDatabase("ExchangeRatesDB", "1.0",
										"Exchange Rates Database");
				if (database) {
					database.transaction(function(tx) {
						tx.executeSql("DROP TABLE " + DB_tableName, []);
					});
				}
			}
		} catch(e) {
		}
	}

	// Function: loadDefaultRates() - Load the default exchange rates
	function loadDefaultRates()
	{
		var popUpElement = document.getElementById('popupConvertTo');
		var element = document.getElementById('txtUSD');
		element.value = "1.44";
		popUpElement.options[0].text = "USD";
		popUpElement.options[0].value = element.value;

		element = document.getElementById('txtEUR');
		element.value = "2.05";
		popUpElement.options[1].text = "EUR";
		popUpElement.options[1].value = element.value;

		element = document.getElementById('txtAUS');
		element.value = "1.19";
		popUpElement.options[2].text = "AUS";
		popUpElement.options[2].value = element.value;
	}
The database code above is pretty straightforward – store the exchange rates inside the database and populate the pop-up menu part when the rates are retrieved.
Modify the load() function as follows:
	//
	// Function: load()
	// Called by HTML body element's onload event when the Web application is ready to
	// start
	//
	function load()
	{
		dashcode.setupParts();

		initDB();
		if (!database) {
			loadDefaultRates();
		}
	}
Press Command-r to test the application. When the application is loaded, the pop-up menu will now display the three different currencies (see Figure 17).

Figure 17: The pop-up menu part displaying the different currencies
When you tap on the Settings button, the exchange rates would also be displayed in the settings subview (see Figure 18).

Figure 18: The exchange rates displayed in the settings subview
Performing the Conversion
You are now ready to perform the actual conversion of the currencies. In Dashcode, select the mainScreen subview and right-click on the Convert! Button and select Events’onclick (see Figure 19).

Figure 19: Handling the onclick event for the Convert! button
Name the event handler as btnConvert_ClickHandler and code it as follows:
	function btnConvert_ClickHandler(event)
	{
		var amount = document.getElementById("txtAmount").value;
		var rates = document.getElementById("popupConvertTo").value;
		var result = amount * rates;
		alert(result);
	}
Press Command-r to test the application. Enter an amount and select the currency to convert. Tapping on the Convert! button will now display the amount converted (see Figure 20).

Figure 20: Try converting some currencies!
Converting your Web Application into an iPhone Native Application
Now that your application is completed, you may deploy your application onto a Web server so that users can access your application through the Safari browser on their iPhones. However, since this is a Web application, the user must have access to the Internet, or else there is no way to access your application. And since our application does not make use of any server-based data, it is a good candidate to convert into a native iPhone application. The easiest way would be to host the Web application within the Safari browser, which is represented by the WebView view in the iPhone SDK.
In this section, I will show you how you can convert an iPhone Web application into a native iPhone application.
First, deploy your Web application by clicking the Share item in Dashcode (see Figure 21). Click the Deploy button so that all the files of the application will be saved to a Web publishing directory. Take note of the Web publishing directory shown in Dashcode. It is saved in /Users/. You will make use of the files contained within this folder shortly.

Figure 21: Deploying a Web application in Dashcode
Launch Xcode and create a new View-based Application project. Name the project as CurrencyConvertor.
In Finder, navigate to the /Users/ folder and select the files shown in Figure 22.

Figure 22: All the project files created by Dashcode
Drag-and-drop all the selected files onto the Resources folder in Xcode. Xcode will prompt you with a dialog (see Figure 23). Check the Copy items into destination group’s folder (if needed) checkbox and click Add.

Figure 23: Adding all the Dashcode files into the Resource folder in Xcode
Perform a global Find-and-Replace (by pressing Shift-Command-F). Search and replace the following strings with an empty string (see Figure 24):
- Parts/
- Images/

Figure 24: Replacing all instances of “Parts/” and “Images/” with an empty string
This will update the various HTML and JavaScript files that reference other files using the Parts/ and Images/ folder. Files stored in the Resources folder of your Xcode application have no directory structure when they are deployed; hence all the files are in a flat directory.
Select the files shown in Figure 25 and drag-and-drop them onto the Copy Bundle Resources (16) folder. This will ensure that all the HTML, JavaScript, CSS, and images files will be deployed together with your application.

Figure 25: Copying all the Web files into the targets folder so that they are deployed together with your application
In the CurrencyConvertorViewController.h file, add the following statements to define an outlet:
	#import <UIKit/UIKit.h>

	@interface CurrencyConvertorViewController : UIViewController {
		IBOutlet UIWebView *webView;
	}

	@property (nonatomic, retain) UIWebView *webView;

	@end
Double-click on the CurrencyConvertorViewController.xib file to open it in Interface Builder.
Add a WebView view to the View window and control-click and drag the File’s Owner item to the WebView view (see Figure 26). Select webView.

Figure 26: Connecting an outlet to a view
In the CurrencyConvertorViewController.m file, add the following statements:
	#import "CurrencyConvertorViewController.h"

	@implementation CurrencyConvertorViewController

	@synthesize webView;

	- (void)viewDidLoad {
		NSString *path = [[NSBundle mainBundle] pathForResource:@"index"
							ofType:@"html"];
		[webView loadRequest:[NSURLRequest requestWithURL:[NSURL fileURLWithPath: path
								isDirectory:NO] ]];
		[super viewDidLoad];
	}
That’s it! Press Command-r to test the application on the iPhone Simulator. The Web application is now hosted within the WebView view (see Figure 27). What you have just done is convert a Web application into a native application!

Figure 27: Running the Web application as a native iPhone application
Summary
In this article, you have seen how easy it is to build Web applications for the iPhone using the Dashcode tool included in the iPhone SDK. Not only that, you have also learned how to convert a Web applications into a native application. If you are currently building Web applications for the iPhone, drop a note below to share with us what type of applications you are building.


26 Comments
I am having the same problem referred to above by wjgarcia and jpgeek — complaining about the variable load.
Hard to understand, since this is just a cut and paste exercise. Anybody unearth a solution?
You managed to convert the web app to a native app, and this was possible because you didn’t use server residen data, I think. How general is this? Like would it be possible to create a Google Maps mashup from a custom teplate and convert that to a native iPhone app?
Also, are there other non-Apple dashcode templates available anywhere?
Hi Lee,
I just found out that I’ve picked “compress javascript” in the dashcode’s deploy option. now I can see the missing js files in the output folder. However, the deployed index.html only shows an empty white screen when I accessing the localhost copy on my mac’s safari as well as my iphone’s safari. is that cause the converted version goes wrong? thx for your advise.
Is there any known/easy/suggested way to localize web apps created with Dashcode? It seems to be built-in for Widgets, but I can’t find any documentation regarding web apps.
[quote=wjgarcia]I am new to iPhone development and this tutorial has been a great introduction to Web Applications. However, I don’t know what am I doing wrong but for some reason it is not working for me. I was able to follow it through until I entered the database access code. Once I have copied and pasted your code into the main.js and tested it I got an error message (see below). The index.html file shows a red arrow pointing the
I pasted your code in the main.js file, right after the definition of the onclick functions for the “Settings” and “Save” buttons. What am I doing wrong? Thanks in advance for your reply.
[/quote]
Hi wjgarcia, tim.brodnax, jpgeek
I had the same problem “Can’t find variable: load”, until I looked through the code that was pasted in. Some of the lines have been wrapped and any line that ends with a comma (,) needs all of its bits to be on the same line. This is not a problem with lines that end with a plus (+)
jpgeek, you may be using the wrong item from the library, as I did at first, you need to ensure that you are using the rounded rectangle shape and not the rounded box, or you will not get access to the gradient fill.
hth!
Any recomendation for Dashcode 3.0(328) with xCode 3.2.1?
I tried to rename all the files until I can run the index.html with all the image, class and other files on the same folder, I test it on the Safary and is working properly but when I load it into the xCode it is not. =(
Thanks in advance.
JB =)-
sry
Hi Lee,
I have a trouble with the database, I have already one (sqlite) with 3 tables and data, but every time I get Failed to retrieve stored information from database – no such column: dci
btw, is it possible to use an external one ? (in the same folder as index.html)
thanks
Dany
Thanks for this great web app and native app convert idea. The web app worked great for me; however, when I tried the conversion to native app, I got the following warnings:
any ideas on how to fix this?
Check dependencies
[WARN]warning: no rule to process file ‘$(PROJECT_DIR)/ButtonHandler.js’ of type sourcecode.javascript for architecture i386
[WARN]warning: no rule to process file ‘$(PROJECT_DIR)/core/external/sizzle_c.js’ of type sourcecode.javascript for architecture i386
[WARN]warning: no rule to process file ‘$(PROJECT_DIR)/parts.js’ of type sourcecode.javascript for architecture i386
[WARN]warning: no rule to process file ‘$(PROJECT_DIR)/main.js’ of type sourcecode.javascript for architecture i386
I have the same problem as Bob Vawter. xcode builds successfully and displays a blank white screen in the iphone simulator. I have 64 warnings stating the following (each for a different file), “warning: no rule to process file ‘$(PROJECT_DIR)/VideoLegacy.js’ of type sourcecode.javascript for architecture i386”
Any help is appreciated!
Thanks WEIMENGLEE, this is a great article.
The dashcode apps that you have converted to native code using the UIWebView is brilliant. So does this mean this native app could be registered into Apple’s App Store?
Thanks again for the informative article.
Thank you so much for writing this tutorial. I was able to create the app on DashCode and was able to add on xCode buy when i run the app on xCode it gives me 3 errors./Users/redolent/Sites/ExchangeRates/ExchangeRates/Classes/ExchangeRatesViewController.h:15: error: expected ‘=’, ‘,’, ‘;’, ‘asm’ or ‘__attribute__’ before ‘UIWebView’
/Users/redolent/Sites/ExchangeRates/ExchangeRates/Classes/ExchangeRatesViewController.h:15: error: expected ‘=’, ‘,’, ‘;’, ‘asm’ or ‘__attribute__’ before ‘UIWebView’
/Users/redolent/Sites/ExchangeRates/ExchangeRates/Classes/ExchangeRatesViewController.m:13: error: no declaration of property ‘webView’ found in the interface
I tried Control+click and dragged the File’s owner on to UIWebView but nothing happened. Could you please let me know what i missed
Hi,
This is a great app, just built it then. My question is, what is the default currency setting on this, and how is it changed?
Thanks.
Hi,
I am new in Dashcode app development.I have followed the steps which you have provided in this tutorial. But i am geting some error in the code which you have provided.
[Session started at 2010-09-08 14:55:29 +0530]
mobile/main.js line 146: SyntaxError: Parse error
mobile/index.html line 14: Can’t find variable: load
[Session ended at 2010-09-08 14:55:37 +0530]
// Function: saveRates() – Save the currency exchange rates into DB
function saveRates()
{
if (database) {
var elementUSD = document.getElementById(‘txtUSD’);
var elementEUR = document.getElementById(‘txtEUR’);
var elementAUS = document.getElementById(‘txtAUS’);
database.transaction(function (tx) {
tx.executeSql(“UPDATE ” + DB_tableName + ” SET key = ‘USD’,
value = ? WHERE id = 0″, [elementUSD.value]);
tx.executeSql(“UPDATE ” + DB_tableName + ” SET key = ‘EUR’,
value = ? WHERE id = 1″, [elementEUR.value]);
tx.executeSql(“UPDATE ” + DB_tableName + ” SET key = ‘AUS’,
value = ? WHERE id = 2″, [elementAUS.value]);
});
}
loadRates();
}
i have used these lines of code. i am getting error in this line (tx.executeSql(“UPDATE ” + DB_tableName + ” SET key = ‘USD’, ).
Please help me in this regard.
Thanks & Regards
Prince
Hi,
I’m pretty new to Apps Development and Mac. I’ve some experience in Web Dev under Windows.
Anyway I don’t manage to get this Currency Convertor to run in Xcode. While it works fine in Dashcode some paths seem to get messed up when transferring all files from Dashcode to Xcode. Or something else – I don’t get it.
All I get when starting the iPhone Simulator are four empty input fields and a select box with “item 1”, “item 2” etc. – see attached screenshot.
Maybe someone was successful with this tutorial and could provide me his Xcode project so I can compare it with mine? Would appreciate that very much. Thanks in advance!
I use Xcode 3.0.2.
Robyn
OK, I got it… I had to simply copy the files deployed by Dashcode (incl. folders) into the Xcode project folder and then in Xcode I had to explicitely import these files saying “Project/Add to Project…” and then choose “Create Folder References for any added folders“ (see attached image).
So it worked then. Yipiieh. 🙂
Strange, i had the same problem with the “cannot find variable load” error. So what i did is cut the load function from the main.js and put in into the index.html header 🙂
That worked, i dunno why. I understand about wrapped up lines and all, and how it is an error. buti dont really have an explanation why what i did worked. I did not put any code in one line.
Still i have some other questions: WHat i have to do exactly to make this work on a webserver? If i put this on my server it only shows an blank page with the standard striped background (no errors in firebug), while it works (nearly) well in ios simulator.
When i say (nearly) well i mean that after make some conversions and click somewhere i get an error and the app hangs. Error is
Result of expression ‘event.argetTouches[0]’ [undefined] is not an object. Line 378
That line has the code : this._touchstartX = event.targetTouches[0].clientX;
Someone know answers to my questions? Thanks i advance.