


Recently, we looked at how to send SMS messages using a standard HTTP POST-based API. As was intimated at the time, most APIs also allow you to process delivery receipts for the messages you send. This allows you to determine the status of the message, i.e. delivered, failed, expired etc. Let’s take a look at how this all works.
Sending SMS Messages – A Quick Recap
To send an SMS message, you plug into a standard API. You generally use a company known as an aggregator or a specific SMS provider to send messages. Each API is different but follows the same general guidelines, i.e. you specify:
- Number you are sending the message to
- Who the message is being sent from
- The message body
- Account user name and password for authentication purposes
Once the call is made, the API usually returns one of two things:
- A confirmation message, which contains a generated message ID (some APIs allow you to generate your own message ID)
- An error, which occurs when a particular message fails to send for one reason or another
If an error doesn’t occur, the message has been successfully sent. At this point your system should log the message in a database, along with the unique message ID. Here’s a typical response from iTagg, who we used previously to show how to send SMS messages:
error code|error text|submission reference 0|sms submitted|2891717007c4bf0ebf2c81cb4995cd2d-3
So what we have here are three pipe-separated values:
- Error code – if an error occurred, this would be a non-zero value. As this message shows a successful send, the error code is 0, indicating success.
- Error text – again, this would be populated with some useful error information if an error occurred. In this instance, the message is sms submitted, indicating all is well.
- Submission reference – this is the part we’re interested in. The unique ID 2891717007c4bf0ebf2c81cb4995cd2d-3 is the identifier assigned by iTagg to the message. It is this identifier that will be passed as part of a delivery receipt.
Handling Delivery Receipts
Each provider’s API differs, and in the case of delivery receipts they differ greatly. We’ll use iTagg in this example to show how to process a delivery receipt, but let’s have a look at the values a couple of providers offer.
2ergo
2ergo offer one of the better delivery receipt API mechanisms. It is quite thorough and offers the following values:
- Delivered
- Rejected
- Expired
- Undeliverable
- Abandoned
iTagg
iTagg can theoretically send multiple delivery receipts per message, e.g. “Acknowledged” when the message is sent to the network, and then “Delivered” once the message is delivered to the target mobile phone. Values they pass are:
- Buffered
- Acknowledged
- Delivered
- Failed
- Unknown
Tanla
Tanla’s mechanism is extremely simple; the message delivery was either successful or it failed.
- Delivered
- Failed
As we used iTagg’s API to send messages in the previous article, we’ll build our example delivery mechanism using iTagg too.
Keeping a Record
If you need it, refer back to the SMS Sending article for information on sending a message. Here’s the original code we wrote to send messages via iTagg:
    protected void btnSend_Click(object sender, EventArgs e)
    {
        // Initialise the Web request
        System.Net.WebClient webClient = new System.Net.WebClient();

        // Prepare the HTTP POST data
        // Change the user name as appropriate
        // Change the password as appropriate
        // Type is set to text for SMS - could also be set to binary
        // Route is set to 4 - this is the iTagg budget route. Other routes are 7 (for UK) and 8 (for Global)
        string postData = "usr=username&pwd=password&from= " + txtFrom.Text + "&to=" + txtTo.Text + "&type=text&route=4&txt=" + txtBody.Text;

        webClient.Headers.Add("Content-Type", "application/x-www-form-urlencoded");

        // Make the request to iTagg
        lblResult.Text = webClient.UploadString("https://secure.itagg.com/smsg/sms.mes", postData);
    }
To be able to process delivery receipts, we must store the message details in a database. Here’s a quick SQL Server database script to store basic message details:
USE master

-- Delete the database if it already exists
IF EXISTS(SELECT [name] FROM sys.databases
	    WHERE [name] = 'MobiforgeMessageDemo')
 BEGIN
	DROP DATABASE MobiforgeMessageDemo
 END

GO

-- Create the database
CREATE DATABASE MobiforgeMessageDemo

GO

USE MobiforgeMessageDemo

-- Add the Messages table
CREATE TABLE [Messages]
(
 AggregatorMessageID		VARCHAR(40),
 InboundMessage			BIT,
 Originator				VARCHAR(12),
 Recipient				VARCHAR(12),
 MessageDate			DATETIME	DEFAULT GETDATE(),
 MessageBody			VARCHAR(160),
 MessageDelivered			BIT			DEFAULT 0
)

GO

-- Stored procedure to insert a message
CREATE PROCEDURE usp_InsertMessage
@AggregatorMessageID		VARCHAR(40),
@InboundMessage			BIT,
@Originator				VARCHAR(12),
@Recipient				VARCHAR(12),
@MessageBody			VARCHAR(160)
AS
BEGIN

SET NOCOUNT ON

INSERT INTO [Messages]
(AggregatorMessageID, InboundMessage, Originator,
 Recipient, MessageBody)
VALUES
(@AggregatorMessageID, @InboundMessage, @Originator,
 @Recipient, @MessageBody)

SET NOCOUNT OFF

END

GO

-- Stored procedure to update a message's delivery status
CREATE PROCEDURE usp_MarkMessageAsDelivered
@AggregatorMessageID		VARCHAR(40)
AS
BEGIN

SET NOCOUNT ON

-- iTagg pass message IDs with a -3 when sending messages,
-- but do not pass the -3 in delivery receipts. So we check
-- if we can find the message first, and if we can't we append
-- a -3 to the end of the ID
IF NOT EXISTS (SELECT AggregatorMessageID
		   FROM [Messages]
		   WHERE AggregatorMessageID = @AggregatorMessageID)
BEGIN

	SET @AggregatorMessageID += '-3'

END

UPDATE [Messages]
	SET MessageDelivered = 1
WHERE AggregatorMessageID = @AggregatorMessageID

END
Note we have implemented a workaround in the usp_MarkMessageAsDelivered stored procedure, to work around an iTagg quirk (all aggregators have them!).
To speed things up, use the ASP.NET project you created for the sending SMS article, and open up the code for the default page.
We’ll now update the code in the default page, to ensure the message is stored in the database after it is sent:
using System;
using System.Configuration;
using System.Data;
using System.Data.SqlClient;
using System.Web;
using System.Web.Security;
using System.Web.UI;
using System.Web.UI.HtmlControls;
using System.Web.UI.WebControls;
using System.Web.UI.WebControls.WebParts;

public partial class _Default : System.Web.UI.Page
{
    protected void Page_Load(object sender, EventArgs e)
    {

    }

    protected void btnSend_Click(object sender, EventArgs e)
    {
        // Initialise the Web request
        System.Net.WebClient webClient = new System.Net.WebClient();

        // Prepare the HTTP POST data
        // Change the user name as appropriate
        // Change the password as appropriate
        // Type is set to text for SMS - could also be set to binary
        // Route is set to 4 - this is the iTagg budget route. Other routes
        // are 7 (for UK) and 8 (for Global)
        string postData = "usr=username&pwd=password&from= " + txtFrom.Text + "&to=" + txtTo.Text + "&type=text&route=4&txt=" + txtBody.Text;

        webClient.Headers.Add("Content-Type", "application/x-www-form-urlencoded");

        // Make the request to iTagg
        lblResult.Text = webClient.UploadString("https://secure.itagg.com/smsg/sms.mes", postData);

        //// Parse the response returned by iTagg to obtain message ID
        string[] iTaggResponse = lblResult.Text.Split(new char[] { '|' });
        string iTaggMessageID = string.Empty;

        // If a valid response was received, store the message ID
        // In a real system we'd implement a much more robust mechanism for
	    // parsing responses
        if (iTaggResponse.Length == 5 && iTaggResponse[2] == "submission referencen0")
        {
            // Remove new line tag
            iTaggMessageID = iTaggResponse[4].Replace("n", string.Empty);
        }
        else
        {
            // We would add code to handle errors here
        }

        // If message was sent successfully, insert it into the database
        // The connection string would normally be in config but we're
        // keeping things simple!
        // Make sure you specify the correct data source for your SQL server here
        // If it's running on the same PC as you are developing on, you should be able to
        // specify the value as (local), e.g. Data Source=(local)
        SqlConnection conn = new SqlConnection("Data Source=SERVERNAME;Initial Catalog=MobiforgeMessageDemo;Integrated Security=true");

        SqlCommand cmd = new SqlCommand("usp_InsertMessage", conn);
        cmd.CommandType = CommandType.StoredProcedure;

        cmd.Parameters.Add(new SqlParameter("@AggregatorMessageID", iTaggMessageID));
        cmd.Parameters.Add(new SqlParameter("@InboundMessage", false));
        cmd.Parameters.Add(new SqlParameter("@Originator", txtFrom.Text));
        cmd.Parameters.Add(new SqlParameter("@Recipient", txtTo.Text));
        cmd.Parameters.Add(new SqlParameter("@MessageBody", txtBody.Text));

        conn.Open();
        cmd.ExecuteNonQuery();
        conn.Close();
    }
}
Try sending a message now. After sending, check out the messages table in the database – you should see the message you’ve just sent in there. That’s the first part dealt with.
The Next Part of the Story.
We now need to build a “listener” Web page to process delivery receipts. This listener Web site should receive an inbound delivery receipt, process it, and update the Messages table’s MessageDelivered Boolean column.
When iTagg pass us a delivery receipt, they pass a HTTP POST request containing one parameter:
- xml
This contains an XML document, which houses delivery receipt information.
The xml parameter includes the following elements:
- version – The iTagg version number for their delivery receipts.
- msisdn – The mobile number the message was sent to.
- submission_ref – The iTagg message ID. We need this to look up the value in the database.
- status – This is the field we’re interested in. This may contain one of a variety of values as we saw earlier. We’re interested in values reading Delivered.
- reason – This is only passed if a premium SMS message is set. We can ignore it here.
- Timestamp – The date/time the action in this delivery receipt was actioned.
- Retry – Denotes whether a premium-rate message should be retried or not.
Our listener page needs to split up the delivery receipt, then store it in the database. The code we’ll write to do this will consist of:
- A small class to represent a delivery receipt
- Some code in an ASP.NET page to create a delivery receipt object and to update the message in the database
Writing the Delivery Receipt Processor class
As we’ve just seen, iTagg passes an XML parameter containing a delivery receipt. We need to write a small class that parses this delivery receipt, so we can easily access the data. Here’s an example of the XML iTagg will send to us:
<?xml version="1.1" encoding="ISO-8859-1"?>
<itagg_delivery_receipt>
  <version>1.0</version>
  <msisdn>447889000000</msisdn>
  <submission_ref>845tgrgsehg394g3hdfhhh56445y7ts6</submission_ref>
  <status>Delivered</status>
  <reason>4</reason>
  <timestamp>20050709120945</timestamp>
  <retry>0</retry>
</itagg_delivery_receipt>
To add the class to our Web site:
1. Right-click on the Web site in Solution Explorer and choose Add New Item.

Figure 1: Adding a new item to the Web site
2. In the dialog that appears, choose Class. Call the class iTaggDeliveryReceipt.cs and click Add.

Figure 2: Choosing the class template
You may see this message:
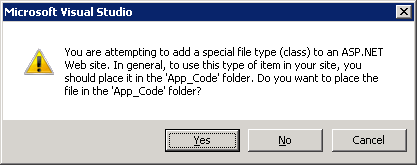
Figure 3: Putting the class in the correct place
Click Yes if you do.
3. The code window for the class will open. Enter the code listing below (replacing what is already there):
using System;
using System.Collections.Generic;
using System.Xml;
using System.Web;

/// <summary>
/// Represents an iTagg delivery receipt
/// </summary>
public class iTaggDeliveryRecipt
{
    // The iTagg delivery receipt version
    private string _version = string.Empty;

    // The mobile number the message was delivered to
    private string _msisdn = string.Empty;

    // The iTagg message ID
    private string _submissionRef = string.Empty;

    // Message delivery status
    private string _status = string.Empty;

    // Message success/failure reason
    private string _reason = string.Empty;

    // Time/date message was delivered
    private string _timestamp = string.Empty;

    // Denotes whether message should be retried
    private string _retry = string.Empty;

    // Public accessors
    public string Version
    {
        get { return _version; }
        set { _version = value; }
    }

    public string Msisdn
    {
        get { return _msisdn; }
        set { _msisdn = value; }
    }

    public string SubmissionRef
    {
        get { return _submissionRef; }
        set { _submissionRef = value; }
    }

    public string Status
    {
        get { return _status; }
        set { _status = value; }
    }

    public string Reason
    {
        get { return _reason; }
        set { _reason = value; }
    }

    public string Timestamp
    {
        get { return _timestamp; }
        set { _timestamp = value; }
    }

    public string Retry
    {
        get { return _retry; }
        set { _retry = value; }
    }

    /// <summary>
    /// Accepts XML parameter as as string and populates class properties
    /// </summary>
    /// <param name="XmlInput"></param>
    public iTaggDeliveryRecipt(string XmlInput)
    {
        try
        {
            // Create XML document
            XmlDocument doc = new XmlDocument();
            doc.LoadXml(XmlInput);

            // Use XPATH to obtain values
            _version = _returnNodeValue(doc, "/itagg_delivery_receipt/version");
            _msisdn = _returnNodeValue(doc, "/itagg_delivery_receipt/msisdn");
            _submissionRef = _returnNodeValue(doc, "/itagg_delivery_receipt/submission_ref");
            _status = _returnNodeValue(doc, "/itagg_delivery_receipt/status");
            _reason = _returnNodeValue(doc, "/itagg_delivery_receipt/reason");
            _timestamp = _returnNodeValue(doc, "/itagg_delivery_receipt/timestamp");
            _retry = _returnNodeValue(doc, "/itagg_delivery_receipt/retry");
        }
        catch (Exception ex)
        {
            Console.WriteLine("Error processing receipt: " + ex.Message);
        }
    }

    /// <summary>
    /// Returns the actual value for the specified node
    /// </summary>
    /// <param name="document"></param>
    /// <param name="xpathQuery"></param>
    /// <returns></returns>
    private string _returnNodeValue(XmlDocument document, string xpathQuery)
    {
        string nodeValue = string.Empty;

        if (document != null)
        {
            XmlNode node = document.SelectSingleNode(xpathQuery);

            if (node != null && !string.IsNullOrEmpty(node.InnerText))
            {
                nodeValue = node.InnerText;
            }
        }

        return nodeValue;
    }
}
This code is quite simple. It takes a string and converts it to an XML document. It then uses some XPATH statements to obtain the values for the class properties.
Now we just need to add a Web page to call the class and act as the listener.
Creating the Listener Web Page
All we need to do here is add a Web page, check if some POST data has been passed, and pass the POST data to the delivery receipt class. Once we have a delivery receipt object, we’ll update the database to mark the message as delivered.
1. In Solution Explorer, right-click on the Web site name again, and choose Add New Item again.
2. Choose Web Form and call it listener.aspx. Click Add.
3. Listener.aspx will open. The first line reads:
<%@ Page Language="C#" AutoEventWireup="true" CodeFile="listener.aspx.cs" Inherits="listener" %>
Modify the end of the line, so it reads:
<%@ Page Language="C#" AutoEventWireup="true" CodeFile="listener.aspx.cs" Inherits="listener" ValidateRequest="false" %>
If you don’t add the ValidateRequest tag, ASP.NET will think the iTagg XML is suspicious and will raise HTTP 500 errors back to iTagg.
4. Save and close listener.aspx. Find listener.aspx.cs in Solution Explorer and open it up.
5. Add this code, replacing any code already there:
using System;
using System.Collections.Generic;
using System.Data.SqlClient;
using System.Data;
using System.Web;
using System.Web.UI;
using System.Web.UI.WebControls;
using System.IO;

public partial class listener : System.Web.UI.Page
{
    protected void Page_Load(object sender, EventArgs e)
    {
        try
        {
            // Check if some POST data was passed
            if (Request.InputStream != null)
            {
                StreamReader sr = new StreamReader(Request.InputStream);

                // Convert the POST stream to a string
                // We remove the xml= tag at the front, otherwise the XML will not parse
                string inputStream = sr.ReadToEnd().Replace("xml=", string.Empty);

                // Create a delivery receipt
                iTaggDeliveryRecipt dr = new iTaggDeliveryRecipt(inputStream);

                // Write out the delivery receipt details to the trace
                Trace.Write("iTagg DR data: " + inputStream);

                Trace.Write("DR submission ref: " + dr.SubmissionRef);
                Trace.Write("DR status: " + dr.Status);

                // Only process if the status is "delivered"
                if (dr.Status == "Delivered")
                {
                    // Try and update the database
                    SqlConnection conn = new SqlConnection("Data Source=SERVERNAME;Initial Catalog=MobiforgeMessageDemo;Integrated Security=true");

                    SqlCommand cmd = new SqlCommand("usp_MarkMessageAsDelivered", conn);
                    cmd.CommandType = CommandType.StoredProcedure;

                    // Make sure we set the aggregator message ID
                    cmd.Parameters.Add(new SqlParameter("@AggregatorMessageID", dr.SubmissionRef));

                    conn.Open();
                    cmd.ExecuteNonQuery();
                    conn.Close();

                    // Show we updated the database in the trace
                    Trace.Write("Successfully updated database.");
                }
                // A different status has been received, so we output a
                // message to show this
                else
                {
                    Response.Write("Message was not delivered. Status: " + dr.Status + "<BR>");
                }

                // Write out a confirmation message at the end
                Response.Write("OK");
            }
        }
        catch (Exception ex)        // Output the error details
        {
            Response.Write("Error occurred whilst processing: " + ex.Message);
            Trace.Write("Error occurred whilst processing: " + ex.Message);
        }

    }
}
This code uses the iTaggDeliveryReceipt class we created earlier to split up the incoming XML, checks whether the status message received is Delivered, and inserts the message into the database if Delivered was received.
As a last step, add this line to your web.config file, right underneath
We’re now in a position to try out the service.
Putting It All Together
Now we have the code written, we need to make it publicly accessible and tell iTagg where they should be sending delivery receipts to. The full process is:
- Publish the listener to a publicly available Web address
- Ask iTagg to send delivery receipts for your account to the publicly available Web address
- Test the system
Publish the Listener
As we’re using C# and ASP.NET, we’ll use IIS as the Web server – IIS7 to be precise. To publish your site, we need to do two things:
- Create an application to hold the Web site in IIS7
- Publish the Web site
Remember this will only work if your server has a public Web or IP address. If you use a hosting service, publish the Web site containing the listener to that hosting service, exactly as you would publish any other Web site.
To create the application, open IIS7 and select Default Web Site (or the Web site you require if you host multiple sites). Right-click and choose Add Application:
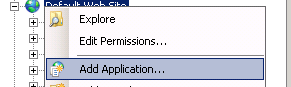
Figure 4: Adding an IIS Application
Set the application name as itagglistener, and choose the directory on your server’s hard disk you want to store the Web site in. Make sure you choose an application pool that has access to your database too.

Figure 5: Specifying application details
Click OK to create the application.
You now need to log on to iTagg’s control panel to set up the location where delivery receipts should be published.
Configure the URL at iTagg
Go to www.itagg.com, and click on the Control Panel option.
You may be prompted to log in. Log in to display your control panel. On the left-hand side, find the Delivery Receipts option and click on it.

Figure 7: The iTagg delivery receipts management page
Set the full URL you want delivery receipts to be delivered to in the Delivery Receipts are currently being posted to… box. It’s important this contains the listener.aspx page name at the end, as in the example above. Once you’ve entered the correct URL, click Update to save the address.
You can use the iTagg interface to test if your listener Web page is working. Click the submit button in the Test the Delivery Receipt Mechanism section. You should see a response displayed along the following lines:

Figure 8: Sending a test delivery receipt from iTagg
We now know everything is working, so we can try sending a message.
Testing the System.
To test the system, send a message using our simple SMS sending Web site. Run the Web site and open the default page. Send a message.
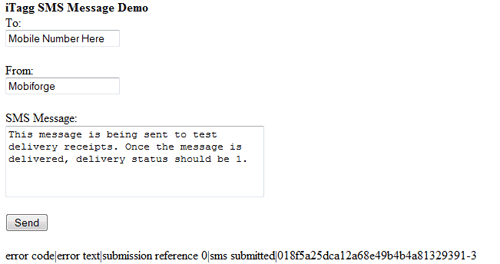
Figure 9: Sending an SMS message
After sending the message, check the database – you should see your record has been added to the Messages table. Note that the MessageDelivered column is set to its default value of false.

Figure 10: Message not yet delivered
Wait for a couple of seconds until the message you sent is delivered to your handset. After delivery, check the database. The MessageDelivered column should be set to true, denoting that the message has indeed been delivered.

Figure 11: The message has been delivered
To prove that iTagg contacted us and sent the delivery receipt details, browse to your listener Web site’s ASP.NE T trace page. If your listener Web site is located at:
https://mobiforge.com/listener/default.aspx
Then you should go to:
https://mobiforge.com/listener/trace.axd
The trace list will be displayed:
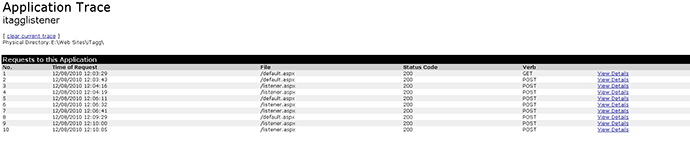
Figure 12: The application trace
The number of items you will see in the list will vary, as it depends on how many hits you’ve generated. Look at items 8, 9, and 10 in the image above. Default.aspx was the page hit when the SMS message was sent (item 8). Why do we have two hits for listener.aspx (items 9 and 10)? Surely we only expect one hit, to tell us the message was delivered?
Remember earlier I mentioned that iTagg can send multiple delivery receipts for each message sent? This is what has happened here. Click on the first listener.aspx trace item.
Look at the line beginning with DR status. Note that the status is acked, i.e. the network has acknowledged the message. This may appear in the trace before the message has been delivered to your phone – it’s telling us the network has the message but it hasn’t yet been sent to the handset.
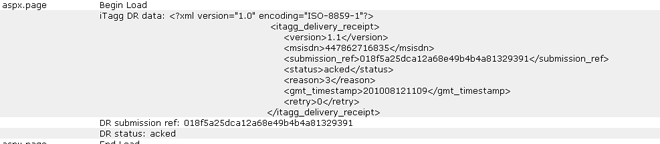
Figure 13: The acknowledgement trace
Click back and view the next listener.aspx hit.
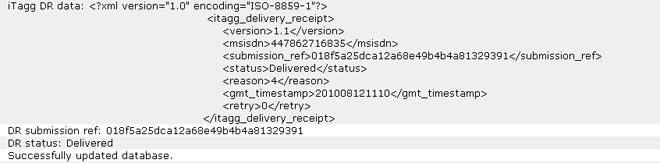
Figure 14: The delivered trace
Note that the DR status now is Delivered. This trace item will only appear after the message arrives to your phone. You can also see a trace item showing us we’ve updated the database.
There you go, a simple delivery receipt processing mechanism. Easy isn’t it!
Troubleshooting
If things didn’t work as expected, make sure you have IIS set up correctly. Can you browse to the site from your browser? Can you hit the listener.aspx page from iTagg? If the answer to any of these questions is no, check your permissions.
If messages are not appearing in the database, the chances are your Web site is running under an application pool that doesn’t have access to the database. Grant access to the database and you’ll resolve the problem.
Summary
We’ve covered a lot of ground in this article. We’ve seen that various APIs can pass delivery receipts to our systems. These are useful as they allow us to accurately report to clients sending lots of SMS messages – the clients can find out how many messages arrived for a particular campaign, for example. This mechanism also helps us build a more accurate messaging system with detailed information held for each message.
To build the listener to support delivery receipts, we had to connect to an aggregator’s API – iTagg’s, in this example. To make everything work we had to have an account with iTagg, and tell iTagg where to send the delivery receipt messages to. We also had to ensure our listener Web site was publicly available.
With all of the various pieces in place, we successfully sent a message to a mobile phone and saw that its delivery status was updated in our messages table after iTagg had notified us that the message had been delivered (and prior to that, acknowledged).
Delivery receipts are an extremely important part of any messaging system infrastructure. They greatly enhance the reporting abilities of your messaging platform and can give you a granular view of message delivery rates. You don’t have to use them but doing so will give your system a competitive advantage – so take advantage. Good luck with your deliveries!


