


An understanding of outlets and actions is one of the first things you will need for iPhone programming. For someone coming from the .NET background, this is a concept that requires some time to get used to – the concepts are similar, but it is a different way of doing things.
And so, in this article, I am going to show you what outlets and actions are. At the end of this article, you will have a solid understanding of how to create outlets and actions, and be on your way to creating great iPhone apps.
First, the basics
So let’s start by creating a really simple project to see how everything fits together. Using Xcode, create a View-based Application project (see Figure 1) and name it OutletsAndActions.
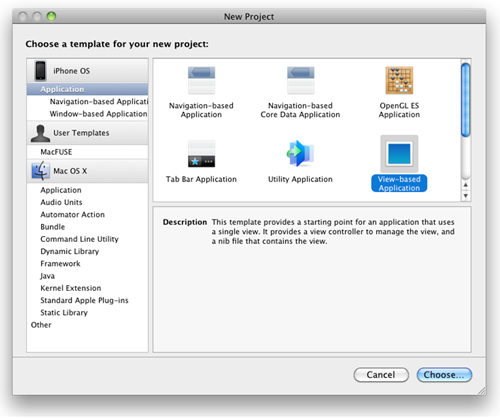
Figure 1 Creating a View-based Application project
The View-based Application project template provides the quickest way to start writing an iPhone application. After the project is created in Xcode, examine the files contained within it (see Figure 2). You should see:
- A
MainWindows.xibfile representing the main window of your application. - An
OutletsAndActionsViewController.xibfile representing a view that will be loaded by your main window. - A set of view controller class files named
OutletsAndActionsViewController.handOutletsAndActionsViewController.mthat control the behavior of the view. - A set of application delegate files named
OutletsAndActionsAppDelegate.handOutletsAndActionsAppDelegate.mthat control the behavior of the application from start to end.
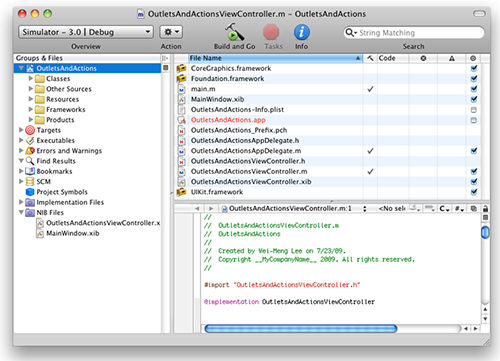
Figure 2 Examining the content of a View-based application project in Xcode
In short, when the application is loaded, the main window loads the view represented by the OutletsAndActionsViewController.xib file.
Let’s now edit the OutletsAndActionsViewController.xib file by double-clicking on it to open it in Interface Builder. When Interface Builder is loaded, double-click on the View item in the OutletsAndActionsViewController.xib window to visually display the View (see Figure 3). Populate the three views onto the View window – Label, TextField, and Button i.e. drag these UI components onto the View window. For more information on using the Interface Builder please see this article.
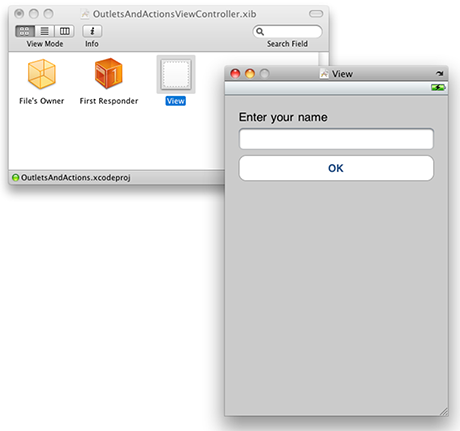
Figure 3 Populating a View window with various views
Creating Actions and Outlets
Creating views in a View in Interface Builder is one thing, but how do you programmatically reference all these views in code? Also, how do you handle the various events associated with a view? For example, you might want to change the text of a Label view when the Button view is clicked. Doing so would require you to be able to programmatically reference the Label view and handle the event(s) raised by the pressing of the Button view.
In iPhone development, you use actions and outlets to connect your code to the various views in your UI. Think of actions as methods in the traditional object-oriented programming world and outlets as objects references. Actions are represented using the IBAction keyword while outlets use the IBOutlet keyword.
There are quite a few ways to create outlets and actions – you can do so either via code, or in Interface Builder. Personally, I like to do via code as it saves some steps; you will see why this is so shortly.
In the OutletsAndActionsViewController.xib window, select the File’s Owner item and view its Identity Inspector window (see Figure 4). Observe that there are two sections here – Class Actions and Class Outlets.
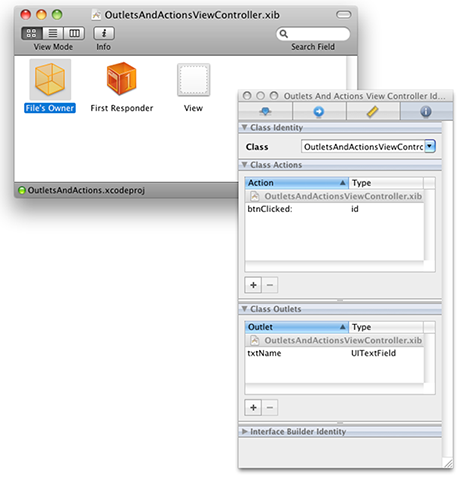
Figure 4 Viewing the Identity Inspector window for the File’s Owner item
To add an action, click on the “+” button under the Class Actions section and name the action as btnClicked: note the ‘:’ character. This action will be used to handle the event that will be raised when the button is pressed.
Likewise, for the outlet, click on the “+” button and name the outlet as txtName. For the outlet, you need to specify the type of view you are referring to. In this case, I will use this outlet to connect to the TextField view programmatically. Hence, specify the type as UITextField.
At this juncture, take note that both the action and outlet that you have created are in the XIB file (see the filenames displayed in gray in the Identity Inspector window).
Connecting Actions and Outlets
Once your actions and outlets are added to your XIB file, you then need to connect them to your views.
In the OutletsAndActionsViewController.xib window, control-click and drag the File’s Owner item to the TextField view (see Figure 5). A popup will appear; select the outlet named txtName.

Figure 5 Connecting an outlet to a view
This connects the outlet you have created (txtName) with the TextField view on the View window. In general, to connect outlets you control-click and drag from the File’s Owner item to the view on the View window.
To connect an action, you control-click and drag a view to the File’s Owner item. Hence, for the OK Button view, control-click and drag the OK Button view to the File’s Owner item (see Figure 6). Select the action named btnClicked:.
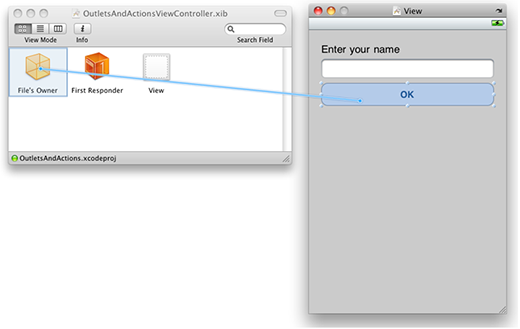
Figure 6 Connecting a view to an action
Right-click on the OK Button view to display its events (see Figure 7). Notice that the Button view has several events, but one particular event – Touch Up Inside, is now connected to the action you specified – btnClicked:. Because the Touch Up Inside event is so commonly used, it is automatically connected to the action when you control-click and drag it to the File’s Owner item. If you want to connect other events to the action, simply click on the circle displayed next to the event and then drag it to the File’s Owner item.
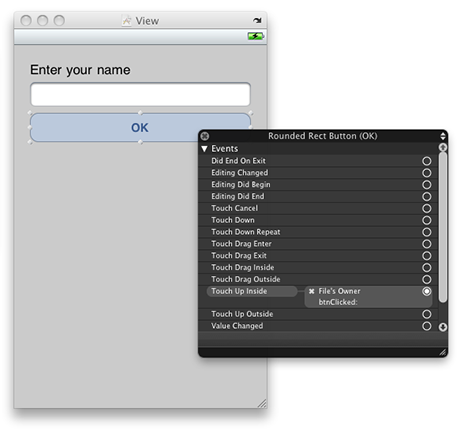
Figure 7 Viewing the events on the Button view
Defining the Actions and Outlets in the View Controller class
With the outlets and actions all connected in Interface Builder, the next step is to write the code to perform whatever actions you want to perform.
In the OutletsAndActionsViewController.h file, define the following:
#import <UIKit/UIKit.h>
@interface OutletsAndActionsViewController : UIViewController {

    //---declaring the outlet---
IBOutlet UITextView *txtName;

}

//---expose the outlet as a property---
@property (nonatomic, retain) UITextView *txtName;

//---declaring the action---
-(IBAction) btnClicked: (id) sender;

@end
Here, you are declaring the outlet and action that you have created earlier in Interface Builder. The @property keyword indicates to the compiler that you want the txtName outlet to be exposed as a property. The nonatomic keyword indicates that there is no need to ensure that the property is used in a thread-safe manner since it is not used in multiple threads. The default behavior is atomic, and specifying nonatomic will actually improve the performance of your application.
Now, remember that I mentioned my personal preference is to declare outlets and actions in code? This is what I mean. When you declare the outlets and actions in code (in the .h file of a view controller), save it, and then open the OutletsAndActionsViewController.xib file using Interface Builder again, you will notice that the outlets and actions will automatically appear (see Figure 8). This time round, the filenames show that the outlets and actions are defined in the .h file.
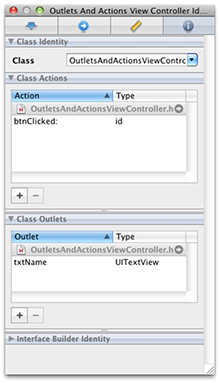
Figure 8 The outlets and actions appearing in the Identity Inspector window
If you take this approach (i.e. declare the outlets and actions in the .h file of the view controller), that will save you the additional step of declaring them in Interface Builder. So why do people still want to declare them in Interface Builder? Well, one cool feature in Interface Builder is that once you declare your outlets and actions, you can get Interface Builder to automatically generate the code for outlets and action for you. You can do so by selecting the File’s Owner item and then selecting File’Write Class Files…. Some are some differences between the code generated for you vs. the one you will write yourself (like what we coded in the .h file). But I will leave it at that. I recommend you to take the coding approach.
In the OutletsAndActionsViewController.m file, define the following:
#import "OutletsAndActionsViewController.h"

@implementation OutletsAndActionsViewController

//---synthesize the property---
@synthesize txtName;

//---displays an alert view when the button is clicked---
-(IBAction) btnClicked:(id) sender {

    NSString *str = [[NSString alloc] initWithFormat:@"Hello, %@", txtName.text];
    UIAlertView *alert = [[UIAlertView alloc] initWithTitle:@"Hello!"
                             message:str delegate:self
                             cancelButtonTitle:@"Done"
                             otherButtonTitles:nil];
    [alert show];
    [str release];
    [alert release];

}

- (void)dealloc {

    //---release the outlet---
[txtName release];
[super dealloc];

}
The @synthesize keyword indicates to the compiler to create the getter and setter for the specified property.
The btnClicked: action simply displays an AlertView with a message containing the user’s name. Note that it has a parameter sender of type id. The sender parameter will allow you to programmatically find out who actually invokes this action. This is useful when you have multiple views connecting to one single action. For such cases, you often need to know which is the view that invokes this method and the sender parameter will contain a reference to the calling view.
That’s it! Press Command-r to test the application on the iPhone Simulator. When the application is loaded, tap on the TextField view to bring up the keyboard. Enter your name and then press the OK button. You will see the message shown in Figure 9.
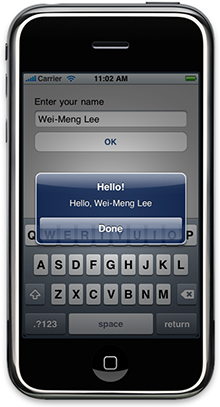
Figure 9 Testing the application
A More Sophisticated Example
Now that you had a good understanding of outlets and actions, let’s work on a slightly more sophisticated example so that the application does something useful. You will now modify the application so that you can display the current time continuously, updating it every second. You also have the option to stop and resume the clock if you wish.
In the View window, add two additional views – Button and Label (see Figure 10).
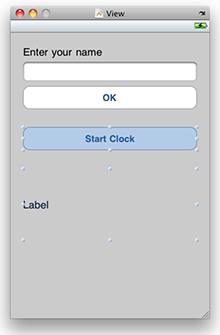
Figure 10 Adding two more views to the View window
Change the font of the Label view by selecting it and then pressing Command-t. Change its font as shown in Figure 11.
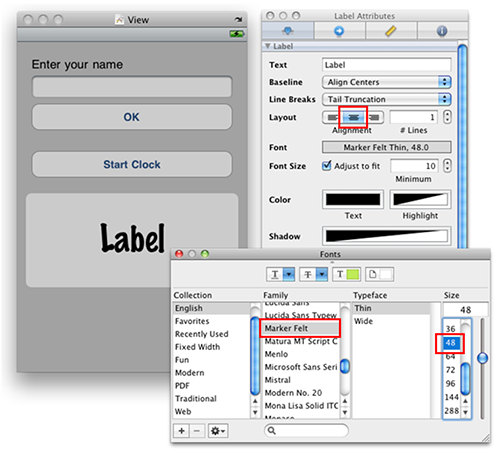
Figure 11 Changing the font of the Label view
Save the file in Interface Builder and go back to Xcode.
In the OutletsAndActionsViewController.h file, add the following declarations:
#import <UIKit/UIKit.h>
@interface OutletsAndActionsViewController : UIViewController {
    IBOutlet UITextView *txtName;

    //---add the following declarations---
    IBOutlet UIButton *btnStartStop;
    IBOutlet UILabel *lblClock;
    NSDateFormatter *formatter;
    NSDate *date;
    NSTimer *timer;
}

@property (nonatomic, retain) UITextView *txtName;

//---add the following properties declarations---
@property (nonatomic, retain) UIButton *btnStartStop;
@property (nonatomic, retain) UILabel *lblClock;

-(IBAction) btnClicked: (id) sender;

//---add the following declaration---
-(IBAction) btnStartStopClicked: (id) sender;

@end
Perform the following connections:
- Connect the lblClock outlet to the Label view (that one you just added)
- Connect the btnStartStop outlet to the Button view (that one you just added)
- Connect the Start Clock button to the btnStartStopClicked: action.
You should right-click on the File’s Owner item to confirm that your connections are made correctly (see Figure 12).
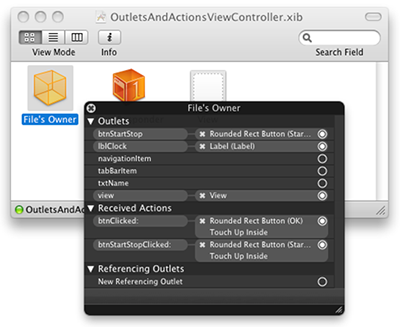
Figure 12 Verifying the connections between outlets and actions are made correctly
Save the file in Interface Builder.
Coding the Application
Back in Xcode, define the following in the OutletsAndActionsViewController.m file:
#import "OutletsAndActionsViewController.h"

@implementation OutletsAndActionsViewController

@synthesize txtName;

//---synthesize all the properties---
@synthesize btnStartStop;
@synthesize lblClock;

- (void)viewDidLoad {

    //---initialize the NSDateFormatter object---
    formatter =[[NSDateFormatter alloc] init];
    [super viewDidLoad];

}

-(IBAction) btnStartStopClicked: (id) sender {
    if ([[btnStartStop titleForState:UIControlStateNormal]
    isEqualToString:@"Start Clock"])
{
    //---start the timer---
        timer = [NSTimer scheduledTimerWithTimeInterval:(1)
                 target:self
                 selector:@selector(updateTime)
                 userInfo:nil
                 repeats:YES];

        //---change the caption to "Stop Clock"---
        [btnStartStop setTitle:@"Stop Clock" forState:UIControlStateNormal];
    }
    else
{
    //---stop the timer---
        [timer invalidate];

        //---change the caption back to "Start Clock"---
        [btnStartStop setTitle:@"Start Clock" forState:UIControlStateNormal];
    }
}


//---called every second---
-(void)updateTime{

    //---display the time---
    date = [NSDate date];
    [formatter setTimeStyle:NSDateFormatterMediumStyle];
    lblClock.text = [formatter stringFromDate:date];

}

- (void)dealloc {
[txtName release];

//---release all the outlets and objects---
    [btnStartStop release];
    [lblClock release];
    [formatter release];
    [date release];

    [super dealloc];
}
When the View is loaded, you first of all initialize the NSDateFormatter object, which you will use later on to format the current time to a format that you wish to display. When the user presses the Start Clock button, you use an NSTimer object to send messages to a method at regular time intervals. In this case, the updateTime method is called every one second. The updateTime method displays the current time in the Label view. To stop the NSTimer object, you can its invalidate method.
To test the application, press Command-r in Xcode. Pressing the Start Clock button will start the clock (see Figure 13), which updates itself every one second.
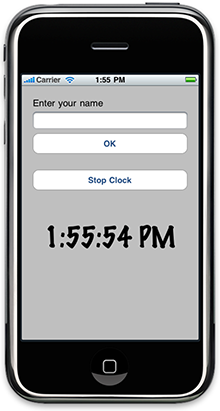
Figure 13 The clock displaying the current time
Summary
After reading through this article, I hope you have a better understanding of how outlets and actions work. Don’t just read this; try it out on your Mac. To really understand iPhone programming, you need to get your hands dirty. Have fun and don’t forget to email me to tell me what other iPhone programming topics you’d like to see on mobiForge.com!


