


One of the key limitations of the iPhone is its constraint on running applications in the background. Because of this, applications cannot keep running in the background when the user switches to another application. So, applications that require a constant state of connectivity (such as social networking applications) will not be able to receive timely updates.
To remedy this limitation, Apple released the Apple Push Notification Service (APNs). The APNs is a service that allows your device to be constantly connected to Apple’s push notification server. When you want to send a push notification to an application installed on the users’ devices, you (the provider) can contact the APNs so that it can deliver a push message to the particular application installed on the intended device.
In this article, you will learn how to perform the various steps needed to create an iPhone application that uses the APNs.
Generating a Certificate Request
The first step to using the APNs is to generate a certificate request file so that you can use it to request for a development SSL certificate later on.
1. Launch the Keychain Access application in your Mac OS X.
2. Select Keychain Access’Certificate Assistant’Request a Certificate From a Certificate Authority (see Figure 1):
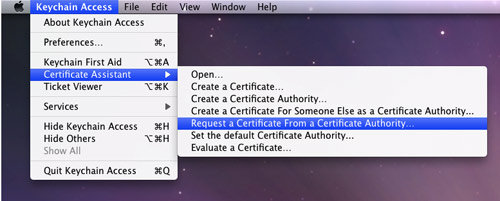
Figure 1. Generating a certificate request
3. Enter the information required and check the Saved to disk option. Click Continue (see Figure 2).
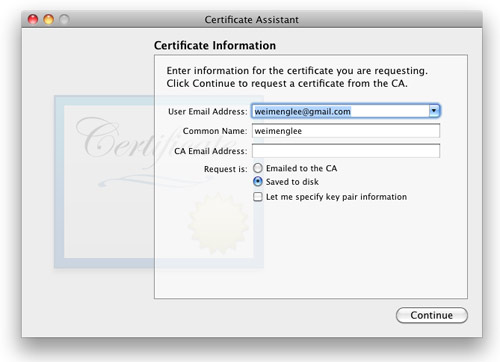
Figure 2. Saving the certificate request to disk
4. Save the certificate request using the suggested name and click Save (see Figure 3): Click Done in the next screen.
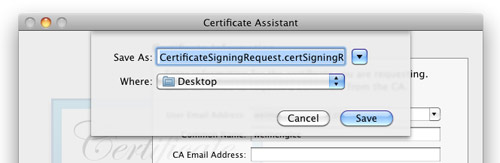
Figure 3. Naming the certificate request
Creating an App ID
Each iPhone applications that uses the APNs must have a unique application ID that uniquely identifies itself. In this step, you will learn how to create an App ID for push notification.
1. Sign in to the iPhone Developer Program at: http://developer.apple.com/iphone/. Click on the iPhone Developer Program Portal on the right of the page (see Figure 4).
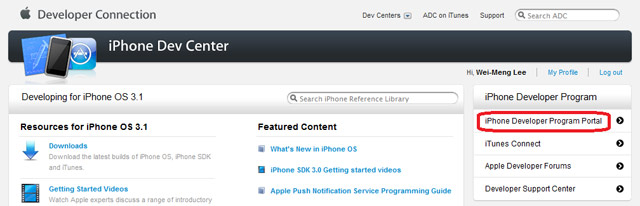
Figure 4. Launching the iPhone Developer Program Portal
2. You should see the welcome page (see Figure 5).

Figure 5. The welcome screen of the iPhone Developer Program Portal
3. Click on the App IDs tab on the left and then click on the New App ID button (see Figure 6).
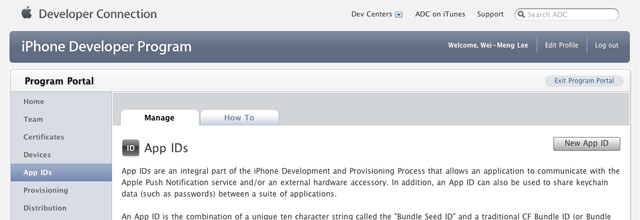
Figure 6. Clicking on the App ID tab
4. Enter “PushAppID” for the Description and select Generate New for the Bundle Seed ID. For the Bundle Identifier, enter net.learn2develop.MyPushApp. Click Submit (see Figure 7).
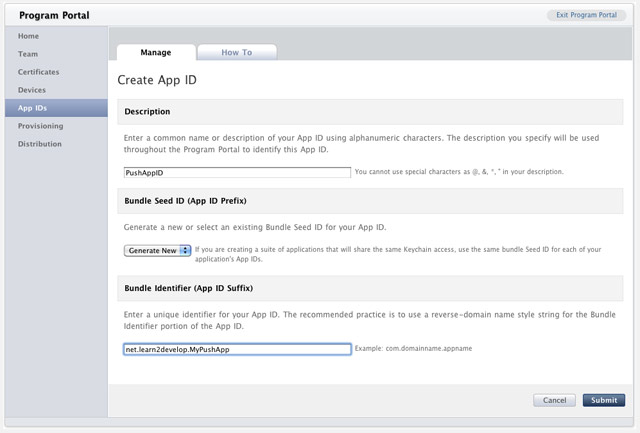
Figure 7. Creating a new App ID
5. You should now see the App ID that you have created (together with those you have previously created) (see Figure 8).

Figure 8. Viewing the newly created App ID
Configuring an App ID for Push Notifications
Once an App ID is created, you need to configure it for push notifications.
1. To configure an App ID for push notification, you need to click the Configure link displayed to the right of the App ID. You will now see the option (see Figure 9).
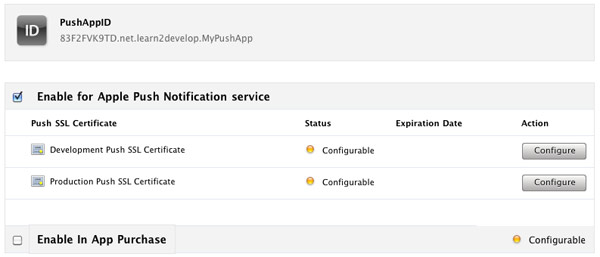
Figure 9. Configuring an App ID for push notification service
Check the Enable for Apple Push Notification service option and click the Configure button displayed to the right of the Development Push SSL Certificate.
2. You will now see the Apple Push Notification service SSL Certificate Assistant screen. Click Continue (see Figure 10).
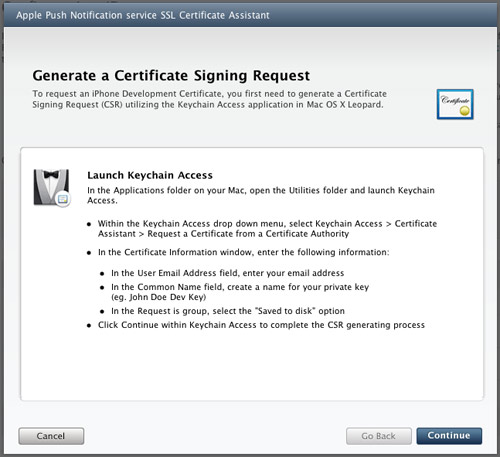
Figure 10. The Apple Push Notification service SSL Certificate Assistant screen
3. Click the Choose File button to locate the Certificate Request file that you have saved earlier. Click Generate (see Figure 11).

Figure 11. Generating the SSL certificate
4. Your SSL Certificate will now be generated. Click Continue (see Figure 12).
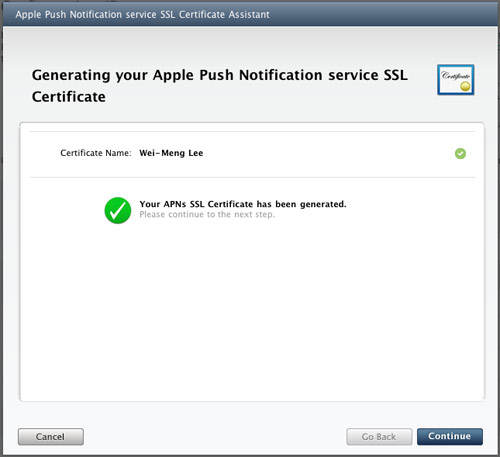
Figure 12. The APNs SSL certificate that is generated
5. Click the Download Now button to download the SSL Certificate. Click Done (see Figure 13).
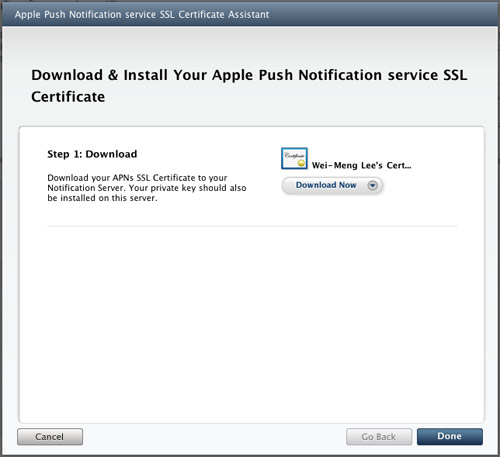
Figure 13. Downloading the certificate generated
6. The SSL Certificate that you download is named aps.developer.identity.cer. Double-click on it to install it in the Keychain Access application (see Figure 14). The SSL certificate will be used by your provider application so that it can contact the APNs to send push notifications to your applications.
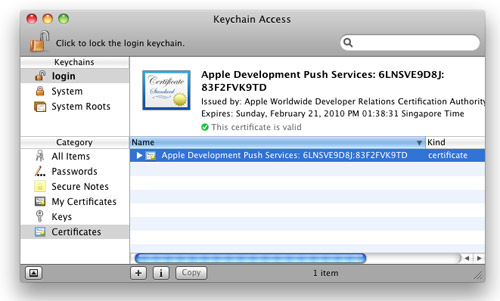
Figure 14. Installing the generated certificate into the Keychain Access application
Creating a Provisioning Profile
The next step is to create a provisioning profile so that your application can be installed onto a real device.
1. Back in the iPhone Development Program Portal, click on the Provisioning tab and click on the New Profile button (see Figure 15).
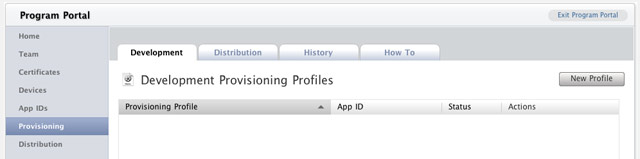
Figure 15. Selecting the Provisioning tab
2. Type in MyDevicesProfile as the profile name. Select PushAppID as the App ID. Finally, check all the devices that you want to provision (you can register these devices with the iPhone Developer Program Portal through the Devices tab). Click Submit (see Figure 16).
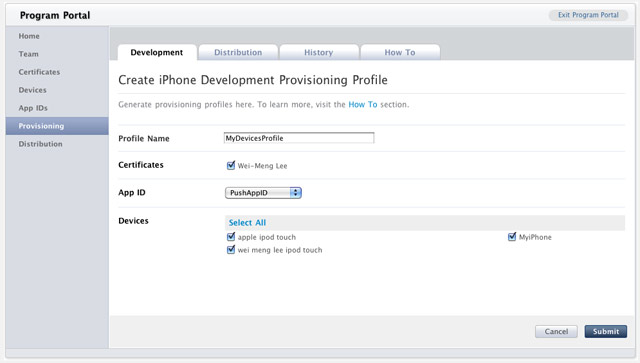
Figure 16. Creating a new provisioning profile
3. The provisioning profile will now be pending approval. After a while, you will see it appear. Click on the Download button to download the provisioning profile (see Figure 17).
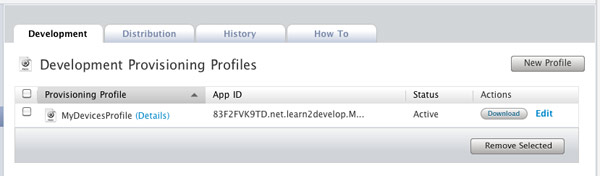
Figure 17. Pending the approval of the provisioning profile
4. The downloaded provisioning profile is named MyDevicesProfile.mobileprovision.
Provisioning a Device
With the provision profile created, you will now install it onto a real device.
1. Connect your iPhone or iPod Touch to your Mac.
2. Drag and drop the downloaded MyDevicesProfile.mobileprovision file onto the Xcode icon on the Dock.
3. Launch the Organizer application from within Xcode and select the device currently connected to your Mac. You should see the MyDevicesProfile installed on the device (see Figure 18).
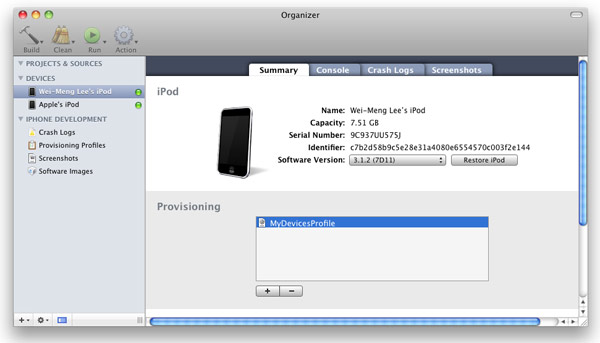
Figure 18. Viewing the installed provisioning profile
Creating the iPhone Application
1. In Xcode, create a new View-Based Application project and name it as ApplePushNotification.
2. Drag and drop a WAV file (shown as beep.wav in this example) onto the Resources folder in Xcode (see Figure 19).
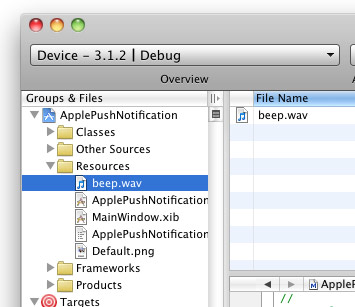
Figure 19. Adding a WAV file to the project
3. Expand on the Targets item in Xcode and select the ApplePushNotification item. Press Command-I. In the Info window, click the Properties tab (see Figure 20).
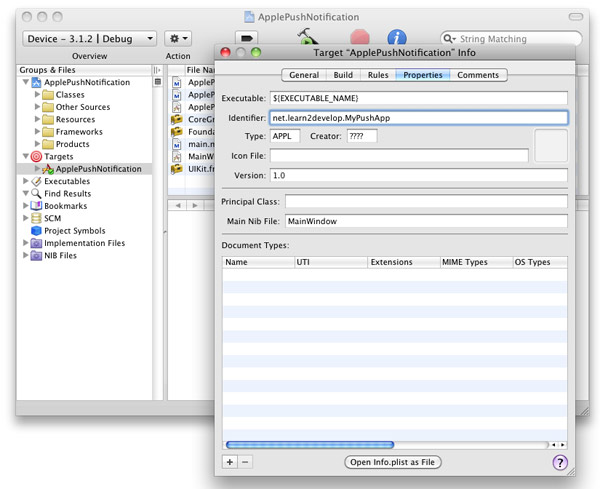
Figure 20. Entering the App ID for the application
In the Identifier textbox, type <net.learn2develop.MyPushApp.
4. Click on the Build tab and type “Code Signing” in the search box. In the Any iPhone OS Device item, select the profile as shown in Figure 21:
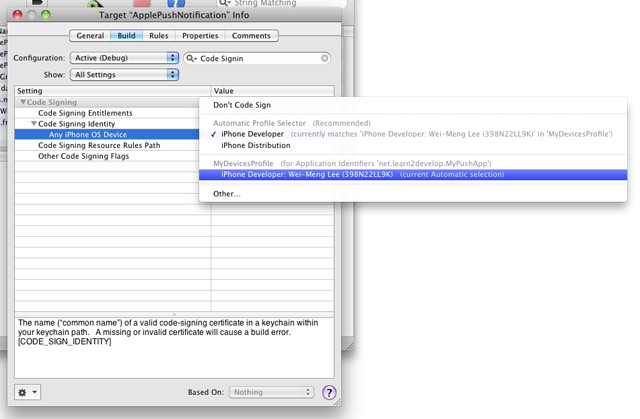
Figure 21. Selecting the profile for code signing
5. In the ApplePushNotificationAppDelegate.m file, type the following code in bold:
Command-RTo save yourself the trouble in developing a push notification provider from scratch, you can use the PushMeBaby application (for Mac OS X) written by Stefan Hafeneger (Get it here).
1. Open the PushMeBaby application in Xcode.
2. Right-click on the Resources folder in Xcode and select Add Existing Files…. Select the aps.developer.identity.cer file that you have downloaded earlier (see Figure 25).
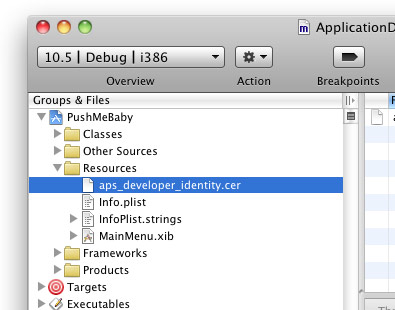
Figure 25. Adding the SSL certificate to the application
3. In the ApplicationDelegate.m file, modify the code as shown in bold below:
- (id)init {
    self = [super init];
    if(self != nil) {
        self.deviceToken = @"38c866dd bb323b39 ffa73487 5e157ee5 a85e0b7c e90d56e9 fe145bcc 6c2c594b";

        self.payload = @"{"aps":{"alert":"You got a new message!","badge":5,"sound":"beep.wav"},"acme1":"bar","acme2":42}";

        self.certificate = [[NSBundle mainBundle]
            pathForResource:@"aps_developer_identity" ofType:@"cer"];
    }
    return self;
}
4. Press Command-R to test the application. You will be asked to grant access to the certificate. Click Always Allow (see Figure 26):
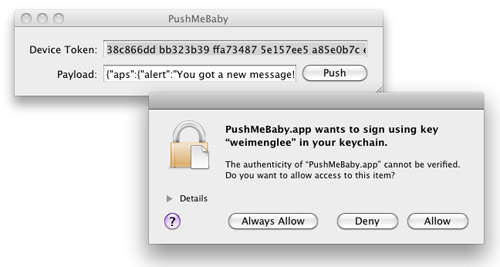
Figure 26. Granting access to the SSL certificate
On the iPhone/iPod Touch, ensure that the ApplePushNotification application is not running. To send a message to the device, click the Push button. The server essentially sends the following message to the Apple Push Notification server:
{
    "aps": {
        "alert" : "You got a new message!" ,
        "badge" : 5,
        "sound" : "beep.wav"},
     "acme1" : "bar",
     "acme2" : 42
}
5. If the message is pushed correctly, you should see the notification as shown in Figure 27.
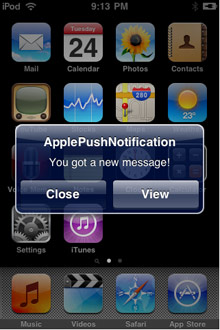
Figure 27. Receiving a Push Notification message
6. If you now debug the ApplePushNotification application by pressing Command-R and send a push message from the PushMeBaby application, the Debugger Console window will display the following outputs:
2009-11-24 21:11:49.182 ApplePushNotification[1461:207] key: acme1, value: bar

2009-11-24 21:11:49.187 ApplePushNotification[1461:207] key: aps, value: {

    alert = "You got a new message!";

    badge = 5;

    sound = "beep.wav";

}

2009-11-24 21:11:49.191 ApplePushNotification[1461:207] key: acme2, value: 42
Summary
In this article, you have seen the various steps required to build an iPhone application that utilizes Apple’s Push Notification service. I am interested to know how you are using the APNs for your application. Use the comment feature below to share with us!


35 Comments
It worked perfect!
Thanks
Thnx for the cool tut. I got everything to work up until the point where i test it for the actual push from PushMeBaby app “yes I copied in my Device Token” but to no avail any idea what i may be doing wrong? Thnx for the help!!
Awesome Article
Worked in first time..
Thanks
Hey…super Tut, Thank you…
but…
If I start pushMeBaby, i get this error
23894:9 gateway.sandbox.push.apple.com
Like this guy:
[url=http://stackoverflow.com/questions/3342221/iphone-pushmebaby-example-error]http://stackoverflow.com/questions/3342221/iphone-pushmebaby-example-error[/url]
Hey…super Tut, Thank you…
but…
If I start pushMeBaby, i get this error
23894:9#! gateway.sandbox.push.apple.com
Thanks, works super for me!
Hi Lee,
This is a great tutorial and it works great. [/i]I am not getting the notification.
Here is my response from Pushme[b]Bay:
2011-04-28 08:36:56.822 PushMeBaby[18959:a0f] MakeServerConnection(): 0
2011-04-28 08:36:56.831 PushMeBaby[18959:a0f] SSLNewContext(): 0
2011-04-28 08:36:56.832 PushMeBaby[18959:a0f] SSLSetIOFuncs(): 0
2011-04-28 08:36:56.833 PushMeBaby[18959:a0f] SSLSetConnection(): 0
2011-04-28 08:36:56.834 PushMeBaby[18959:a0f] SSLSetPeerDomainName(): 0
2011-04-28 08:36:56.835 PushMeBaby[18959:a0f] SecKeychainOpen(): 0
2011-04-28 08:36:56.845 PushMeBaby[18959:a0f] SecCertificateCreateFromData(): 0
2011-04-28 08:36:56.857 PushMeBaby[18959:a0f] SecIdentityCreateWithCertificate(): 0
2011-04-28 08:36:56.859 PushMeBaby[18959:a0f] SSLSetCertificate(): 0
2011-04-28 08:36:59.965 PushMeBaby[18959:a0f] SSLHandshake(): 0
2011-04-28 08:37:03.820 PushMeBaby[18959:a0f] SSLWrite(): 0 89
[i]I don’t know what does 89 represent.
Any help is greatly appreciated.
Thanks.
We are sending alerts to iPad app through apple sand box. From our C# console, it connects to APNS (TCP/IP), authenticates SSL and sends notification. But the device didn’t receive anything. Certificate(.pem) generated for development environment and we are sending the notification in ByteArray format. Is there a way to validate the device token?. Also how to retrieve the status through enhanced notification format. Any feedback/suggession would be of great help. Thank you
Please, code not working in XCode 4 – iOS 4.3
Can you help?
Tks
Great Article!!!
It’s really comprehensive!
I’m new to iPhone Push Notification. These days I register an App Ids and want to use push notification.
And now I encounter a problem, a big problem to me. Appreciate any help from you and others.
My XCode version is 3.2.5 and my iPhone NOT JAILBREAK for testing is 3GS. I do follow all the steps as you mentioned above. But when I test it, the console told me:
No valid ‘aps-environment’ entitlement string found for application ‘ApplePushNotification’: (null). Notifications will not be delivered.
Error: Error Domain=NSCocoaErrorDomain Code=3000 UserInfo=0x1318d0 “no valid ‘aps-environment’ entitlement string found for application.
Just like others who met the problem, I try to resolve the problem as googler’s instructions:
1. Configuration the App ID with push notification.
2. After that generat a new Provisioning Profile with that App ID.
3. Removed all old provisioning profile from Xcode and iOS device before installing the new one.
4. Last, run test application as you gave, then I met that problem. I can’t get device token.
Although I know error code 3000 means app id and profile are not matched and I’m sure that the profile I used is exactly matched the app id that has already push notification available, I still meet this problem.
Appreciate for your any help.
Thanks.
[quote=yhz61010]Great Article!!!
It’s really comprehensive!
I’m new to iPhone Push Notification. These days I register an App Ids and want to use push notification.
And now I encounter a problem, a big problem to me. Appreciate any help from you and others.
My XCode version is 3.2.5 and my iPhone NOT JAILBREAK for testing is 3GS. I do follow all the steps as you mentioned above. But when I test it, the console told me:
No valid ‘aps-environment’ entitlement string found for application ‘ApplePushNotification’: (null). Notifications will not be delivered.
Error: Error Domain=NSCocoaErrorDomain Code=3000 UserInfo=0x1318d0 “no valid ‘aps-environment’ entitlement string found for application.
Just like others who met the problem, I try to resolve the problem as googler’s instructions:
1. Configuration the App ID with push notification.
2. After that generat a new Provisioning Profile with that App ID.
3. Removed all old provisioning profile from Xcode and iOS device before installing the new one.
4. Last, run test application as you gave, then I met that problem. I can’t get device token.
Although I know error code 3000 means app id and profile are not matched and I’m sure that the profile I used is exactly matched the app id that has already push notification available, I still meet this problem.
Appreciate for your any help.
Thanks.[/quote]
The problem has been solved:
1. Add Entitlements.plist in Resources folder.
2. Add a new key: aps-environment, value: development. Do not modify other key/value pairs .
I just did those steps to solve my problem.
I have problem with sending PN via pushmebaby , but really does not work ! I have xcode 4 and ios 4.3.1 . here is my output :
[code]2011-06-22 23:37:57.770 PushMeBaby[1517:903] MakeServerConnection(): 0
2011-06-22 23:37:57.827 PushMeBaby[1517:903] SSLNewContext(): 0
2011-06-22 23:37:57.827 PushMeBaby[1517:903] SSLSetIOFuncs(): 0
2011-06-22 23:37:57.828 PushMeBaby[1517:903] SSLSetConnection(): 0
2011-06-22 23:37:57.828 PushMeBaby[1517:903] SSLSetPeerDomainName(): 0
2011-06-22 23:37:57.829 PushMeBaby[1517:903] SecKeychainOpen(): 0
2011-06-22 23:37:57.830 PushMeBaby[1517:903] SecCertificateCreateFromData(): 0
2011-06-22 23:37:57.834 PushMeBaby[1517:903] SecIdentityCreateWithCertificate(): 0
2011-06-22 23:37:57.835 PushMeBaby[1517:903] SSLSetCertificate(): 0
2011-06-22 23:37:58.251 PushMeBaby[1517:903] SSLHandshake(): -9843
2011-06-22 23:38:01.514 PushMeBaby[1517:903] SSLWrite(): -9806 0
2011-06-22 23:38:02.053 PushMeBaby[1517:903] SSLWrite(): -9806 0
2011-06-22 23:38:02.615 PushMeBaby[1517:903] SSLWrite(): -9806 0
2011-06-22 23:38:03.313 PushMeBaby[1517:903] SSLWrite(): -9806 0
2011-06-22 23:38:03.797 PushMeBaby[1517:903] SSLWrite(): -9806 0[/code]
even I change the port :
[code]SSLSetPeerDomainName(context, “gateway.sandbox.push.apple.com”, 30);[/code]
to
[code]SSLSetPeerDomainName(context, “gateway.sandbox.push.apple.com”, 22);[/code]
but nothing happened !!!!! even my iphone push app outputs , did not change to something like this :
[quote]6. If you now debug the ApplePushNotification application by pressing Command-R and send a push message from the PushMeBaby application, the Debugger Console window will display the following outputs:[/quote]
Please help me
any answer ?
Hi,
article looks great, though I still haven’t tried myself :). Before that, I would like to have some experts advice on what I have in mind (I am quite new to this):
– I am thinking of an app able to run on the background and show pop up messages every x hours (i.e. 1 hour started says Hi!, after 1 more it says “How are you?” and so on… of course what I have in mind is a bit more interesting…
The idea being:
– This messages should be already preloaded in the app
– Therefore no need for connectivity from internet
For what I understand from the APN service (very well explained here) is:
– It is meant to be for server app sending notifications to the devices (client apps)
– Therefore need for connectivity
Would appreciate a lot if anybody can give me some ideas on how this can be done and whether this APN is the only option.
THanks all
[quote=momeks]any answer ?[/quote]
To all how tried hard, get no errors and gain absolutly no result:
An AdHoc profile is NOT!!!! a developer profile (It seems to be seen as productiv)!
Change nothing then the provision file from AdHoc to Develop (take care, the device gets a new token!) and everything will work proper.
Any one Please help, I tried this by the steps given in the post. But I didn’t get any notification in mobile and I didn’t get any Error while Running PushMeBaby.
Thanks in advance.