


The Test Application (or “test suite”, as it is also known) for DeviceAtlas is a system that has been developed which provides you, the user, with the opportunity to input device specific data directly into our system.
This simple process is demonstrated below in a step-by-step introduction to “My First Test Session” , so read on to find out more.
Using a mobile device, you access a website (ta-da.mobi), login using your mobiForge.com username and password, confirm what device you are using, and finally, you run the tests! We have developed a number of tests for the launch of this system, and will be adding to this list as more information is required.
TADA – Your first steps
As mentioned above, if you want to access the test suite, you must first create a mobiForge login. As soon as this process is complete, you will then need to login to DeviceAtlas at least once, in order to active your new account on the test suite system.
What next?
Now that you have an active account, you can proceed to login to ta-da.mobi on your mobile device! From here on, I’ll be demonstrating the usage of the system using my trusty Nokia E65, which means that your mileage may vary, depending on how capable your device is, so bear that in mind when viewing these screenshots.
TADA!
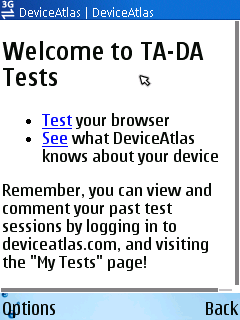
The first thing you’ll see on visiting the TADA site, is the welcome page.
From here, you can click “Test”, to access the test suite itself, or “See”, to view a brief DeviceAtlas demo page which will list some of the known information about your device. Of course, this will only work if your device is actually recognised by DeviceAtlas at the time.
Logging in…
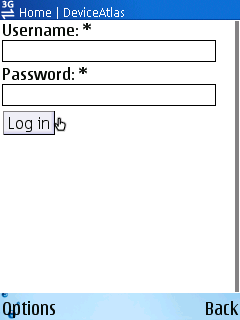
After clicking “Test”, you’ll be present with a login page.
This is where your DeviceAtlas login details will be required!
Automatic Device Detection / Session Continuation
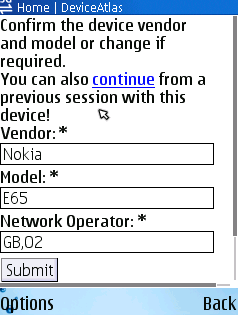
As soon as you’ve logged in, you’ll be presented with a device detection page.
If we’ve guessed the details correctly, then you’re free to simply hit “Submit”, but if any of the text fields are incorrect, all you need to is fix the problems and carry on. *note* If you are returning to the test suite site on a device that you have already used on it, you will be given the option (as shown in the screenshot above) to continue from a previous session. This allows you to pick up from where you left off, if you want to!
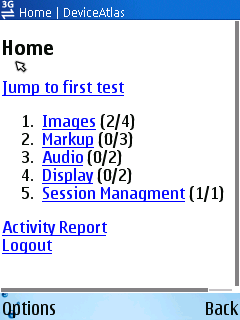
The Test Suite
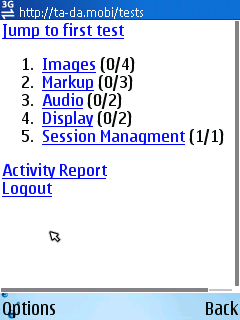
At this point, you have entered the test suite, congratulations! As can be seen in the screenshot below, you will be presented with a number of links. The top link is a quick-start link, that will simply push you into the test process, starting at the top and working your way down.
Below this, you can see a list of test sections, each of which contains a number of tests. The numbers in brackets after the section titles lets you know how many tests you have completed, and the total number of tests within them.
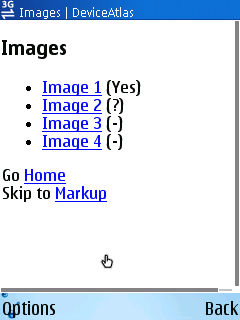
The “Images” Test Section
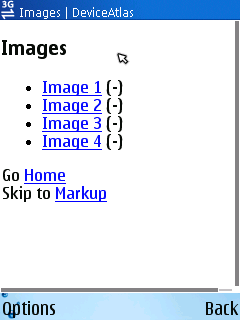
The next screenshot shows you a list of tests in the first section from the previous page – “Images”. As can be seen, there are 4 tests, followed by the answer you have provided for the test.
The test answers listed here are represented as follows:
- “–” – If a test hasn’t been accessed
- “?” – If a test has been accessed, but no answer has been provided
- “Yes/No/Not Sure” – If a test has been accessed and an answer provided
- “235” – An example of the screen dimension test answers, if provided
The Tests
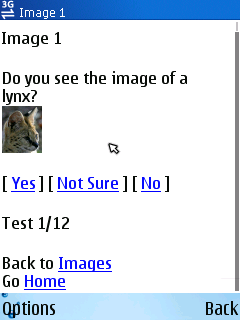
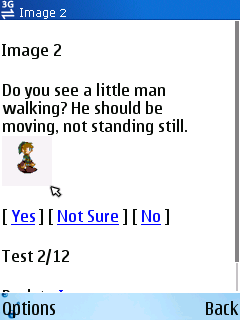
Image 6 shows you the first test in our test suite, an image test. As can be seen, the instructions are clear, and what you must do to provide a valid answer is obvious. If you can see the image clearly, and as you might expect, you simply click “Yes”. If the image is garbled, or you experience something else unexpected, you click “Not Sure”. If the image simply doesn’t display, you click “No”. It really is as simple as that!
As soon as you provide a valid answer by clicking on one of these links, you are automatically forwarded on to the next test, which in this case is another image test.
Exiting a Test

If, for whatever reason, you wish to abort a test run, you can use one of the links at the bottom of every test page, as shown in image 8 below:
The first link will take you back to the test listing for your current section, while the second link will take you back to the test suite home page.
Exiting a Section
Similarly, you can exit a section using the links at the bottom of the page.
This time, the first link will take you to the test suite home page, while the second link will allow you to skip to the next test section.
Home
If after having completed a number of tests, you have returned to the test suite home page, you will be presented with a page similar to this:
As can be seen, a number of the tests have been completed in the “Images” section, as demonstrated throughout this walkthrough!
Mobile Activity Report
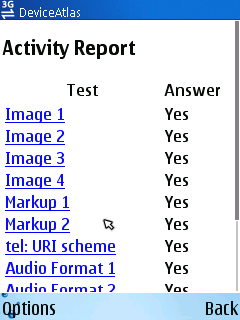
During a test session you can review a quick overview of the answers that you have provided so far, along with a list of tests that you have yet to complete. This is accessed via the “Activity Report” link at the bottom of the page. The page for the current session (for this walkthrough) is shown here.
Desktop Activity Report
Last but not least, is the realtime session report that can be accessed on DeviceAtlas, on your desktop browser. While running through the tests on a mobile device, you can monitor your progress by clicking on the “My Tests” link on the top right hand corner of any DeviceAtlas page. This report lists every test suite session that you have taken, along with the device information you provided, the device user agent string and the results that were stored for each test.
Good Things Come To Those Who Wait
By submitting your tests, you are directly contributing to the JSON files that we make available for download to all of our licence holders.
We have developed a complex cooking process, that takes all of the opinions on a device from WURFL, Vodafone, Nokia, Volantis and many other data sources, combine then with the opinions added by our users on via TADA, and out pops a handy fact, which is the value that gets pumped into the JSON file at the end of the process.
For example, take a look at the “URI Scheme Tel” property on the Nokia E65 on DeviceAtlas. As you can see, a property that I entered on my mobile phone has made it through the cooking process, and is considered a source opinion for the final fact, alongside Vodafone and WURFL. This process isn’t instant, but is completed on a very regular basis, which means that your TADA test results will have direct results on our data!


