


In past articles, we’ve discussed testing mobile Web sites using browsers, and testing using emulators. Using this combination, along with a solid test plan, should bring you to a point where your mobile site is stable and appears to be working correctly on a number of devices. Ah, but wait; what do I mean by appears to be? Remember that an emulator is a simulation of how the device should behave, i.e. if any part of the simulation is incorrect, even in a minute way, then the emulator’s behaviour may differ from the real device. The only way to prove your site or application works correctly on a range of devices is to physically test it on real devices.
This obviously presents a number of problems:
- Which devices do I need to test?
- Where do I obtain these devices from?
- How can I afford these devices?
- How can I make sure these devices are available in the countries I’m releasing in, and on the networks I need to test on?
It also presents a number of benefits:
- You can eliminate potential problems/incompatibilities with real devices before releasing the mobile site into the wild
- You gain knowledge about configuration settings on certain devices, that will assist you in future projects (e.g. a =phone may have CSS turned off by default)
- You can report back to the client that the system has been tested on a number of actual handsets and has successfully passed through a testing phase
- If you’ve successfully tested on handsets that the client has access to, you may be able to have your project signed off quickly
Which Devices do I Need to Test?
The big question to ask before starting testing is “Which devices should I test?”. This is vitally important. If your site/application is targeted at the corporate market, then it may make sense to look at testing on smartphones only, such as iPhone, Android, BlackBerry and Nokia E-Series devices. If it’s a social networking system then you need to test all of the above plus a good range of feature phones. The best bet is to take a two-fold approach:
- Identify which recently released devices you need to support
- Identify which devices released in the past eighteen months are still popular and decide which of those you wish to target
If you wish you can test on as many handsets as you wish, but bear in mind physical handset testing is not like testing using your browser or an emulator. Browsers and emulators can quickly be torn down and put back up. But a physical device more often than not requires input either via a numeric keypad or touchscreen, and you have to learn the different ways the various operating systems do things. It also takes time to reboot the device should you need to do so, and you’re also incurring data charges (and possibly SMS/call charges depending upon the nature of the site/application).
It all sounds a bit time-consuming, not to mention expensive. The latest handsets can cost over £500! But don’t worry, there are a few cheaper ways of accessing devices.
Where do I obtain these devices from, and how can I afford them?
You really have three choices when it comes to testing on physical handsets:
- Purchase the devices
- Hire the devices
- Use a testing provider
Purchasing the devices is an expensive business, and you’d better have a big wallet if you plan to do this. New devices are really expensive to buy sim-free, and the only other alternative is to purchase an expensive long-term contract; again, not a good idea. Older devices can be cheaper and are more readily available. If you have your heart set on owning the devices you want to test on then the options are:
- Visit eBay, where you should be able to pick up some good deals (expect to pay a premium for newer devices though)
- Try a used phone site, such as www.usedphonesuk.com
A cheaper, but still not great option, is to hire the devices. Sites like Adams Phones offer this facility. You can select the phones you want, how long you want them, use them, and return them. This should be cheaper than buying the phones. But beware! You will be billed for everything – call costs, message costs, data costs etc. And you’ll be billed on a minute by minute basis, at a much greater cost than you would on a contract. This is fair enough; after all, you’ve saved the cost of buying the handset and of being stuck with it for eighteen months or so. But for most projects, it still isn’t cost efficient. You’re under pressure to complete testing as fast as you can so you can send the phones back, and you’ll have a limitation on how many devices you can actually afford to hire. If you only need one or two particular types of device, this is possibly a good way to go. If you’ve developed a system that needs to work on hundreds of devices, forget it and look at using a testing provider.
A testing provider is a company that allows you to access physical handsets over the Internet. They do this by wiring up the devices to a custom software solution that allows users to take control of devices for set periods of time. Testing providers are not cheap; at least, they don’t look cheap, charging anything from roughly $12 per hour to $45 per hour. But when compared to purchasing or hiring devices, testing providers are inexpensive. All data, calls, and SMS charges are included – there are no hidden costs (other than downloading premium content). And there’s also a way to test some devices for free too.
How can I make sure these devices are available in the countries/on the networks I’m releasing for?
Again, if you purchase or hire the devices you’ll be limited to one country’s networks. Imagine you hire a Spanish phone in the UK and need to test opting in to a Spanish keyword/shortcode. It won’t work because the Spanish phone will be roaming in the UK. Straight away, your end to end test has failed.
Testing providers provide handsets that are on networks in various countries. Even better, these handsets are actually located in the correct country, so sending text messages etc will work a treat. And those text messages are all included in your hourly fee.
Now we’ve set the scene for device testing providers, we’ll look at a couple of providers and show how the services work.
On-line Device Testing Providers.
I’m going to look at two on-line testing providers; one which is limited (but free), and another that is fully featured and has support for various test scenarios.
Samsung Lab. Dev
Samsung’s developer centre features lots of goodies for the mobile developer, but perhaps the most interesting is Lab.Dev. This gives registered users free on-line access to physical Samsung devices for testing purposes. Visit the Web site and register if you don’t have an account; then click on the Lab.dev link. Samsung give you a number of hours when you sign up and more hours are allocated as you use the system.

Figure 1: Samsung Lab.dev
Symbian, Windows Mobile, and Java devices are available for testing. Make sure you’re signed in, then click on the range of devices you wish to use, e.g. Symbian.

Figure 2: Samsung Lab.dev device chooser
Click on the device you want to use. When you mouse over a particular device a pop-up will appear, showing how long you can reserve it for. You can either start using the device immediately or reserve it for a later time.
Clicking on the device initiates a Java download (the system uses a Java engine). Accept the download and content from Samsung, and the environment will appear displaying the device:

Figure 3: Samsung Lab.dev control panel UI
You can use the mouse or the control panel on the left-hand side of the screen to control the device.
There are some issues; not all devices are connected to a network, so it’s not always possible to browse the Internet. Sometimes devices don’t seem to work, and devices are heavily used at peak times. But for a free service it’s excellent and well worth using.
Device Anywhere
Unlike Samsung Lab.Dev, DeviceAnywhere is a paid-for solution. DeviceAnywhere offers a software package that cleverly allows you to use real devices over the Internet. The devices are connected to the Internet and can be used to make phone calls, send text messages, browse the Internet and download applications. As you are using the actual physical device, you can be confident that what happens when you use the device through DeviceAnywhere is what will happen when a user uses your service on that device.
DeviceAnywhere offer a trial account which will give you three hours access to their solution. You need to talk to a salesperson to set the trial up. Once you’ve done this, you’ll receive an e-mail with your login details and instructions on setting up your trial.
The process of setting up DeviceAnywhere is:
- Download and install DeviceAnywhere Studio (supported on Windows, Mac, and Linux)
- Login using the provided details
- Begin testing devices
The company provides access to handsets in the form of “packages”. These packages involve access to:
- All devices
- Android devices only
- iPhone devices only
- Both Android and iPhone
- Devices on a specific network in a specific country
Each package has a different price point, and costs vary depending on the number of devices included in the package. You’re billed by the minute, and can either buy hours in advance (which is cheaper) or pay as you go.
Once you’ve installed DeviceAnywhere and allowed it to install its updates, log in and you’ll be presented with the home screen. This lists the devices you have access to:

Figure 4: DeviceAnywhere – device picker UI
The list of packages available to you is displayed in a drop-down list above the images of the devices. The list can be used to filter the displayed devices.

Figure 5: DeviceAnywhere – devices by operator
Each device is displayed with an icon alongside it, this denotes the device’s current status:

Figure 6: DeviceAnywhere – device status
- The green power icon means the device is available for use (a grey power icon means the device is off-line)
- The brush icon means the device is being cleaned up. The device can be reserved once it’s available by right-clicking on it
- The padlock icon means somebody else is using the device
To use a device, right-click on it and select Acquire Device:
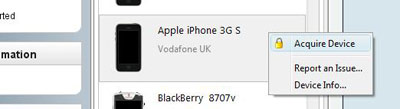
Figure 7: DeviceAnywhere – acquiring a device
After clicking past the trial account warning message (make sure you click No, not Yes), the device will be displayed on-screen. Remember here that you start using your allocated time (on a minute-by-minute basis) as soon as you acquire a device, so don’t keep hold of a device longer than you need to.
You can use the device almost exactly as though it were in the palm of your hand. I say almost because you have to simulate touch screen gestures and the like using the mouse and keyboard, which isn’t always easy. It’s pretty good though and doesn’t present a problem on non-touch screen devices.

Figure 8: DeviceAnywhere – Using a device
You can choose to view the device at normal size, super size, or a smaller size. Phones with accelerometers can be rotated, you can capture images and you can even play back a video of what you’ve just done.
DeviceAnywhere uses your speakers and microphone if you want to make phone calls. The quality varies on this but unless calls form part of your solution it’s questionable that you’d want to do it anyway.
When you have finished with the device, right-click and choose Release Device. The system supports devices from all manufacturers including Apple, Nokia, Sony Ericsson, LG, Motorola, HTC, and Samsung. Here’s a Nokia E71 in action:

Figure 9: DeviceAnywhere – Using Nokia E71
The tabs to the right of the device allow you to do things like change the video quality and the text input type (e.g. ABC, 123 etc). The mobile number of the device is displayed above the device image, and you can even call it or send text messages to it.
The great thing about DeviceAnywhere is the ability to create test projects. These allow you to create a process of “steps” that your testers can implement. You can also highlight what proof is required to prove a step has been successfully completed.
It’s pretty easy to create a test project:
- Go to the Project menu and select New Project
- Add devices to the project
- Once the project has been saved, click on Test Case Editor under Test Case Manager in the left-hand pane
- Create some manual test cases. Right-click on manual test cases and select New Test Case. Once you’ve entered a name the device will appear
- Click on Add step. Give the step a name, some instructions, and specify what type of proof is required
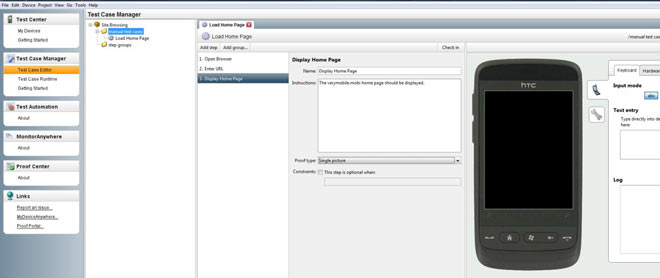
Figure 10: DeviceAnywhere – Creating a test project
When you’ve created the test project, you can test it. Click on Test Case Runtime in the left-hand pane and then click New test cycle. Enter the relevant details into the pop-up dialog that appears and click Next.

Figure 11: DeviceAnywhere – Creating a test cycle
Select the test case you wish to use and click Next.

Figure 12: DeviceAnywhere – Selecting a test case
Now select the device you wish to use for this test cycle, and finally click Finish.

Figure 13: DeviceAnywhere – Selecting a device for a test cycle
The device list is displayed, showing the device(s) you have chosen to test on. To kick off the test cycle, select the required device and click on Run Test Cycle.

Figure 14: DeviceAnywhere – Test case manager
You or your tester can now process each step of the test process, capturing the relevant proofs as necessary.

Figure 15: DeviceAnywhere – Running a test case
If there’s a problem (as in the screen above, where the site has not opened full-screen), you can annotate some notes by selecting Add Note from the drop-down More option:

Figure 16: DeviceAnywhere – Adding notes to test case
Once you’ve completed the test cycle, click on View Results. This is where things start becoming clever. A Web site opens showing the outcomes of the test cycle, which can be sent to other members of staff.

Figure 17: DeviceAnywhere – Test results
DeviceAnywhere also supports automated testing by capturing keystrokes in a macro-like format, but unfortunately this functionality doesn’t seem to be available in the demo.
A side benefit of the solution is it makes it easy to capture screenshots for presentations and demos. You can even make videos of the sessions if you like, using a tool such as Camtasia.
There are other on-line device providers; check out Perfecto Mobile, for instance. They also offer a free trial, have a good range of devices in multiple countries, and support automated testing. Their prices are cheaper but they don’t seem to have quite as many handsets.
Summary
This article concludes the “testing trilogy” that began with functional testing through Firefox and initial device testing using emulators. The ultimate test of any mobile Web site or application is proving it works on individual handsets. Cost is a major barrier to handset access, but by using an on-line device provider this cost can be mitigated (and even eliminated in the case of some Samsung devices). If you can find the budget, an on-line device provider is a great way of testing your mobile creations; just make sure you log off from each device as soon as you’ve finished testing. This will help your testing time go further. Happy testing!


