


Next up in our HTML5 for Mobile Web series is the canvas element. Canvas is particularly interesting since it facilitates the use of graphics without the need for any plugins or other technologies other than JavaScript and CSS.
Quite a few new elements were introduced in HTML5, although few have received as much attention as canvas. Several elements have been removed too, including some of the most infamous ones such as big, font, and frameset. For a full reference of new and removed HTML5 elements, please see this page http://www.w3.org/TR/html5-diff/.
In this article, we’ll take a look at how to setup a canvas suitable for use on a mobile device, and then we’ll look at how we can handle images, text, drawing arc and curves, and various transformations that can be performed. We’ll also embed several live examples for good measure. We pull some of these ideas together into our final example, an HTML5 Meme Generator, which we broke out into a separate article.
Setting up your canvas
The canvas element provides a bitmapped region that can be used to render graphics on an area of a web page via a scripting language such as JavaScript. Getting started is simple, just use the canvas tag directly in your code, with appropriate width and height attributes:
<canvas id="mycanvas" width="250" height="250"></canvas>
This creates a fixed-size canvas element on the page. In many mobile apps we will want instead for the canvas element to extend over a some portion of the device’s screen. To guess at how to do this, you might try to set the width and height properties of the element to n% e.g. with something like:
<canvas id="mycanvas" width="100%" height="100%"> </canvas>
Unfortunately it’s not possible to set the canvas dimensions using percentages directly, so we need some other way to do it.
The trick instead is to grab the screen width and height of the device using JavaScript window.innerWidth and window.innerHeight properties.
    canvas = document.getElementById('mycanvas');

    // Set canvas dimensions
    canvas.width = window.innerWidth;
    canvas.height = window.innerHeight;
We also add some CSS to fill the browser viewport to 100% in both directions, and remove the scrollbars. In addition, for the examples in this article, we add a dashed border, so that you can clearly see the edge of the canvas.
Responsive canvas
So now we have a canvas that will fill the screen of any browser we load it up on. But what about when the user changes the orientation of the device, from portrait to landscape, or vice-versa? Or, if on desktop, the window is resized. In these situations, we’d like the canvas to resize itself, so that it is the correct size whatever the orientation. We can achieve this responsive canvas by adding some resize logic, and having this logic execute whenever a window resize event is triggered.
To achieve this we simply reset the canvas dimensions to the the new viewport dimensions whenever the device orientation is changed. So, we add an event listener to the onorientationchange event and when triggered, we simply set the canvas width and height to the window.innerWidth and window.innerHeight as before. The code to achieve this is listed below.
      var canvas;
      var canvasWidth;
      var ctx;

      function init() {
        canvas = document.getElementById('canvas');
        if (canvas.getContext) {
          ctx = canvas.getContext("2d");

          window.addEventListener('resize', resizeCanvas, false);
          window.addEventListener('orientationchange', resizeCanvas, false);
          resizeCanvas();
        }
      }

      function resizeCanvas() {
        canvas.width = window.innerWidth;
        canvas.height = window.innerHeight;
      }
Note that for mobile browsers we want to trigger the resize on the orientationchange event, whereas on desktop browsers, it’s the resize event that we’re interested in. We include them both here for good measure.
Alternatively, if you are using a device-detection solution, you can know the device width and height in advance, so you could set the canvas dimensions accordingly whevener the device changes orientation.
The Canvas Context
Before we can manipulate the canvas, we need to get a reference to the canvas context. Whenever we have a new canvas, we’ll make a call to the getContext() function which returns an object that exposes a drawing API, so that we can draw things on the canvas. We obtain the context like this:
  var canvas = document.getElementById('mycanvas');
  var ctx = canvas.getContext('2d');
Redrawing canvas after orientation change
Our work to resize after an orientation change is not yet complete, however. A side effect of changing the canvas dimensions is that the canvas is wiped clean. Thus, if we want to resize the canvas and maintain what is painted on it, then we need a way to preserve the current canvas data prior to the resizing. One way to achieve this is to first make a copy of the original canvas, and then to redraw it on the resized canvas, using the getImageData and putImageData functions. The code looks like this:
  // Copy canvas as image data
  var imgData = ctx.getImageData(0,0, canvas.width, canvas.height);

  // Resize original canvas
  canvas.width = window.innerWidth;
  canvas.height = window.innerHeight;

  // Copy back to resized canvas
  ctx.putImageData(imgData, 0, 0);
If you also want to scale the canvas content to fit it to the full canvas size in the new orientation, then you can use a different approach to copy the data before the resize operation. This time we copy the canvas to a hidden temporary canvas, resize the original canvas, and then we draw and scale back onto the resized canvas:
  // Set up temporary canvas
  var tmpCanvas = document.createElement('canvas');
  tempCanvas.width = canvas.width;
  tempCanvas.height = canvas.height;
  tmpCtx = tempCanvas.getContext('2d');

  // Copy to temporary canvas
  tempCanvas.drawImage(canvas, 0, 0);

  // Resize original canvas
  canvas.width = window.innerWidth;
  canvas.height = window.innerHeight;

  // Copy back to resized canvas
  ctx = canvas.getContext('2d');
  ctx.drawImage(tempCanvas, 0, 0, tempCanvas.width, tempCanvas.height, 0, 0, canvas.width, canvas.height);
When we call drawImage we can resize the image to whatever dimensions we like. In this case we simply choose the full canvas width and height so that it fills the canvas.
Images
So now that we’ve set up our canvas, let’s see how we can draw on it. We’ll start with images, which can easily be loaded onto the canvas element. In fact, we’ve already seen the function to draw an image onto the canvas, although we have not explicitly used it with images. When we showed how to resize a canvas earlier, we used the drawImage function, to draw the contents of one canvas onto another canvas. We can simply provide an image, or indeed a video, instead of another canvas as argument to this function. We must also specify the x,y coordinates for the origin of the image. The function looks like this:
drawImage(image, x, y);
We can scale the image too with this function, if we provide width and height parameters:
drawImage(image, x, y, width, height);
With the following code we load up an image and display it at the center of the canvas. In the HTML we specify the canvas, and the image that we are going to display:
  <img id="image-lenna" src="lenna.png" style="display:none" />
  <canvas id="image-canvas"></canvas>
And in the JavaScript we load the image from the DOM, and we only draw it on the canvas after it has loaded, and the onload event has been fired:
  var canvas = document.getElementById('image-canvas');
  ctx = canvas.getContext('2d');
  var img = document.getElementById('image-lenna');

  // Only draw image after it's loaded
  img.onload = function() {
    var x = canvas.width/2 - img.width/2;
    var y = canvas.height/2 - img.height/2;
    ctx.drawImage(img, x, y);
  }
Figure 1: Loading image from DOM into canvas element
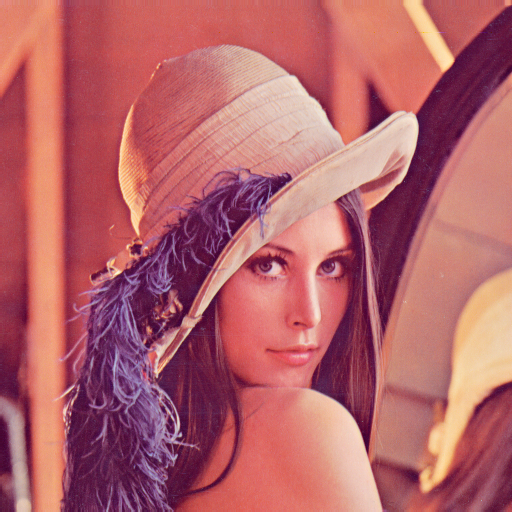
Image from URL
It’s also possible to load an image from a URL. In the following code we set up a new Image object, and then set the src attribute to be the URL of the image. As with the previous example, we draw the image after it has loaded. The code will look something like:
  var img = new Image();
  img.src = 'http://example.com/example.jpg';

  //Wait for image to finish loading
  img.onload = function() {
    //Draw the image on the canvas
    ctx.drawImage(img, x, y);
  }
Upload an image
You can also upload an image to the canvas element using the standard file element. This opens an dialog so that the user can choose a local image to be loaded into the browser. Depending on your device, you may also have the option to use the device camera to take a picture and load that into the canvas. The action dialog and file browser presented by Chrome for Android is displayed below.
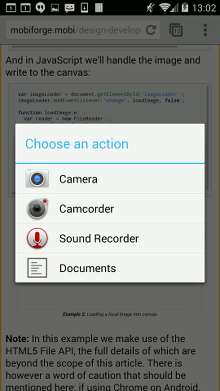

Figure: 1 Android file action dialog (left) and file browser (right)
Once we’ve taken a camera shot, or have chosen an image, we can then read the image as a dataURL, and then draw it onto the canvas. So, in the HTML we’ll have the canvas element, and the file input element:
<canvas id="imgdisplay" width="500" height="500" style="border:1px solid grey">
</canvas><br />

<input type="file" id="imageLoader" name="imageLoader" />
And in JavaScript we’ll handle the image and write to the canvas:
  var imageLoader = document.getElementById('imageLoader');
  imageLoader.addEventListener('change', loadImage, false);

  function loadImage(e) {
    var reader = new FileReader();
    reader.onload = function(event){
        img = new Image();
        img.onload = function(){
          ctx.drawImage(img,0,0);
        }
        img.src = event.target.result;
    }
    reader.readAsDataURL(e.target.files[0]);
    return false;
  }
Example 2: Loading a local image into a canvas element (try it – it’s live!)
Note: In this example we make use of the HTML5 File API, the full details of which are beyond the scope of this article. There is however a word of caution that should be mentioned here: if using Chrome on Android, and memory is low, then when a file is selected via the file dialog, the webpage will reload, with no warning or error. The issue is discussed here.
Download canvas image
It is also possible to download the contents of the canvas as an image file. The main trick here is to grab the canvas content as image data, and then to perform the download. To obtain the canvas as an image, there is a convenient function, toDataURL() that we can use. So, we create an image from the canvas data like this:
var img = canvas.toDataURL("image/png");
Note that we can optionally specify the image format which defaults to PNG. Now, let’s create a simple Download link. We can use the HTML5 download attribute to specify the filename:
<a href="" download="canvas-image.png" id="canvas-download">Download as image</a>
And then we can attach an event listener to trigger the download when the link is clicked:
    download = document.getElementById('canvas-download');
    download.addEventListener('click', function() {
      var data = canvas.toDataURL();
      download.href = data;
    }, false);
There are security issues that can crop up around converting a canvas to image data, that revolve around images from different domains than the site domain, and security exceptions can be thrown. This is beyond the scope of this article, but watch out for them!
Drawing on the Canvas
So, we’ve seen how to get images in and out of the canvas, now what about drawing on the canvas? To draw on the canvas element, as mentioned, we need to obtain a reference to its 2d Context:
var ctx = canvas.getContext('2d');
Now we can start to draw text and shapes. Some of the basics are covered below.
Drawing text, or, Canvas Hello World!
We’ll start with creating some Hello, World! text. There are two main methods for drawing text on the canvas: fillText(text, x, y) and strokeText(text, x, y). The first draws solid, “filled”, text on the canvas. The second draws the outline of the text, with no fill. See example below. The x and y parameters specify the the coordinate at which to draw the text.
ctx.fillText("Hello, World!",20,20);

Figure 3: Drawing text on canvas with fillText()
ctx.strokeText("Hello, World!",20,20);

Figure 4: Drawing text on canvas with strokeText()
Canvas Styling
We can easily style the canvas by setting some context properties. The following are some properties to change how lines and fills will be drawn:
strokeStyle: colour, gradient or patternfillStyle: colour, gradient or patternlineWidth: numeric width of linefont: string specifying font size and face
For example we can style our text like this:
    ctx.fillStyle = '#29a1f1';
    ctx.font = '40pt impact';
    ctx.lineWidth = 3;

Figure 5: Styled text on canvas
Drawing shapes
Next we’ll try our hand at drawing shapes on the canvas. Probably the easiest thing to draw is a rectangle:
ctx.strokeRect(10,10,100,100);
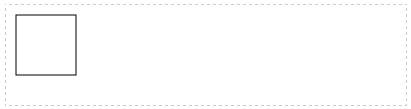
Figure 6: Rectangle drawn on canvas with strokeRect
This will draw the outline of a rectangle, starting at pixel 10,10 and extending to 100 pixels in the horizontal and vertical directions. The stroke style can be modified using the strokeStyle method, and which can take a colour, a gradient, or a pattern as argument. The width can be set using with lineWidth property. Below we set it to a blue line of width 10:
  ctx.lineWidth = 10;
  ctx.strokeStyle = 'blue';

Figure 7: Rectangle drawn with strokeRect, with styling
Similarly we can draw solid rectangles and set the fill style. This time we draw a rectangle filled with a beautiful mustardy yellow colour:
  ctx.fillStyle = "#f7c825";
  ctx.fillRect (20, 20, 200, 80);
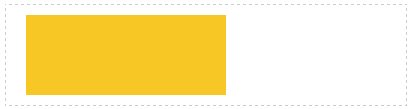
Figure 8: Filled rectangle drawn with fillRect
Clearing the canvas
Now that you know how to draw a rectangle on the canvas, a useful tip to clear the canvas is to use the clearRect() which functions similarly to the strokeRect() and fillRect() functions, but with the effect that it clears the specified rectangular areas of the canvas. So, to clear the whole canvas we could use:
ctx.clearRect(0, 0, canvas.width, canvas.height);
Canvas paths
Shapes other than rectangles must be built up using paths. For example, a line can be drawn using the following:
  ctx.beginPath();
  ctx.moveTo(20,20);
  ctx.lineTo(200,80);
  ctx.stroke();
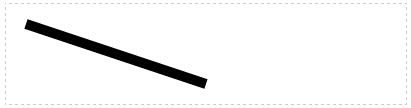
Figure 9: Line drawn with lineTo function
Arcs and Circles
Arcs and circles can be drawn using the arc function. An arc is specified by its starting point, x,y, it’s radius r, and its inital and final angles, a and b. The arc is drawn along the circumference of the circle of radius r, centered at x,y, and which subtends the angle b-a.
To draw a circle centered at the center of the canvas, and with radius 20, we could use 0, and 360degrees (2*PI radians) as the start and ending angles. So, the code would look like:
  ctx.beginPath();
  ctx.arc(canvas.width/2, canvas.height/2, 20, 0, 2*Math.PI);
  ctx.stroke();
Based on this, to draw a semi-cirle, we can simply change the end angle, so that we only draw half the circle:
  ctx.beginPath();
  ctx.arc(canvas.width/2, canvas.height / 2 + 30, 20, 0, Math.PI);
  ctx.stroke();
An optional parameter specifies the direction, clockwise or anticlockwise, that the arc will be drawn.
  ctx.beginPath();
  ctx.arc(canvas.width/2, canvas.height/2+60, 20, 0, Math.PI, 1);
  ctx.stroke();
Olympics anyone?
As an example, a naive approach to draw the Olympic rings might look something like this:
  // Define our colours in drawing order
  var colors = ['blue', 'yellow', 'black', 'green', 'red'];
  var radius = 20;

  // Set start cooridinates
  var x=radius*2;
  var y=radius*2;

  // Increments for each successive circle
  var x_inc = radius*1.25;
  var y_inc = -radius;
  while (colors.length > 0) {
    // Set the circle style
    ctx.strokeStyle = colors.shift();
    ctx.lineWidth = 5;

    // Draw a circle
    ctx.beginPath();
    ctx.arc(x, y, radius, 0, 2*Math.PI);
    ctx.stroke();

    // Reverse the y direction
    y_inc = y_inc*-1;
    y = y+y_inc;
    x = x+x_inc;
  }
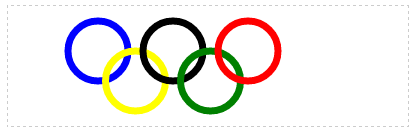
Figure 10: Olympic rings drawn with arc function
Curves
There are two choices for curves: quadraticCurveTo() for quadratic curves, and bezierCurveTo() for Bezier curves.
Quadratic Curves
Quadratic curves are the simpler of the two. They are defined in terms of a start point, an end point, and a control point. The further away the control point is from the other two points, the sharper the curve. The quadraticCurveTo() function takes as arguments the control (cpx,cpy) and end points (endx,endy):
ctx.quadraticCurveTo(cpx, cpy, endx, endy);
The start point is defined by using the moveTo() function.
So, you could draw a long, thin curve with something like this:
  // Long thin curve
  ctx.beginPath();
  ctx.moveTo(20,20);
  ctx.quadraticCurveTo(400,40,20,60);
  ctx.stroke();
And a wide, shallow curve could be drawn with this:
  // Wide shallow curve
  ctx.beginPath();
  ctx.moveTo(20,80);
  ctx.quadraticCurveTo(100,120,210,80);
  ctx.stroke();
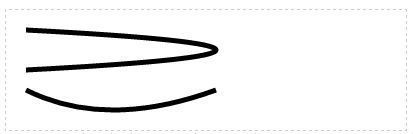
Figure 11: Quadratic curves drawn with the quadraticCurveTo function
Bezier Curves
Bezier curves are a little more complex than quadratic curves, having two control points, rather than just a single one as with the quadratic curves. This allows for more complex curves to be drawn. To draw a Bezier curve we provide the control and end points to the bezierCurveTo() function, and once again, the start point is specified via the moveTo() function. The image below (from Wikipedia) should help to visualise the relationship between the significant points, and the shape of the curve:

Figure 2: Illustration of Bezier curve, with start and end points P0, P3, and control points P1, P2
ctx.bezierCurveTo(cp1x, cp1y, cp2x, cp2y, endx, endy);
A simple example is the following wavy curve, which we obtain by putting the control points on opposite sides of the line joining the two end points:
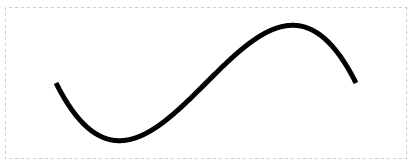
Figure 12: Bezier curve drawn with the bezierCurveTo function
The code used to draw this is:
  ctx.beginPath();
  ctx.moveTo(100, 75);
  ctx.bezierCurveTo(200, 275, 300, -125, 400, 75);
  ctx.stroke();
Canvas Transformations
We can easily apply a number of transformations to a canvas element. Rotation, translation, and scaling each are facilitated with a dedicated function. In addition a more generic transform function is available too.
Before looking at specific examples, note that the transformations apply to the whole canvas, rather than any drawn primitive. So, any transformation applied to the canvas, will affect anything drawn on the canvas after the transformation. Anything drawn on the canvas prior to the transformation remains unaffected.
Translation
Translation is acheived by specifying the desired translation in the x and y dimensions. So to translate 100 units in the x dimension, and 100 units in the y dimension we would use the following code:
ctx.translate(100,100);
In the next few examples, we’ll draw the original shape in blue, and its transformation in green.
![]()
Figure 13: Canvas translation
  // Draw another rectangle
  ctx.fillStyle = 'blue';
  ctx.fillRect(10,10,60,60);

  // Translate
  ctx.translate(100,70);

  // Draw another rectangle
  ctx.fillStyle = 'green';
  ctx.fillRect(10,10,60,60);
Rotation
To rotate the canvas, we simply call the rotate function. As an example let’s rotate our rectangle. This is achieved by rotating the canvas, and then redrawing the rectangle. Let’s rotate by 45 degrees, before we draw the second rectangle
  ctx.rotate(Math.PI/4);

  //Now use the same parameters as before to draw the rectangle
  ctx.fillRect (20, 20, 100, 100);
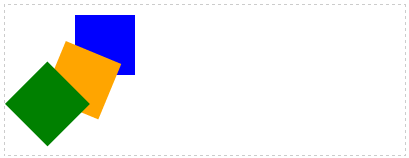
Figure 14: Canvas rotation
To make it easier to see what’s happening, we’ve drawn an intermediate rectangle (orange), rotated to 22.5degrees. (Note that the angle must be specified in radians. So 45deg = 45*Math.PI/180). Although we use the same code to draw each rectangle, they are rendered at 22.5 and 45 degrees, because the rotation has been applied to the canvas itself.
  ctx.fillStyle = 'blue';
  ctx.fillRect(70,10,60,60);

  ctx.rotate(Math.PI/8);
  ctx.fillStyle = 'orange';
  ctx.fillRect(70,10,60,60);

  ctx.rotate(Math.PI/8);
  ctx.fillStyle = 'green';
  ctx.fillRect(70,10,60,60);
This might not be the result you were expecting. The canvas was rotated 45 degrees around its origin. Often it’s required to rotate the canvas around its centre. To achieve this, we would first translate the canvas so that 0,0 now sits at the center of the canvas, and then we would apply the rotation. So we would use:
  ctx.translate(canvas.width/2, canvas.height/2);
  ctx.rotate(Math.PI/4);
At this point, we’ve essentially moved the coordinate frame to the center of our original frame, and we’ve rotated around this point. We could choose to draw our rectangle right now, based in the translated coordinate frame, or we can translate back to the original frame, and specify our rectangle parameters with respect to that.
Let’s translate back to the original frame, and draw against that:
  ctx.translate(-canvas.width/2, -canvas.height/2);
  ctx.fillStyle = "green";
  ctx.fillRect(20, 20, 100, 100);
Other times, we’d like to rotate around the center of a single object on the canvas, so that we can essentially rotate that object in place. In this case, we need to first translate the canvas origin to the center of the object, perform the rotation, and then translate back again.
  ctx.fillStyle = 'blue';
  ctx.fillRect(70,10,60,60);

  // Translate to object center
  ctx.translate(100, 40);

  ctx.rotate(Math.PI/4);

  // Translate back again
  ctx.translate(-100, -40);
  ctx.fillStyle = 'green';
  ctx.fillRect(70,10,60,60);
Note that we use the same code to draw the rectangle. The key is that we are computing the coordinates with respect to the coordinate frame of the canvas itself.
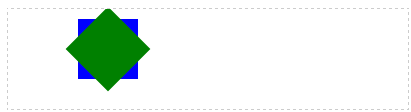
Figure 15: Canvas rotation after translation to center of object
Scaling
To scale, we use the scale function. This takes as parameters the x and y values to be scaled by. For example, to scale the canvas by 2 in both x and y dimensions, we’d use:
ctx.scale(2,2);
As in the rotation example above, this function applies to the canvas itself, rather than to anything that’s already been drawn on it. So the scale operation just performed will affect subsequent objects we draw on the canvas, and won’t affect anything previously drawn. So we can draw the same rectangle as earlier, but it will now be twice the size.
  ctx.fillStyle = 'blue';
  ctx.fillRect(10,10,60,60);

  // Scale the canvas
  ctx.scale(2,2);
  ctx.fillStyle = 'green';
  ctx.fillRect(10,10,60,60);
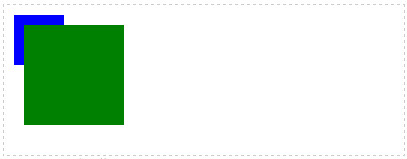
Figure 16: Canvas scaling
Custom Transformation
We can also apply custom transformation by supplying the components of a transformation matrix as arguments to the transform and setTransform functions. These essentially allow you to apply translation, rotation, skewing, and scaling transformations. The arguments correspond to the values in the matrix below, which is multiplied by the matrix representation of a point to obtain the transformed point.

Where each of a,b,c,d,e,f can be thought of as having the following tranformation effects
| Parameter | Description |
|---|---|
| a | Scale horizontally |
| b | Skew horizontally |
| c | Skew vertically |
| d | Scale vertically |
| e | Translate horizontally |
| f | Translate vertically |
So, the setTransform function has the following signature: setTransform(scaleX, skewX, skewY, scaleY, translateX, translateY).
The setTransform and transform functions differ only in that the transform function is cumulatively applied to previous transforms, whereas the setTransform is independent of any previous transforms applied.
In the canvas custom transformation demo below, we’ve provided sliders for each of the elements so that the effects of each can be observed.
a (scaleX)
d (scaleY)
b (skewX)
c (skewY)
e (transX)
f (transY)
| 1 | 0 | 0 |
| 0 | 1 | 0 |
| 0 | 0 | 1 |
Compatibility & Fallback
Providing a fallback for the canvas element relatively simple. We simply add the alternate content for unsupported browsers as children of the canvas element itself.
For example, we could add some alternative HTML content like this:
<canvas id="mycanvas" width="" height="">
  Canvas element not supported. Here is picture of a kitten instead<br />
  <img src="thegreatcatsby.jpg" />
</canvas>
| Android | iOS | IE Mobile | Opera Mobile | Opera Classic | Opera Mini | Firefox Mobile | Chrome for Android | Blackberry | |
|---|---|---|---|---|---|---|---|---|---|
| (Sources: caniuse.com, DeviceAtlas, mobilehtml5.org) | |||||||||
At the time of writing, support is already very widespread for the canvas element across the various mobile browsers. Even Opera Mini partially supports it. In some of the examples however, we also use the HTML5 FileAPI, which is not supported on some devices, for instance iOS versions lower than 6.
Meme Generator Example
As a final demonstration, we’ve pulled together some of topics we covered into another live example: a simple HTML5 Meme Generator. We present the finished app, and walk you through how it was built.
Conclusion
This concludes our overview of the canvas element for now. There’s a lot to cover with canvas, and we’ve only looked at the basics here. Hopefully it’s clear that the canvas element is very powerful, but also quite easy to get started with. With wide support across mobile devices, and a huge variety of potential applications, canvas is already proving very popular with developers.
References
- WHATWG Canvas spec http://www.whatwg.org/specs/web-apps/current-work/multipage/the-canvas-element.html
- HTML5 differences from HTML4: http://www.w3.org/TR/html5-diff


Leave a Reply