


So far in my previous few articles on Android I have focused on showing you how to get things done in Android without really spending too much time discussing the visual aspect of Android application development – User Interface design. In this article, and the next, I will walk you through the various elements that make up the UI of an Android application. In this first part of the article, I will discuss the various layouts available in Android to position the various widgets on your screen.
Android Screen UI Components
Up to this point, you have seen that the basic unit of an Android application is an Activity. An Activity displays the user interface of your application, which may contain widgets like buttons, labels, text boxes, etc. Typically, you define your UI using an XML file (for example, the main.xml file located in the res/layout folder), which may look like this:
<?xml version="1.0" encoding="utf-8"?>
<LinearLayout xmlns:android="http://schemas.android.com/apk/res/android"
    android:orientation="vertical"
    android:layout_width="fill_parent"
    android:layout_height="fill_parent"
    >
    <TextView
        android:layout_width="fill_parent"
        android:layout_height="wrap_content"
        android:text="@string/hello"
        />
</LinearLayout>
During runtime, you load the XML UI in the onCreate() event handler in your Activity class, using the setContentView() method of the Activity class:
    @Override
    public void onCreate(Bundle savedInstanceState) {
    	super.onCreate(savedInstanceState);
    	setContentView(R.layout.main);
    }
What happens is that during compilation time, each element in the XML file is compiled into its equivalent Android GUI class, with attributes represented by methods. The Android system then creates the UI of the Activity when it is loaded.
While it is always easier to build your UI using a XML file, there are times where you need to build your UI dynamically during runtime (for example, when writing games). Hence, it is also possible to create your UI entirely using code.
Views and ViewGroups
An Activity contains Views and ViewGroups. A View is a widget that has an appearance on screen. Examples of widgets are buttons, labels, text boxes, etc. A View derives from the base class android.view.View.
One or more Views can be grouped together into a ViewGroup. A ViewGroup (which is by itself is a special type of View) provides the layout in which you can order the appearance and sequence of views. Examples of Viewgroups are LinearLayout, FrameLayout, etc. A ViewGroup derives from the base class android.view.ViewGroup.
Android supports the following ViewGroups:
LinearLayoutAbsoluteLayoutTableLayoutRelativeLayoutFrameLayoutScrollView
The following sections will discuss each ViewGroup in more details. Note that in practice, it is common to nest different types of layouts to create the UI you want.
Creating the Sample Project
For this article, create a new Android project and name it as shown in Figure 1.
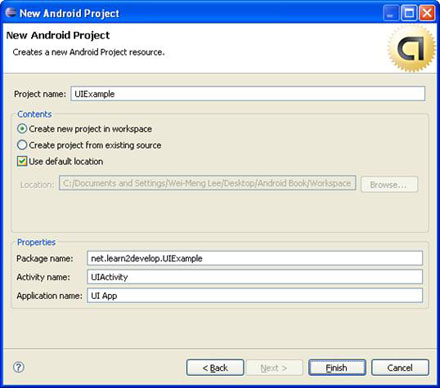
Figure 1 Creating a new Android project using Eclipse
Eclipse provides only minimal support for designing Android UI and so you won’t be able to drag-and-drop of widgets on a design surface. Instead, you can use the free DroidDraw tool available at http://www.droiddraw.org/. Figure 2 shows the DroidDraw in action. You can drag-and-drop widgets onto different layouts and then use it to generate its equivalent XML code. While DroidDraw is not perfect, it is very useful to get you started with Android UI design and is a good tool to learn the various Views and ViewGroups in Android.
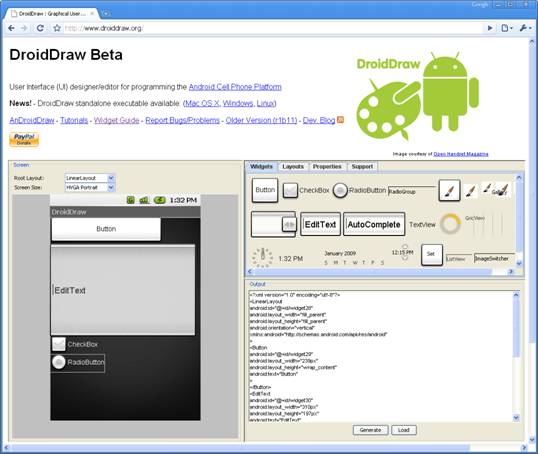
Figure 2 The DroidDraw web application to design your Android UI
You can also download standalone versions of DroidDraw for Windows, Mac OS X, and Linux.
LinearLayout
The LinearLayout arranges views in a single column or single row. Child views can either be arranged vertically or horizontally. To see how LinearLayout works, let’s modify the main.xml file in the project:
<?xml version="1.0" encoding="utf-8"?>
<LinearLayout xmlns:android="http://schemas.android.com/apk/res/android"
    android:orientation="vertical"
    android:layout_width="fill_parent"
    android:layout_height="fill_parent"
    >
    <TextView
        android:layout_width="fill_parent"
        android:layout_height="wrap_content"
        android:text="@string/hello"
        />
</LinearLayout>
In the main.xml file, observe that the root element is <LinearLayout> and it has a <TextView> element contained within it. The <LinearLayout> element controls the order in which the views contained within it appear.
Each View and ViewGroup has a set of common attributes, some of which are shown in Table 1.
| Attribute | Description |
|---|---|
layout_width |
Specifies the width of the View or ViewGroup |
layout_height |
Specifies the height of the View or ViewGroup |
layout_marginTop |
Specifies extra space on the top side of the View or ViewGroup |
layout_marginBottom |
Specifies extra space on the bottom side of the View or ViewGroup |
layout_marginLeft |
Specifies extra space on the left side of the View or ViewGroup |
layout_marginRight |
Specifies extra space on the right side of the View or ViewGroup |
layout_gravity |
Specifies how child Views are positioned |
layout_weight |
Specifies how much of the extra space in the layout to be allocated to the View |
layout_x |
Specifies the x-coordinate of the View or ViewGroup |
layout_y |
Specifies the y-coordinate of the View or ViewGroup |
Table 1 Common attributes of views and viewgroups
Note that some of these attributes are only applicable when a View is in certain specific ViewGroup(s). For example, the layout_weight and layout_gravity attributes are only applicable if a View is either in a LinearLayout or TableLayout.
For example, the <TextView> element above has its width filling up the entire width of its parent (which is the screen in this case) using the fill_parent constant. Its height is indicated by the wrap_content constant, which means that its height is the height of its content (in this case, the text contained within it). If you do not wish to have the <TextView> view occupy the entire row, you can set its layout_width attribute to wrap_content, like this:
<TextView
    android:layout_width="wrap_content"
    android:layout_height="wrap_content"
    android:text="@string/hello"
    />
This will set the width of the view to be equal to the width of the text contained within it. You can also set the width to an absolute value, like this:
<TextView
    android:layout_width="105px"
    android:layout_height="wrap_content"
    android:text="@string/hello"
    />
In this case, the width is set to 105 pixels wide. Let’s modify the main.xml file by adding a <Button> view as shown below:
<?xml version="1.0" encoding="utf-8"?>
<LinearLayout
    android:layout_width="fill_parent"
    android:layout_height="fill_parent"
    xmlns:android="http://schemas.android.com/apk/res/android"
    >
    <TextView
        android:layout_width="105px"
        android:layout_height="wrap_content"
        android:text="@string/hello"
        />
    <Button
        android:layout_width="100px"
        android:layout_height="wrap_content"
        android:text="Button"
        />
</LinearLayout>
Figure 3 shows the views laid out from left to right.
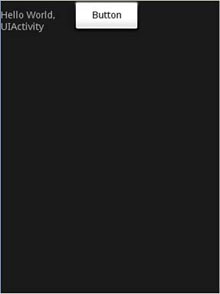
Figure 3 The views laid out in LinearLayout
The default orientation of LinearLayout is set to horizontal. If you want to change its orientation to vertical, set the orientation attribute to vertical, like this:
<LinearLayout
    android:layout_width="fill_parent"
    android:layout_height="fill_parent"
    android:orientation="vertical"
    xmlns:android="http://schemas.android.com/apk/res/android"
    >
Figure 4 shows the effect of changing the orientation to vertical.
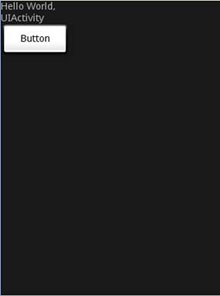
Figure 4 Changing the orientation to vertical
InLinearLayout, you can apply the layout_weight and layout_gravity attributes to views contained within it, as the following modifications to main.xml shows:
<?xml version="1.0" encoding="utf-8"?>
<LinearLayout
    android:layout_width="fill_parent"
    android:layout_height="fill_parent"
    xmlns:android="http://schemas.android.com/apk/res/android"
        android:orientation="vertical"
    >
    <TextView
        android:layout_width="105px"
        android:layout_height="wrap_content"
        android:text="@string/hello"
        />
    <Button
        android:layout_width="100px"
        android:layout_height="wrap_content"
        android:text="Button"
        android:layout_gravity="right"
        android:layout_weight="0.2"
        />
    <EditText
        android:layout_width="fill_parent"
        android:layout_height="wrap_content"
        android:textSize="18sp"
        android:layout_weight="0.8"
        />
</LinearLayout>
Figure 5 shows that the button is aligned to the right of its parent (which is the LinearLayout) using the layout_gravity attribute. At the same time, you use the layout_weight attribute to specify the ratio in which the Button and EditText views occupy the remaining space on the screen. The total value for the layout_weight attribute must be equal to 1.
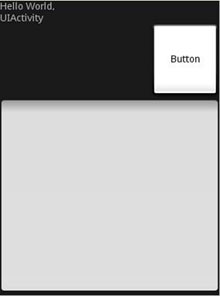
Figure 5 Applying the layout_weight and layout_gravity attributes
AbsoluteLayout
The AbsoluteLayout lets you specify the exact location of its children. Consider the following UI defined in main.xml:
<?xml version="1.0" encoding="utf-8"?>
<AbsoluteLayout
    android:layout_width="fill_parent"
    android:layout_height="fill_parent"
    xmlns:android="http://schemas.android.com/apk/res/android"
    >
    <Button
        android:layout_width="188px"
        android:layout_height="wrap_content"
        android:text="Button"
        android:layout_x="126px"
        android:layout_y="361px"
        />
    <Button
        android:layout_width="113px"
        android:layout_height="wrap_content"
        android:text="Button"
        android:layout_x="12px"
        android:layout_y="361px"
        />
</AbsoluteLayout>
Figure 6 shows the two Button views located at their specified positions using the android_layout_x and android_layout_y attributes.
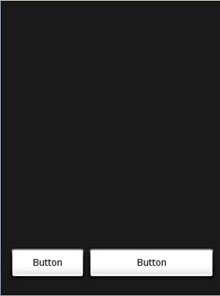
Figure 6 Views laid out using AbsoluteLayout
Author’s Note. You should ideally use AbsoluteLayout when you need to reposition your views when there is a change in the screen rotation.
TableLayout
The TableLayout groups views into rows and columns. You use the <TableRow> element to designate a row in the table. Each row can contain one or more views. Each view you place within a row forms a cell. The width for each column is determined by the largest width of each cell in that column.
Populate main.xml with the following elements and observe the UI as shown in Figure 7.
<?xml version="1.0" encoding="utf-8"?>
<TableLayout
    xmlns:android="http://schemas.android.com/apk/res/android"
    android:layout_height="fill_parent"
    android:layout_width="fill_parent"
    android:background="#000044">
    <TableRow>
        <TextView
            android:text="User Name:"
            android:width ="120px"
            />
        <EditText
            android:id="@+id/txtUserName"
            android:width="200px" />
    </TableRow>
    <TableRow>
        <TextView
            android:text="Password:"
            />
        <EditText
            android:id="@+id/txtPassword"
            android:password="true"
            />
    </TableRow>
    <TableRow>
        <TextView />
        <CheckBox android:id="@+id/chkRememberPassword"
            android:layout_width="fill_parent"
            android:layout_height="wrap_content"
            android:text="Remember Password"
            />
    </TableRow>
    <TableRow>
        <Button
            android:id="@+id/buttonSignIn"
            android:text="Log In" />
    </TableRow>
</TableLayout>
Figure 7 Using the TableLayout
Note that in the above example, there are two columns and four rows in the TableLayout. The cell directly under the Password TextView is populated with an <TextView/> empty element. If you don’t do this, the Remember Password checkbox will then appear under the Password TextView, like that shown in Figure 8.
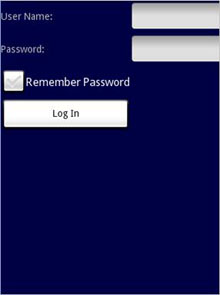
Figure 8 Note the change in the position of the Remember Password view
RelativeLayout
The RelativeLayout lets you specify how child views are positioned relative to each other. Consider the following main.xml file:
<?xml version="1.0" encoding="utf-8"?>
<RelativeLayout
    android:id="@+id/RLayout"
    android:layout_width="fill_parent"
    android:layout_height="fill_parent"
    xmlns:android="http://schemas.android.com/apk/res/android"
    >
    <TextView
        android:id="@+id/lblComments"
        android:layout_width="wrap_content"
        android:layout_height="wrap_content"
        android:text="Comments"
        android:layout_alignParentTop="true"
        android:layout_alignParentLeft="true"
        />
    <EditText
        android:id="@+id/txtComments"
        android:layout_width="fill_parent"
        android:layout_height="170px"
        android:textSize="18sp"
        android:layout_alignLeft="@+id/lblComments"
        android:layout_below="@+id/lblComments"
        android:layout_centerHorizontal="true"
        />
    <Button
        android:id="@+id/btnSave"
        android:layout_width="125px"
        android:layout_height="wrap_content"
        android:text="Save"
        android:layout_below="@+id/txtComments"
        android:layout_alignRight="@+id/txtComments"
        />
    <Button
        android:id="@+id/btnCancel"
        android:layout_width="124px"
        android:layout_height="wrap_content"
        android:text="Cancel"
        android:layout_below="@+id/txtComments"
        android:layout_alignLeft="@+id/txtComments"
        />
</RelativeLayout>
Notice that each view embedded within the RelativeLayout have attributes that allow them to align with another view. These attributes are:
layout_alignParentToplayout_alignParentLeftlayout_alignLeftlayout_alignRightlayout_belowlayout_centerHorizontal
The value for each of these attributes is the ID for the view that you are referencing. The above XML UI creates the screen shown in Figure 9.
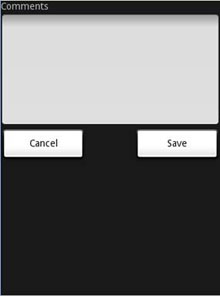
Figure 9 Using RelativeLayout to layout views
FrameLayout
The FrameLayout is a placeholder on screen that you can use to display a single view. Views that you add to a FrameLayout is always anchored to the top left of the layout. Consider the following content in main.xml:
<?xml version="1.0" encoding="utf-8"?>
<AbsoluteLayout
    android:id="@+id/widget68"
    android:layout_width="fill_parent"
    android:layout_height="fill_parent"
    xmlns:android="http://schemas.android.com/apk/res/android"
    >
    <FrameLayout
        android:layout_width="wrap_content"
        android:layout_height="wrap_content"
        android:layout_x="40px"
        android:layout_y="35px"
        >
        <ImageView
            android:src = "@drawable/androidlogo"
            android:layout_width="wrap_content"
            android:layout_height="wrap_content"
            />
    </FrameLayout>
</AbsoluteLayout>
Here, you have a FrameLayout within an AbsoluteLayout. Within the FrameLayout, you embed an ImageView view. The UI is as shown in Figure 10.
Note: This example assumes that the res/drawable folder has an image named androidlogo.png.
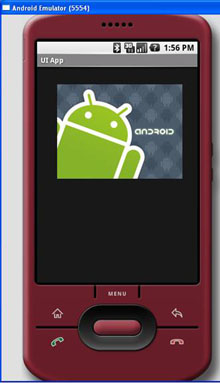
Figure 10 Using FrameLayout
If you add another view (such as a Button view) within the FrameLayout, the view will overlap the previous view (see also Figure 11):
<?xml version="1.0" encoding="utf-8"?>
<AbsoluteLayout
    android:id="@+id/widget68"
    android:layout_width="fill_parent"
    android:layout_height="fill_parent"
    xmlns:android="http://schemas.android.com/apk/res/android"
    >
    <FrameLayout
        android:layout_width="wrap_content"
        android:layout_height="wrap_content"
        android:layout_x="40px"
        android:layout_y="35px"
        >
        <ImageView
            android:src = "@drawable/androidlogo"
            android:layout_width="wrap_content"
            android:layout_height="wrap_content"
            />
        <Button
            android:layout_width="124px"
            android:layout_height="wrap_content"
            android:text="Print Picture"
            />
    </FrameLayout>
</AbsoluteLayout>
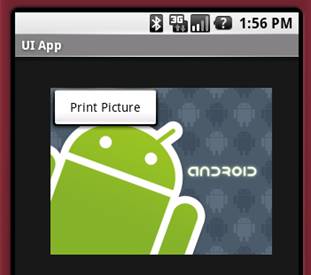
Figure 11 Overlapping views
You can add multiple views to a FrameLayout, but each will stack on top of the previous one.
ScrollView
A ScrollView is a special type of FrameLayout in that it allows users to scroll through a list of views that occupy more space than the physical display. The ScrollView can contain only one child view or ViewGroup, which normally is a LinearLayout.
Note: Do not use a ListView together with the ScrollView. The ListView is designed for showing a list of related information and is optimized for dealing with large lists.
The following main.xml content shows a ScrollView containing a LinearLayout, which in turn contains some Button and EditText views:
<?xml version="1.0" encoding="utf-8"?>
<ScrollView
    android:id="@+id/widget54"
    android:layout_width="fill_parent"
    android:layout_height="fill_parent"
    xmlns:android="http://schemas.android.com/apk/res/android"
    >
    <LinearLayout
        android:layout_width="310px"
        android:layout_height="wrap_content"
        android:orientation="vertical"
        >
        <Button
            android:id="@+id/button1"
            android:layout_width="fill_parent"
            android:layout_height="wrap_content"
            android:text="Button 1"
            />
        <Button
            android:id="@+id/button2"
            android:layout_width="fill_parent"
            android:layout_height="wrap_content"
            android:text="Button 2"
            />
        <Button
            android:id="@+id/button3"
            android:layout_width="fill_parent"
            android:layout_height="wrap_content"
            android:text="Button 3"
            />
        <EditText
            android:id="@+id/txt"
            android:layout_width="fill_parent"
            android:layout_height="300px"
            />
        <Button
            android:id="@+id/button4"
            android:layout_width="fill_parent"
            android:layout_height="wrap_content"
            android:text="Button 4"
            />
        <Button
            android:id="@+id/button5"
            android:layout_width="fill_parent"
            android:layout_height="wrap_content"
            android:text="Button 5"
            />
    </LinearLayout>
</ScrollView>
Figure 12 shows the ScrollView displaying a scroll bar on the right side of the screen. Users can drag the screen upward to reveal the views located at the bottom of the screen.
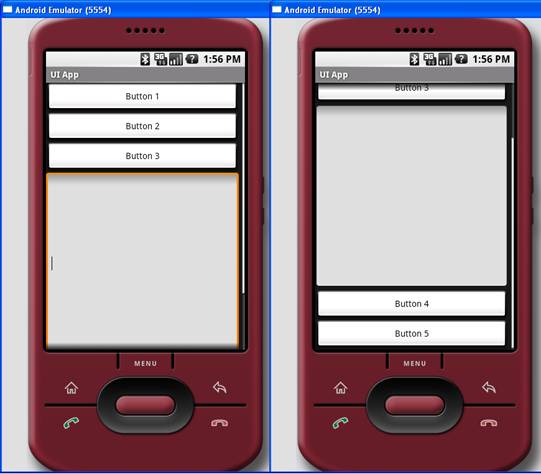
Figure 12 Using the ScrollView
Summary
In this article, you have seen the various layouts available in Android to create your UI. In the next installation of this article, I will show you the various views (widgets) that you can use in Android to create your next killer applications. Till then, have fun!


18 Comments
Thanks you!
Best android tutorial i found in internet dam thanks 🙂
G8 tut
how to give display other than English language in android?
Hi…mobiforce team…its nice tut.. its really helps me…
thanx….
very nice!!!!!!
i want create another program…..
up i want create one listView in one ScrollView on up of desktop of android….and down i want insert 5 Button in Horizontal in one frame…..
It’s possible?????
if possible…hot to create all in one xml???????
Hi Wei Meeng,
This is a great article. The best basic UI tutorial thus far..
Sincere Thanks
Thanks for this great help.
[url]http://www.techienjoy.com[/url]
Hi great set of tutorials – although I kept on getting an “r.layout.main cannot be resolved” error, and the app wouldn’t compile.
Turns out it was a missing image in the basicviews.xml
android:src=”@drawable/icon”
Placing an image called “icon.png” in the res/drawable-hdpi/ / ldpi / mdpi folders sorted this error out, and the example then compiled ok…
Nice one! very useful for beginners..