One of the several features outlined in the HTML 5 specification is the support for Web applications that continue to work while they are offline. This feature is very useful for Web applications because a Web application can be loaded just once and then run offline without needing a persistent Internet connection, making it behave just like a locally installed native application.
Dashcode supports the manifest attribute available in the HTML 5 specifications for offline web applications. And so in this article, you will learn how to write offline iPhone Web applications using Dashcode.
Enabling Offline Mode
To enable your iPhone Web applications to run in offline mode, you first need to configure your project in Dashcode.
Using Dashcode, create a new Custom project, save it and name it as OfflineApp.
Click on the Application Attributes tab and check the “Allow offline viewing of this web application” option (see Figure 1).
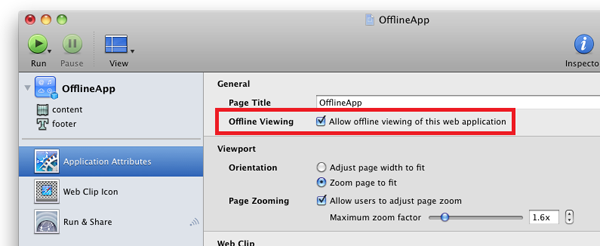
Figure 1.Enabling your application to run in offline mode
If you examine the index.html page now, you will see that the manifest attribute of the html element is now set to “OfflineApp.manifest”:
<!DOCTYPE HTML PUBLIC "-//W3C//DTD HTML 4.01//EN" "http://www.w3.org/TR/html4/strict.dtd">
<html manifest="OfflineApp.manifest">
<head>
This offline manifest file (whose content will be populated automatically by Dashcode) will contain the list of files that the browser needs to cache in order to allow the application to run in offline mode.
Configuring Apache for Web Publishing
In order for your web server to serve the manifest file correctly, you need to configure your web server (which is Apache in Mac OS X) to add the correct MIME type.
In Spotlight, type “Terminal” to launch the Terminal application. Type the following commands (see Figure 2):
cd Sites

pico .htaccess
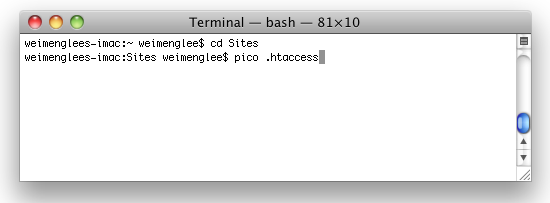
Figure 2. Modifying the .htaccess file
This launches the .htaccess file, which is used to configure the behavior of Apache. In the Pico editor, type the following line:
AddType text/cache-manifest .manifest
Save the file by pressing Ctrl-X. Type Y to go ahead and save the file (see Figure 3). This will enable Apache to serve the manifest file correctly with the text/cache-manifest MIME type.
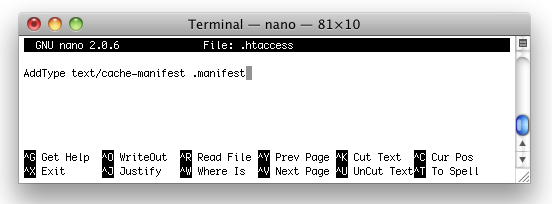
Figure 3. Saving the .htaccess file in Pico
Type the following commands:
cd /etc/apache2/users

sudo pico $USER.conf
In the $USER.conf file in Pico, modify the content as shown in Figure 4. When done, save the file by pressing Ctrl-X. Press “Y” to go ahead and save the file.
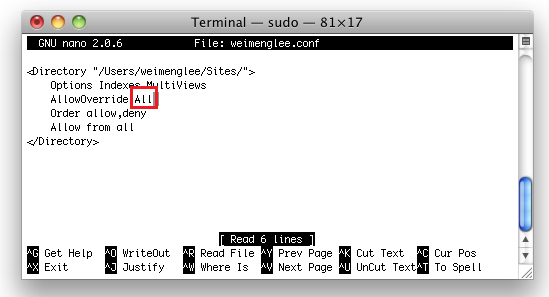
Figure 4. Modifying the $USER.conf file
In System Preferences, check the Web Sharing service to enable web sharing (see Figure 5).
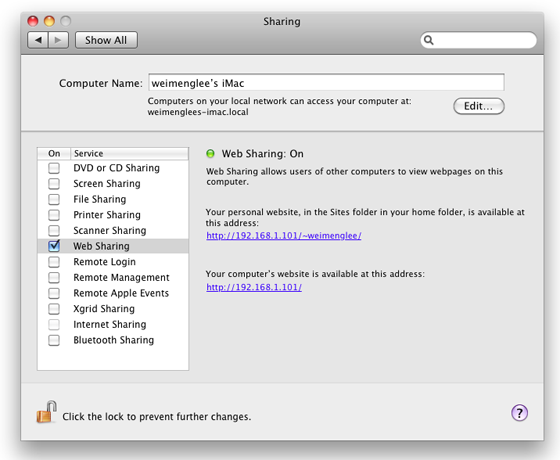
Figure 5. Enabling Web Sharing in your Mac OS X
Detecting Online and Offline Modes
Back in Dashcode, edit the main.js file and code the following statements in bold:
function load()
{
    dashcode.setupParts();

    // Indicates whether the browser is online or offline
    var online = window.navigator.onLine;

    if (!online) {
        // Handle the case when the browser is offline
        alert("We are offline!");
    } else {
        alert("We are online!");
    }

    // Sets the online and offline events at the body element
    document.body.addEventListener("online", function () {
        alert('The browser is online');
    }, false);

    document.body.addEventListener("offline", function () {
        alert('The browser is offline');
    }, false);

}
The above code basically detects if the browser is currently online using the window.navigator.onLine property. You also add event handlers to detect when the browser goes offline or online. When the browser changes its online status, you display an alert to inform the user.
Click on the Run & Share tab and click the Deploy button (see Figure 6).
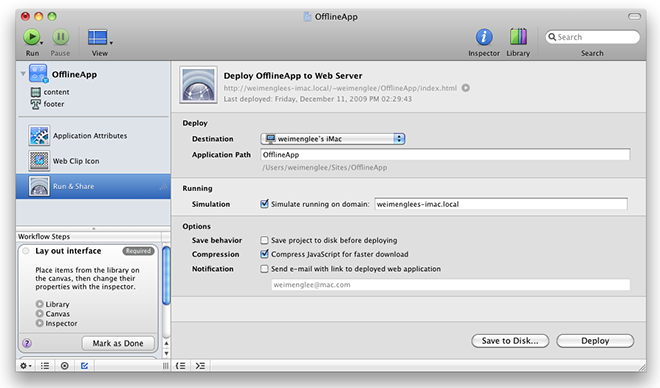
Figure 6. Deploying the app onto Apache
Using the iPhone Simulator, launch Mobile Safari and navigate to: http://<IP_ADDRESS>/~<LOGIN_NAME>/OfflineApp/index.html.
You will see that the application displays an alert indicating that it is online (see Figure 7).
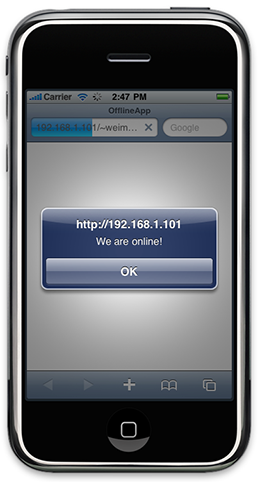
Figure 7. The application is currently online
To truly experience this application, you should ideally test it on a real device. Load the application using the Mobile Safari and then turn off the WiFi (or turn on Flight Mode) to disconnect it from the Internet. You might also want to add a book mark to the application.
Using Mobile Safari, reload the same application (through typing the same URL or using the bookmark) and this time round, it should display the “We are offline!” alert, proving that the application is loaded from the browser’s cache. In addition, if the device regains Internet access while the application is running, it will display an alert to inform you.
Client-Side Storage
Besides supporting offline storage, Mobile Safari also supports the various local storage facilities. In particular, for simple data storage you can use the key/value storage. Key/value storage is divided into two types – localStorage and sessionStorage. This section covers both. Instead of discussing the difference between the localStorage and sessionStorage, let’s create a simple project and examine the output.
Using Dashcode, create a new Custom project, save it and.name it as LocalData. Populate the content part with the Push Button parts as shown in Figure 8.
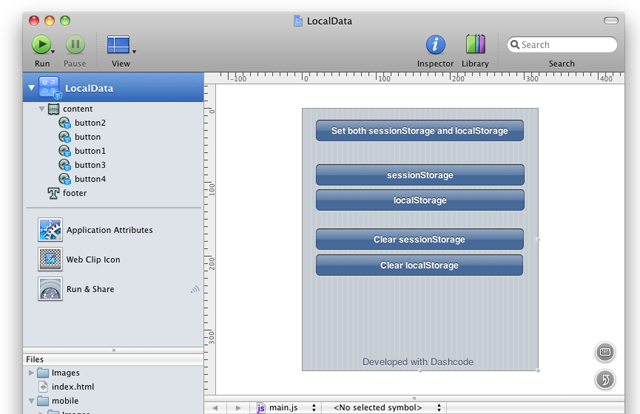
Figure 8. Designing the UI of the application
Right-click on each Push Button part and select Events’onclick. Name the event handlers for each button as follows:
- setClickHandler
- sessionStorageClickHandler
- localStorageClickHandler
- clearSessionStorageClickHandler
- clearLocalStorageClickHandler
In the main.js file, add the following code snippets:
//---using sessionStorage---
function sessionStorageClickHandler(event)
{
    alert("sessionStorage: " + sessionStorage.getItem("date"));
}

//---using local Storage---
function localStorageClickHandler(event)
{
    alert("localStorage: " + localStorage.getItem("date"));
}

//---using both session and local storage---
function setClickHandler(event)
{
    var d = new Date();
    localStorage.setItem("date", d);
    sessionStorage.setItem("date", d);
    alert("Set!");
}

//---clear the session storage---
function clearSessionStorageClickHandler(event)
{
    sessionStorage.clear();
    alert("Cleared!");
}

//---clear the local storage---
function clearLocalStorageClickHandler(event)
{
    localStorage.clear();
    alert("Cleared!");
}
Press Command-R to test the application on the iPhone Simulator (see Figure 9). Perform the following actions:
- Tap the first button to set both the session storage and local storage.
- Tap the sessionStorage and localStorage buttons to examine the values of the keys stored. You should see that the values returned by both the session and local storage.
- Rerun the application from within Dashcode.
- Tap the sessionStorage and localStorage buttons to examine the values of the keys stored. Observe that the value previously set for the sessionStorage is no longer available. In contrast, the localStorage still prints out the value set earlier. Hence, the sessionStorage is only valid for the duration of the session; it is purged when the window is closed and it is not shared with other windows. On the other hand, the localStorage is persistent and its value is still retained after the window closes and it is also shared with other window.
- Tap on the last two buttons to clear the values set for each key.
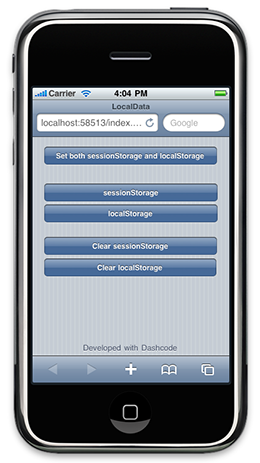
Figure 9. Testing the application
Summary
In this article, you have seen the technique to create an offline application that continues to work even after the device has disconnected from the Internet. In addition, you also saw the two different ways to store information on the client side – session and local storage. In the next article, I will show you how to create offline databases using Dashcode.


