


In a previous article, I put forward a three-point plan for testing mobile Web sites. One of the points involved the use of emulators for first-pass device testing. This article concentrates on configuring emulators for mobile site testing (it also highlights emulators that can be used to test mobile applications too). It outlines the different types of emulator available, the best ones to use, and the various ways in which they can be used.
For the uninitiated, an emulator is a software program that aims to replicate the functions of a specific piece of hardware or software.
About Device-Specific Testing
Desktop Web developers have it relatively easy – build in support for four or five browsers, and it’s job done. Not so on mobile. If you look at Wikipedia’s Mobile Browser page, you’ll see it lists at least 30+ different mobile browsers. In truth, there are probably many more. Look at the list of devices supported by DeviceAtlas and you’ll see it claims to support over 4,500. With these kinds of numbers in mind, how on earth are you supposed to test your Web site across all devices?
The simple answer is – you can’t. What you can do is test the site on at least one device from all popular manufacturers, and on as many of the mobile browsers as possible. This will give you a good idea of how the site works on different devices and will also help you to resolve any issues. The catch is making sure you have access to all of the necessary devices and mobile browsers. You may only be able to use one or two physical devices – not enough to adequately test on. But emulators can be used instead to allow you to simulate testing on the real device or browser. The benefits of this approach are many-fold:
- No data browsing charges are incurred, as all browsing is performed via your standard Web connection
- Quicker access to devices – starting an emulator is faster than switching sim cards and rebooting devices
- Provides access to a potentially large number of devices/browsers – the number of devices you can use is only limited by hard disk space and the number of emulators you can find
- Inexpensive – many emulators are available for free
Types of Mobile Emulator
Mobile emulators fall into three main categories:
- Device emulators – These are generally provided by device manufacturers and simulate the actual device. Device emulators are excellent for testing your site or application on a particular device or set of devices.
- Browser emulators – These simulate mobile browser environments. Whilst useful for determining the functionality available in a particular mobile browser, they are useless for device-specific testing.
- Operating System Emulators – Microsoft provides emulators for Windows Mobile, and Google provides an emulator for Android. These run within a simulated mobile device environment and provide access to applications running within the operating system, e.g. a Web browser.
Problems with Emulators
Emulators are great, but you should not assume that just because your site works perfectly on an emulator, it will function in the same way on the real device. Emulators can often differ in subtle ways from the devices they simulate; this is especially the case if the developer of the emulator is not the original creator of the device. Use emulators to cover a wide breadth of devices that you wouldn’t have access to, and fix any bugs you find; but make sure you test the site on some real devices too, just to be sure.
Popular Emulators
There are a large number of emulators available. The following companies offer emulators for some or all of their mobile devices (note the lists below are not exhaustive):
- Research in Motion (BlackBerry)
- Apple (iPhone)
- Samsung
- Palm
- LG
- Motorola
Operating system emulators are available from:
- Microsoft (Windows Mobile)
- Google (Android)
- Nokia (Series 40 and Series 60)
Some available browser emulators are:
- Opera Mini
- Openwave
There are also some generic emulators – mobiForge offers an emulator which can be skinned as a Nokia N70 or a Sony K750. This is a useful starting point for basic testing. Yospace sells a smartphone emulator that supports a number of devices. However, most of the devices supported are now out of date (the Nokia 6310i, for example).
Where Can I Find These Emulators?
Emulators can generally be found in one of three places:
- On a manufacturer’s development portal
- Bundled as part of an SDK
- As part of a Web site
You can always try searching for a specific emulator in your favourite search engine too, e.g. “iphone emulator”.
The remainder of this article will show you how to obtain, install, and use some freely available emulators. Some points to be aware of before we start:
- Many of these downloads are big, so make sure you don’t exceed your download limit
- Due to the size of the downloads, a fast Web connection is essential
- Many developer portals will ask you to register – this is usually a painless process
- As the emulators try to connect to the Internet, you may see firewall warnings; unblocking these will prevent them from reappearing
The emulators outlined in this article are grouped as follows:
- Web-based emulators
- Installable emulators
- Symbian-based emulators
- Emulators that can only be used to test applications
Web-based Emulators
Web-based emulators are easy and quick to access – no installation, no fuss. Just enter the correct URL and start testing.
Apple (iPhone) Emulators
What can be said about the iPhone that hasn’t been said already? The revolutionary device continues to take the market by storm. Unfortunately developing for the iPhone is somewhat locked down. You need:
- A computer running a version of OS X (i.e. an Apple Mac)
- The iPhone SDK
A full iPhone emulator is included as part of the iPhone SDK. To obtain this, register with Apple as a developer.
This isn’t much good to those of us running Windows. Fortunately, there’s a FREE iPhone simulator available on the Web. It can be found at testiphone.com.
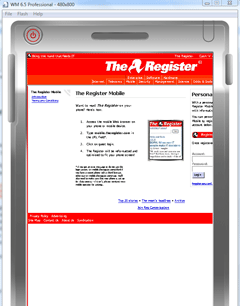
This provides a nice, quick way of testing your Web sites on a simulated iPhone. Just type in the URL of the site you want to test and hit ENTER (I’ve visited verymobile.mobi):
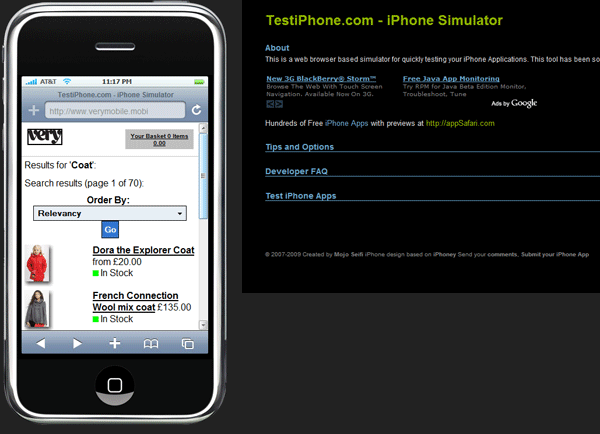
Testiphone.com simulator displaying verymobile.mobi site
Opera Mini
Opera Mini is probably the most popular user-installable browser. Opera offers an on-line simulator that allows you to run Web sites immediately. Head over to the demo site and enter the required URL into the browser. After a brief delay, the site will load:
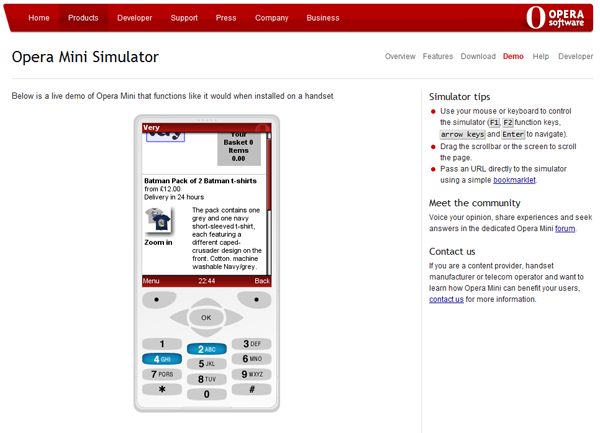
Opera Mini simulator
Installable Emulators
Many device manufacturers offer free emulators; after all, they want you to develop for their platforms. More developers = more applications = more users = more revenue. Details about how to obtain, install, and use some of the more popular emulators are below.
Research in Motion Emulators
In my opinion, RIM offers the gold standard in emulators (or “simulators” in RIM terminology). I’ve come across very few discrepancies – the mobile device almost always behaves like the real device would (in fact, the only time I know a difference was found was during development of a J2ME application – and it was minor). The RIM emulators are available from the RIM Developer Zone. You’ll need to sign up for an account. This is a pretty painless process – just click the Sign Up link on the right-hand side of the screen (near to the login dialog).
Downloading
Once you’ve signed up, click on the Web Development Tools & Downloads link. You’ll see a section entitled BlackBerry Smartphone Simulator. Click the link and a page will be displayed, listing lots of different simulators. Simulators are grouped by the BlackBerry version number.
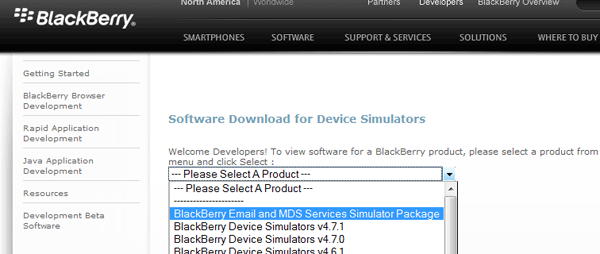
Blackberry simulator download options
You need to download at least two files:
- BlackBerry Email and MDS Services Simulator Package – This program simulates the BlackBerry Enterprise Server. You will not be able to connect the simulator to the Internet without it.
- Any BlackBerry Device Simulator – Clicking on a device simulator item in the drop-down list and clicking Next will display the simulators available in that group. You can download and install as many as you like.
The first item in the list is BlackBerry Email and MDS Services Simulator Package. Select this and click Next. A list of files will appear, offering different versions of the simulator. It’s generally OK to pick the latest version – if you find a simulator doesn’t work after downloading, download the matching MDS simulator package. Click on the Download link and you will be asked to enter your personal details. Rather annoyingly, you will be asked this every time you download a file, although checking the Remember Me box should pre-populate the data fields. Once your details are entered, click Next. You’ll now be asked to agree to the terms and conditions. If you agree, click Agree, then Next. A further set of terms and conditions are displayed. Click I Agree and Next to proceed.
You’ll finally be presented with a Download button. Click this and the file will begin downloading.
Repeat the process to download a device simulator package. Choose a BlackBerry Device Simulator from the drop-down list, and the site will display the device simulators available within that package. In the example below, I’ve selected BlackBerry Device Simulators v4.7.0, which offers lots of different devices:
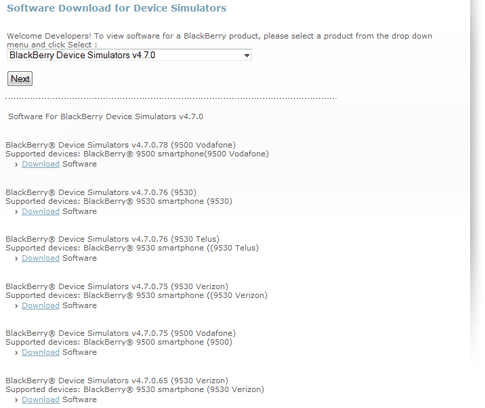
Blackberry device simulators for v4.7.0
Click on the Download link for the device required (I chose 9500 smartphone (for Europe)). Make sure you click the “I confirm this information is correct” radio button on the registration form. Once you’ve accepted the terms and conditions, you can download. Be aware the BlackBerry simulator files are BIG! The Europe 9500 file is almost 72MB in size.
Once the files are downloaded, you are ready to install.
Installing and Running
You should have two BlackBerry files on your computer. The two files I downloaded were:
- BlackBerry_Email_MDS_4.1.2.17.exe
- BlackBerry_Simulators_4.7.0.122_9500_Europe.exe
Install the MDS first. It’s a typical wizard based installation. A couple of clicks of the Next button and you should be done.
Once that’s installed, do the same for the device simulator package you downloaded. Again, just keep clicking Next until the install is complete.
Open up your Start Menu and browse. You should see a Research In Motion program group. To run a BlackBerry simulator, you need to start the MDS, then the simulator. The MDS sub-folder has three programs located within it. We’re interested in the MDS program, as this gives us Web connectivity. Click it and it will run in a command window. Make sure you unblock the program if your firewall complains about it. Once started, minimise or ignore the command window.
Now start up the device simulator from the Smartphone Simulators sub-folder in the Start Menu. The simulator will appear:
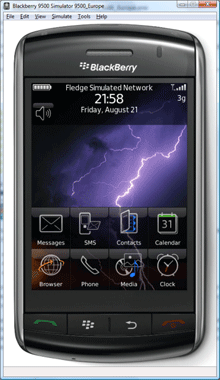
Blackberry device simulator
Now open up the Web browser on the device and browse to a mobile site of your choice (I’ve gone to www.verymobile.mobi again). One nice touch here is you can either type using your keyboard, or simulate typing using the simulator’s on-screen keyboard. After a couple of seconds, the mobile site will load:

Blackberry device simulator displaying a web page
Note that the site is perfectly formatted on the device; this site uses device detection technologies to ensure it renders correctly. The Web server thinks it is serving pages to a BlackBerry 9500, and to all intents and purposes it is. Powerful stuff.
Once you’ve finished with the simulator, close it as you would any normal Windows program. Just remember you also need to close the command prompt the MDS is running within.
Other great features of the BlackBerry simulators:
- Easy loading of Java programs via the File menu (for J2ME testing)
- Ability to map mouse buttons
- Take snapshots of the device or just the LCD
- Ability to go full-screen for presentation purposes
- Simulate events, such as incoming voice call (useful for applications that may be interrupted)
Remember there’s a huge number of BlackBerry device simulators available – in fact, there’s one for just about every BlackBerry there is. RIM are right on the ball when it comes to releasing them – the Storm simulator was available long before the device was. Use this powerful resource for testing and you won’t go far wrong.
Palm Emulators
Introduction and Downloading
Palm is making a big splash in the mobile world with its upcoming Pre. A Palm Pre emulator can be downloaded from the Palm developer site as part of the Mojo SDK. You need to register to download the SDK, which is available for Windows, Linux, and Mac. It is reliant on Java 6 and Virtual Box (Sun’s virtual machine software) being installed, links to both of which are provided on the download page. Again, be aware of the download size – Virtual Box is over 60MB and the Mojo SDK is around 176MB.
Installing and Running
Once you’ve downloaded everything, and made sure Java and Virtual Box are installed, you can install the Mojo SDK. Doing this is a snap; just click Next a couple of times. After installation is complete, a Palm folder will appear in your Start Menu. Click on this, then on SDK. You’ll see a Palm Emulator menu item. Click on this and the emulator will load (it runs as a VirtualBox virtual machine – you may receive a firewall warning):
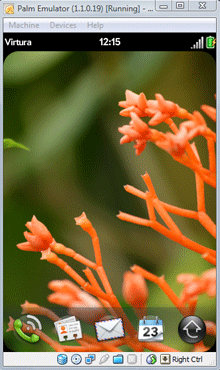
Palm Pre emulator
This emulator emulates a Palm Pre running the Palm WebOS. Click on the black arrow icon and the menu will appear. Click on Web to launch the Web browser. Type in the URL of the Web site you want to test and it will load up in the WebOS browser:
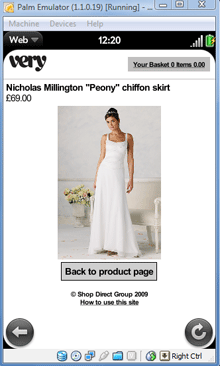
Palm Pre emulator displaying web page
This is a really powerful emulator and is well worth downloading. The Mojo API also contains lots of interesting sample projects, so download it and have a play.
Microsoft Emulators
Introduction
Microsoft has invested a lot in Windows Mobile, and continues to do so despite a relatively poor market share. A big benefit of developing for Windows Mobile is the ability to use a .NET language, and this attracts many developers to the platform. There are numerous issues with the operating system, which many are hoping will be fixed in version 7, due for release in 2010. An interim 6.5 release is due in September 2009.
There are numerous manufacturers of mobile handsets running Windows Mobile operating systems; the most prolific is HTC, which has been supplying Windows Mobile handsets for a number of years. Emulator skins are available for most Windows Mobile handsets from various manufacturers (Samsung for example).
Downloading and Installing
Note that if you are running Visual Studio 2008, there’s a chance you already have Windows Mobile emulation installed. This article assumes you do not have Visual Studio 2008 installed.
- Download and install Microsoft Device Emulator 3.0 (this is a standalone package – Visual Studio does not need to be installed)
- Download and install the emulator images for the Windows Mobile operating systems required (Windows Mobile 6, Windows Mobile 5, and Windows Mobile 2003SE are available – make sure you download the correct language version)
- Download and install Virtual PC 2007 to provide the emulators with Internet connectivity
- Download and install ActiveSync 4.5 (XP/2003) or Windows Mobile Device Centre (WMDC – Vista/2008)
Using and Configuring Microsoft Emulators
Once this little lot is installed (it will be heavy on your download bandwidth), open Windows Explorer. Microsoft Device Emulator does not add an entry to the Start Menu. Browse to C:Program FilesMicrosoft Device Emulator1.0 and run the dvcemumanager.exe program. This displays a management screen, listing all the types of emulator available to you:
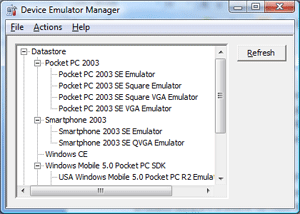
Microsoft emulator options
Highlight the emulator image required, right-click, and choose Connect from the context menu. This will start the emulator:
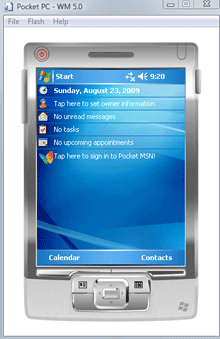
Microsoft Device emulator
However, if you try to connect to a Web site using Pocket Internet Explorer you’ll be told you cannot connect. This is because three things need to happen before the device can connect to the Internet:
- It must be cradled – The emulated device needs to connect to ActiveSync or WMDC. To do this, return to the Device Emulator Manager, right-click on the emulator image currently running (it will have a green “play” icon next to it) and select the Cradle option. The icon will change to a small linked pipe
- The network card must be bound to the device – This is why Virtual PC is required. The emulator window provides three menus – File, Flash, and Help. Click on File and choose Configure. Click on the Network tab and check the “Enable NE2000 PCMCIA network adapter and bind to:”. You should see Connected Network Card selected in the drop-down list. It’s usually fine to leave this as is; but feel free to change it if required. Click OK to save your selection
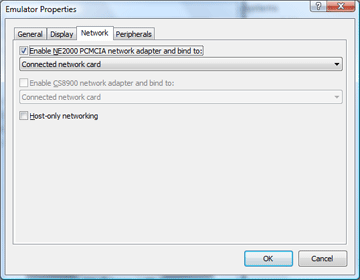
Microsoft emulator network options - Windows Mobile must be told the network card is used to connect to the Internet – This needs to happen within the emulated operating system itself. Depending upon the version of Windows Mobile used, you need to browse to the Connections section. This is usually accessed via Start/Settings/Connections. Once you’re there, click Network Cards. In the box that reads “My network card connects to”, choose The Internet. Click OK/X a few times to return to the home screen
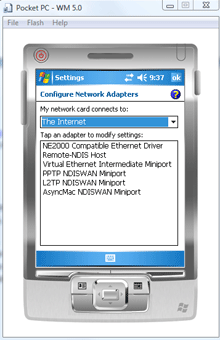
More Microsoft Device Emulator networking fun
This is all a bit long-winded, but once you’ve done it you can save the configuration so you don’t have to do it again. You do need to repeat the process for each emulator image though.
Finally, you can test out a Web site on Windows Mobile. Click Start, then Internet Explorer. Type in the URL required and it will appear in the emulator.
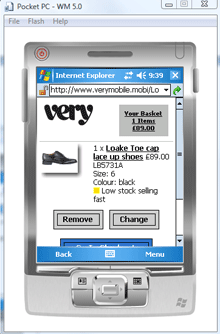
Microsoft Device Emulator displaying web page
As an alternative to the steps above, you can download full SDKs for the more recent versions of Windows Mobile. SDKs, including emulators, are available for Windows Mobile 6 and Windows Mobile 6.5. If you install either of these, a Start Menu folder called Windows Mobile 6 SDK is created. This contains a Standalone Emulator Images sub-folder, and within this are a number of emulators. Click on the emulator required to start it – here’s a screenshot of what should be The Register’s mobile site running under Internet Explorer on Windows Mobile 6.5 (you’ll still need to go through the process of configuring the network card and setting it to use “The Internet” in the operating system, but you shouldn’t have to cradle the device):
Microsoft Device Emulator displaying full desktop web page
Windows Mobile 6.5 tries to identify itself as a desktop browser (it loads the desktop version of the BBC Web site, for example), so mobile sites don’t render correctly. This is something to think about whilst testing for Windows Mobile 6.5.
Microsoft does not make it easy to install Windows Mobile emulators, but once you’ve set them up they’re generally nice and easy to use. It’s well worth it if you need to target the platform as part of your development strategy.
Android Emulator
Introduction
The Android operating system, backed by Google and other major industry names, currently seems best placed to challenge Apple’s perceived dominance of the smartphone market. Android is certainly here to stay for the foreseeable future, so it makes sense to test your applications on it (or at least a virtual version of it). There’s a bit of work involved in setting up the emulator, but once you’ve done this you can test mobile Web sites in addition to debugging applications.
Downloading and Installing
As with almost all emulator providers listed in this article, start by visiting the developer portal. Also as with most emulator providers, you have to download the full SDK in order to obtain the emulator. It’s another big download I’m afraid.
You need to have the Eclipse Development Environment installed to use the Android SDK. Ensure you download a Java version of Eclipse. To install the entire Android environment is a long-winded process:
- Unzip the downloaded Eclipse file and save it to a folder of your choosing
- Unzip the downloaded Android SDK and save it to a folder of your choosing
- Copy the location of the Android SDK’s tools folder to the clipboard
- Go to the Start Menu, right-click on Computer, and choose Properties
- Click on Advanced System Settings, and then on Environment Variables
- In the System Variables list, find the Path variable
- Highlight Path, click Edit, and press the End key to move to the end of the string
- Type a semi-colon, then paste in the location of the Android SDK’s tools folder
- Click OK to save the settings
- Run Eclipse, and once it has opened, click on Help/Install Software
- In the Work With box, type https://dl-ssl.google.com/android/eclipse/
- After a few seconds, Eclipse will connect to the site and Developer Tools will be listed
- Check the box next to Developer Tools, then click Next twice
- Accept the terms and conditions, then Finish. This will install the Android plug-ins for Eclipse
- Restart Eclipse when prompted
- After Eclipse restarts, go to the Window menu, and click Preferences
- On the left-hand side of the screen, click Android. Then click the Browse button next to SDK Location
- Browse to the folder you saved the Android SDK to, then click OK
- Click Apply. After a few seconds, a couple of SDK Targets should appear in the list
- Close the Preferences window, click on the Window menu again, and this time choose Android AVD Manager
- Create an Android Virtual Machine (AVD). Set a name, Target platform, and skin
- Click Create AVD, then Finish
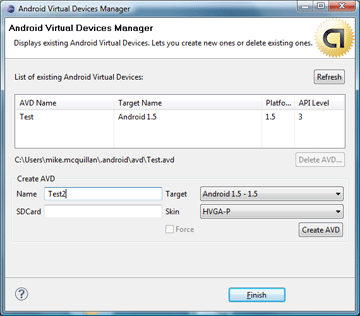
Creating Android Virtual Device Manager set up
It’s almost time to see the Android emulator in action. To do this, we need to create a new project. In Eclipse:
- Click File/New/Project
- In the dialog that appears, choose Android/Android Project
- Click Next, and specify a project name (e.g. HelloWorld)
- Choose the required development platform(s), e.g. Android 1.1)
- Choose an Application Name, Package Name, and Create Activity name. In this example I’ve selected HelloWorld, com.android.tests, and HelloWorld
- Once all the above is entered, click on Finish to create the project
- The code generated in the file
HelloWorld.javawill read:package com.android.tests; import android.app.Activity; import android.os.Bundle; public class HelloWorld extends Activity { /** Called when the activity is first created. */ @Override public void onCreate(Bundle savedInstanceState) { super.onCreate(savedInstanceState); setContentView(R.layout.main); } } - Paste in this code instead (this is just about the most basic Android project you can create; we just want a basic project to start the emulator):
package com.android.tests; import android.app.Activity; import android.os.Bundle; import android.widget.TextView; public class HelloWorld extends Activity { /** Called when the activity is first created. */ @Override public void onCreate(Bundle savedInstanceState) { super.onCreate(savedInstanceState); TextView tv = new TextView(this); tv.setText("Hello Android World"); setContentView(tv); } } - You should now be able to compile the application and run it on the emulator. To do this, click on the Run menu, click Run, and then choose Android Application from the list that appears
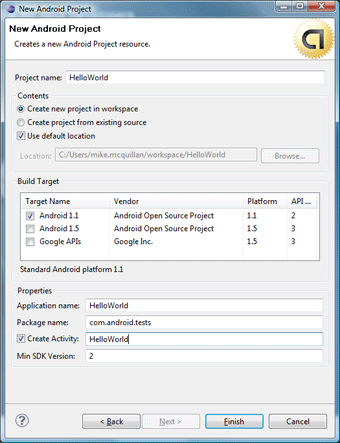
Creating an Android Project in Eclipse
The emulator will take a short while to load and you’ll see an Android logo whilst it is doing this. Once loaded, the Hello World application is displayed:

Android Hello World app
It’s easy to load up and debug your Android applications. It’s also easy now to test mobile Web sites. Click on the Home button, then on the Browser icon. This launches the Web browser. Enter the URL you require and it will load up (Use MenuGo to enter a URL):
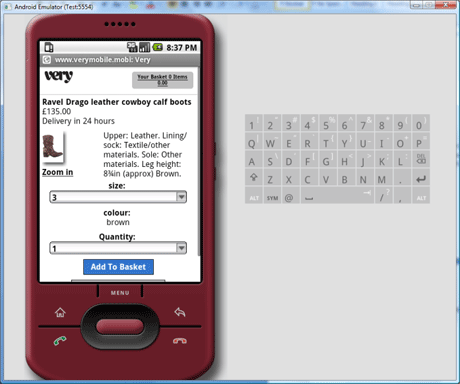
Android Emulator displaying web page
You can add Motorola emulators to Android by downloading the MOTODEV Studio for Android from the Motorola developer portal.
Openwave
Openwave’s browser is used on several handsets. The company provides a simulator, freely available for download (subject to registration). Registration only takes a moment, and the download itself is a relatively small 6.5MB in size. Unfortunately I couldn’t download from the Openwave site as the link was broken. Typing openwave_v70_simulator.exe into Google rectified the problem however.
Installation is the usual process of clicking Next. To launch the emulator, open the Start Menu and find Openwave v7 Simulator, expand it, and click Openwave v7 Simulator.
Open the browser in the emulator that appears, enter a URL, and the site will load:
Openwave state different types of device skins can be loaded.
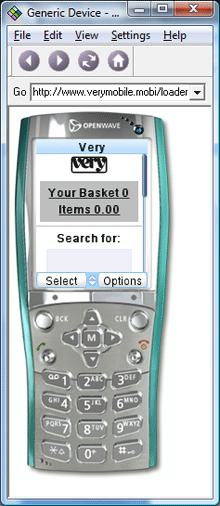
Openwave simulator
Symbian-based Emulators
Thanks to Nokia’s adoption of the platform, Symbian is one of the most prevalent platforms used on mobile devices (it’s also used on some Sony and Samsung devices amongst others). There are SDKs available for the various Symbian flavours. We’ll concentrate on the Series 60 SDK. Manufacturers are free to include different emulators with the SDK, as you’ll see. The included emulators can be used to test mobile applications as well as Web sites.
Symbian S60 Emulators
We highlight two installations of the S60 SDK here – one provided by Samsung, and another by Nokia. Both of these organisations offer development portals:
The SDK download from either of these sites is around 600MB. You’ll need to register with both sites to download. As both of these SDKs are essentially the same, they both have the same pre-requisites; you need to have Perl 5.6.1 or higher already installed (you will see a warning if this is not installed – the link points to the Strawberry Perl installer).
When installing, you’ll notice the emulator is the only component that must be installed (choose the Custom set-up type to see optional components). If you only require the emulator, uncheck all other options; otherwise, select the required items before clicking Next. If you have no plans to develop Symbian applications, it’s worth unchecking the various options, as this installation will use a lot of space on your hard disk (1.74GB approx). The emulator alone requires over 1GB of space.
If you do want to develop Symbian applications, you’ll need the Eclipse development IDE. The installer will prompt you for the location of this (you can leave it blank if you don’t use Eclipse).
Samsung Emulators
To download the Symbian SDK from Samsung, click the Symbian link on the home page.
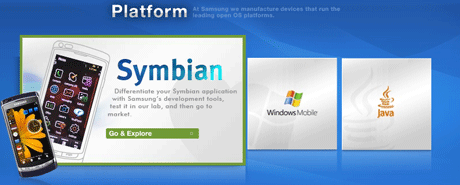
Samsung Symbian homepage
On the page that loads, click on S60 5th Edition SDK in the Tools & SDKs list. Download v1.0 of this SDK (this is the latest version available at the time of writing).
Once installation has completed, there will be a S60 Developer Tools entry in the Start Menu. One of the links is to an Emulator. Click on this and the emulator will load.
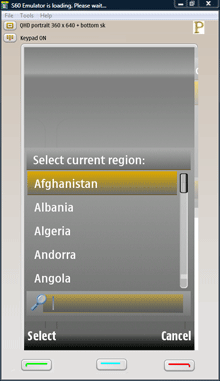
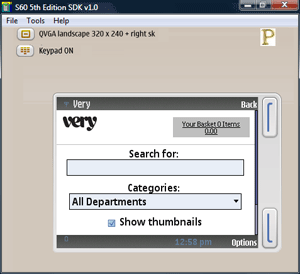
S60 Emulator
Select the required country from the list, then the required city. Set the date and time and you’re presented with the home screen. Click on the browser icon to open the Web browser. Type in the required URL and it will appear on-screen.
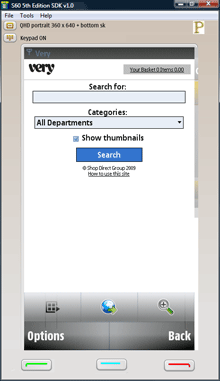
S60 Emulator displaying web page
You can change the layout of the screen. The default is 360×640. Clicking on the icon next to QHD portrait… at the top of the screen will cycle through the available layouts.
S60 Emulator with screen in landscape
This is useful if you are resizing images dynamically in your mobile site; the options available can be used to determine whether images are being resized correctly.
Nokia Emulators
Considering Nokia is the largest manufacturer of mobile devices in the world, there are surprisingly few emulators available for their devices. In fact, it seems there aren’t any at all, other than the emulators included in the SDKs (Yospace did offer some Nokia emulators but they are all quite old devices now, and Nokia themselves haven’t released a standalone emulator since 2004).
SDKs can be obtained from Forum Nokia. There are many SDKs available; I’ve downloaded the version for the Nokia N97. At the end of the Nokia installation, you are asked to select the default device. There are two options – Nokia N97 or s60 5th Edition.

Choosing Nokia device emulator
Make sure Nokia N97 is selected, then click Next and Finish to complete the installation. To run the emulator, go to the Start Menu, find the Nokia Developer Tools folder, and drill down until you hit the program list. Click on Emulator and the Nokia N97 emulator will load (make sure you unblock any firewall requests).
The process is the same as using the Samsung Symbian emulator; choose a country, then a city, set the date and time, and you’ll arrive at the device home screen. The first time I tried to load up the Web browser I received an error:
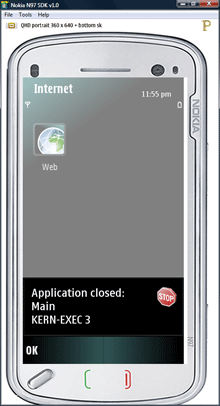
Nokia N97 emulator
This happens if any widgets are running on the home screen. Rebooting the device should resolve this. Once the browser opens, enter a URL and the site will load up.
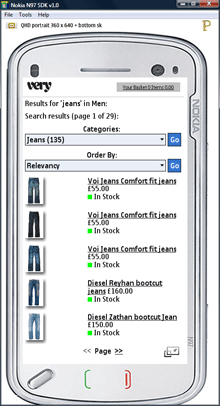
Nokia N97 emulator displaying webpage
As with the Samsung version, this emulator can also be used to test mobile applications.
Emulators Used For Application-only Testing
Some SDKs provide emulators that can only be used to test mobile applications. Many of the J2ME SDKs are cases in point. Whilst this renders them useless for mobile site testing, it provides application developers with a useful and quick way to debug applications.
The J2ME SDKs are all reskinned versions of kToolbar, a minimal but useful Java development environment. Installing this is easy; unzip the downloaded file, and keep clicking Next until installation is complete. Download size is around 60MB per version of the SDK. You need to be running the Java 2 SDK 1.6 or later to install any of the J2ME SDKs.
J2ME Emulators
Samsung
Samsung’s Java toolkit includes a number of device emulators. To download this, visit the Java section of the Samsung Innovator Web site, and click on the link for the SDK required in the Tools & SDKs list (I chose v1.1, released on May 28th 2009). Once installed, you’ll see a Samsung SDK 1.1 for the Java(TM) ME Platform entry in your Start Menu. This contains a number of programs. Opening up KToolbar displays a mini development project management environment, which comes with a number of sample projects. Open up one of these and click on the Devices tab. Choose Samsung-Devices from the drop-down list and a number of Samsung devices appear on-screen.
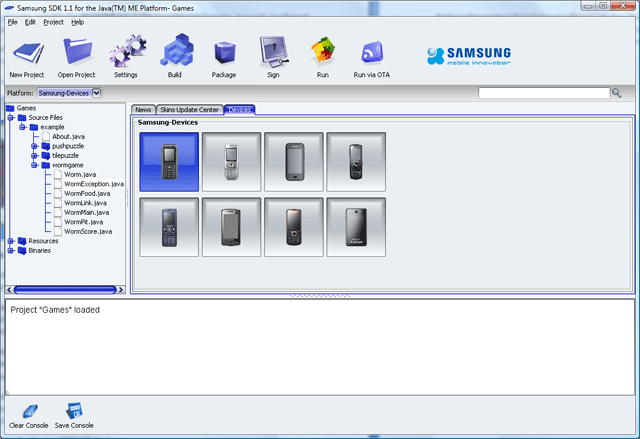
Choosing device emulator in Samsung SDK
Highlight one of these devices and click the Run icon on the toolbar. This starts the project in the required emulator. There is a Run MIDP Application link in the program group, which points at the emulator executable. This had no effect on my Vista SP1 machine, you may have more luck.
The emulators work well with the Java projects, but do seem a bit slow (SGH-J700 sample displayed below).
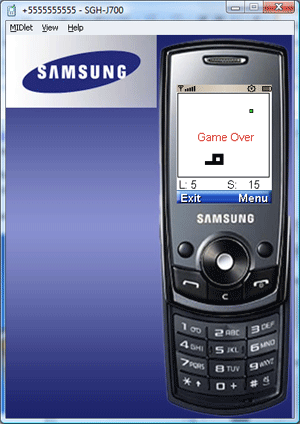
Samsung SGH-J700 device emulator
LG
LG are one of the doyens of mobile; they’re the third-largest mobile phone manufacturer in the world. The company provides a detailed developer portal, which offers numerous tools. One of these is a Java ME SDK, and it includes an emulation environment for testing purposes. Once you’ve pointed your browser at LG’s developer site, click on the Java SDK and Skin Package link. There are currently three versions of the API, all of which contain an emulator; it’s best to download the latest. You’ll also see lots of skin packages; these allow you to set the emulator skin to various LG devices. You don’t actually need to register to download LG’s SDK – just click on the link and wait for the file to download. The same goes for the skins. It’s best not to download the skins separately; instead, use the Skins Update Center in the LG development environment.
After everything has installed, look in your Start Menu for a folder called LG SDK 1.3 for the Java(TM) ME Platform. There’s a program item with the same name; click this to open the development environment.
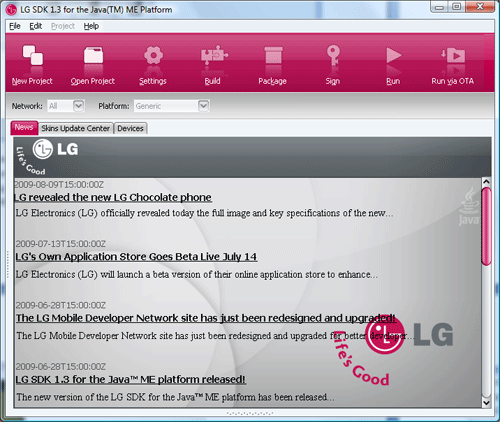
LG SDK
After opening a project, select the required target platform from the drop-down list – either LG MIDP 2.0 or LG MIDP 2.0 MVM. Different devices will be displayed depending upon the selection made (there’s also a generic LG device). Highlight the device required and click the Run toolbar icon. The application will run and be displayed on the emulator:
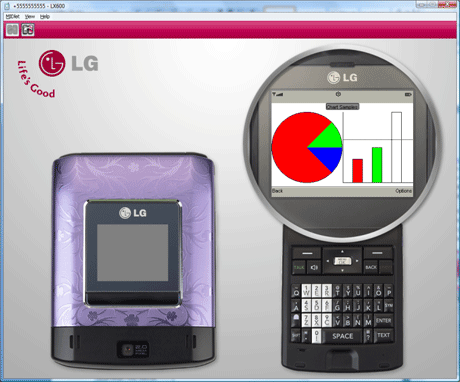
LG device emulator
Summary
This article does not purport to list every mobile emulator available; others are out there (e.g. the BREW SDK contains a BREW emulator). It does give a good overview of a number of free emulators and outlines how to install, configure and use said emulators to test mobile sites and applications. Many of the emulators come as part of an SDK, so you can start building and testing using them straightaway.
Emulators give you access to many platforms and “devices” that you may not have been able to test on otherwise. Whilst it is wise to exercise caution when using an emulator (remember there may be slight differences between the emulator and the “real thing”), they generally give a good indication of whether something will work on the real device or not. Emulators can save you a lot of money and time, so try using them as part of your test plans.


19 Comments
i now understand why android emulator is slow. It requires java runtime therefore it’s written in Java! They should make it a native app to make it 10x faster
That was a very informative article.
Thx a million
yes, ditto – much appreciated!
Regarding testing web sites on testiPhone.com; you should use the Safari browser with a User Agent string for the iPhone. This way your CSS3 media queries should work 😉
If you are trying to get the Android Emulators going, and are having trouble because no targets are found after setting up the SDK in Eclipse, check out [url=http://www.mail-archive.com/[email protected]/msg18517.html]this link[/url]. It helped me, and it may help you too!
http://www.mail-archive.com/[email protected]/msg18517.html
awesome reference! bookmarked!
btw, not long ago Opera also release an Opera Mobile emulator. you might wanna add this to your list.
http://www.opera.com/developer/tools/
Hello,
This is quite useful.Thanks for drafting it nicely.
Could you please let me know the below details:
1. What all are browsers supported by Blackberry OS
2.History of Blakcberry OS( from 1st version to till date)
3.Which is thebest emulator for Blackberry
Thanks in Advance
Hi Ranjith
It’s difficult to say which is the best emulator for Blackberry. They are all pretty good so it’s just a case of you choosing which devices you want to target.
All Blackberry devices run a proprietary browser, but browsers such as Opera Mini can be installed.
Unfortunately I can’t really help you on the history of the Blackberry OS, you’ll need to have a look around the Web for information on that.
I need simulator which have A-GPS.Can you hepl me?thank you
Once launched, the emulator is already connected to your network but you must configure windows mobile’s network settings. From witih Windows Mobile, go to Settings, Connections, Network Cards and select NE2000 Compatible ethernet driver. Check that the emulator is succesfully connected to the Internet. If failed make sure that you are connected to the correct network from the upper tray icon. bike accident lawyer