


In my previous article on Windows Phone 7 development, I showed how you can quickly get started using Visual Studio 2010 together with the Windows Phone Developer Tools. In this second article in the series, I will discuss a topic that is garnering a lot of interest in recent years -location services. Location services usually involve two key components – getting your location data and displaying your location on a map. Hence in this article, I will first show you how to display a map in your Windows Phone 7 application and then use the Location Service APIs to obtain your current position.
Displaying BingMaps
First things first, let’s learn how to display a map in your Windows Phone 7 application. Using Visual Studio 2010, create a new Windows Phone Application project and name it as BingMaps.
In the Toolbox, drag and drop the Map control (see Figure 1) onto the main page of the application.
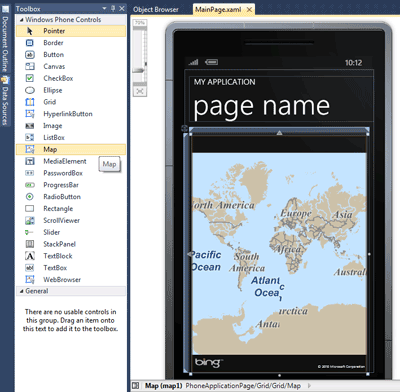
Figure 1.Adding the Map control to the main page of the application
Resize the map control so that it fills the screen as shown in Figure 1. Alternatively, you can also edit the mainpage.xaml file by adding the following
Press F5 to test the application on the emulator. You should see the map displayed in the emulator as shown in Figure 2.
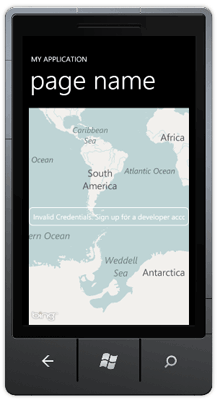
Figure 2. The Bing Maps contained within the application
Observe carefully that there is a message displayed in the middle of the map. Turns out that in order to use the Bing Maps in your Windows Phone application, you need to apply for a free map key. If not, the message will always be displayed on the map.
Registering for a Bing Maps API key
To register for a free Bing Maps API key, head over to https://www.bingmapsportal.com/. You will need to have a Windows Live ID (see Figure 3). If you already have one, click the Sign In button to sign in.
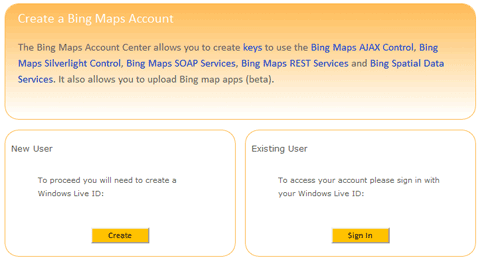
Figure 3. Creating a Bing Maps account
Once you have signed in, click the Create or view keys link and enter the information as shown in Figure 4.
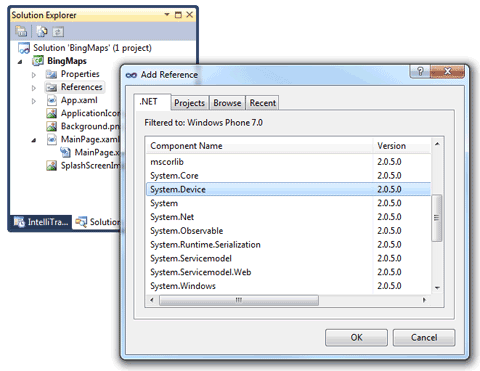
Figure 4. Applying for a free map key
Once the key is obtained, enter it by adding the CredentialsProvider attribute to the
<Grid x:Name="ContentPanel" Grid.Row="1" Margin="12,0,12,0">
<my:Map Height="601" HorizontalAlignment="Left"
Margin="6,6,0,0" Name="map1" VerticalAlignment="Top" Width="444"
CredentialsProvider="xxxxxxxxxxxxxxxxxxxxxxxxx" />
</Grid>
When you now rerun the application again, the message appearing on the middle of the map will now go away.
Obtaining Location Data
Displaying the map by itself is interesting, but it would be even better if you can get your current location coordinates and then use the map to display your position. In Windows Phone 7, the Location Service APIs are all encapsulated in the System.Devicedll. The Location Service APIs allows you to obtain your geographical location through the use of GPS, cellular triangulation, and Wi-Fi triangulation. Best of all, all the complexities of resolving the location is hidden from the developer through this set of APIs.
To use the Location Service APIs, you need to add a reference to the System.Devicedll. Right-click on the References folder in Solution Explorer and select Add Reference…. Select the System.Devicedll and click OK (see Figure 5).
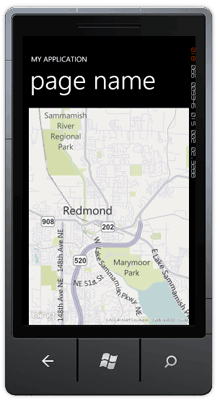
Figure 5. Adding a reference to the System.Devicedll
To make use of the classes in the System.Devicedll, first import the System.Device.Location namespace in the MainPage.xaml.cs file:
using System;
...
usingMicrosoft.Phone.Controls;
usingSystem.Diagnostics; //---for Debug.WriteLine()---
usingSystem.Device.Location;
To use the Location Service API, create a variable of type GeoCoordinateWatcher:
public partial class MainPage : PhoneApplicationPage
{
GeoCoordinateWatcher watcher;
  // Constructor
  publicMainPage()
  {
    InitializeComponent();
  }
In the constructor for the page, instantiate the GeoCoordinateWatcherclass and set its properties and event handlers as follows:
public partial class MainPage : PhoneApplicationPage
{
GeoCoordinateWatcher watcher;
    // Constructor
    publicMainPage()
    {
      InitializeComponent();

      if (watcher == null)
      {
        //---get the highest accuracy---
        watcher = new GeoCoordinateWatcher(GeoPositionAccuracy.High)
        {
          //---the minimum distance (in meters) to travel before the next
          // location update---
          MovementThreshold = 10
        };

        //---event to fire when a new position is obtained---
        watcher.PositionChanged += new
        EventHandler<GeoPositionChangedEventArgs
        <GeoCoordinate>>(watcher_PositionChanged);

        //---event to fire when there is a status change in the location
        // service API---
        watcher.StatusChanged += new
        EventHandler<GeoPositionStatusChangedEventArgs>
        (watcher_StatusChanged);
          watcher.Start();
    }
  }
Here is the method to handle the event when the location service changes its status:
void watcher_StatusChanged(object sender, GeoPositionStatusChangedEventArgs e)
{
  switch (e.Status)
  {
    caseGeoPositionStatus.Disabled:
    Debug.WriteLine("disabled");
    break;
    caseGeoPositionStatus.Initializing:
    Debug.WriteLine("initializing");
    break;
    caseGeoPositionStatus.NoData:
    Debug.WriteLine("nodata");
    break;
    caseGeoPositionStatus.Ready:
    Debug.WriteLine("ready");
    break;
   }
}
Here is the method to handle the event when a new location is found:
void watcher_PositionChanged(object sender,
GeoPositionChangedEventArgs<GeoCoordinate> e)
{
  Debug.WriteLine("({0},{1})",
  e.Position.Location.Latitude, e.Position.Location.Longitude);
}
In this case, the newly found location can be accessed through the GeoCoordinate argument.
Unfortunately, the Location Service APIs require a real device to work; the emulator does not return any location data.
Navigating the Map to a Particular Location
With the location data obtained, you can now display the current location using the map. You change the center of the map through the Center property:
voidwatcher_PositionChanged(object sender,
GeoPositionChangedEventArgs<GeoCoordinate> e)
{
  Debug.WriteLine("({0},{1})",
  e.Position.Location.Latitude, e.Position.Location.Longitude);

  map1.Center = new GeoCoordinate(
  e.Position.Location.Latitude, e.Position.Location.Longitude);
}
The Center property takes in a GeoCoordinate object.
Manipulating the Map
Besides making the map display a particular location, you can also change the zoom level of the map through its ZoomLevel property:
map1.ZoomLevel = 13;
Figure 6 shows the Bing Map display at zoom level 13. The bigger the zoom level, the more details will be displayed by the map.

Figure 6. Displaying the map at zoom level 13
You can also display the Zoom bar – two buttons containing a “+” and a “-“, to zoom in and out of the map. While you can use the pinch gesture (multi-touch) on a real device to zoom in and out of the map on a real device, the zoom bar is useful when testing the application on an emulator:
map1.ZoomBarVisibility = System.Windows.Visibility.Visible;
Figure 7 shows the zoom bar displayed at the bottom of the map.
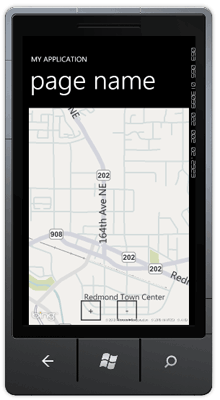
Figure 7. Displaying the zoom bar at the bottom of the map
Besides the default mode that the map is showing (road mode), you can make the map display in aerial mode through the Mode property:
map1.Mode = new Microsoft.Phone.Controls.Maps.AerialMode();
Figure 8 shows the map in aerial mode.
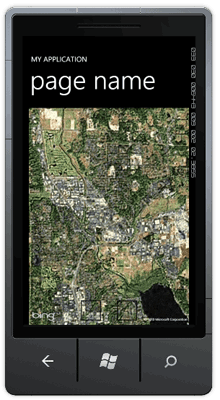
Figure 8. Display the map in aerial mode
Adding Pushpins
Another common task you usually do with a map is adding pushpins. Adding a pushpin to the map allows you to indicate clearly the location you are currently displaying. To add a pushpin to the map, you will use the PinPush class located in the Microsoft.Phone.Controls.Mapsnamespace, hence you need to import it before using it:
using Microsoft.Phone.Controls.Maps;
The following code snippets add a pushpin at a particular location:
map1.Center = new GeoCoordinate(47.676289396624654, -122.12096571922302);
map1.ZoomLevel = 22;

//---create a new pushpin---
Pushpin pin = new Pushpin();

//---set the location for the pushpin---
pin.Location = new GeoCoordinate(47.676289396624654, -122.12096571922302);

//---add the pushpin to the map---
map1.Children.Add(pin);
Figure 9 shows the default pushpin(which is not a very attractive image) at the center of the map.
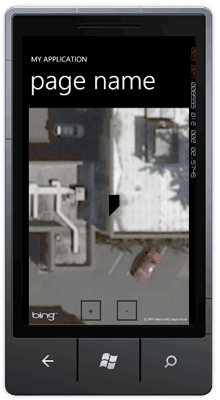
Figure 9. Displaying the default pushpin
The content of the pushpin takes in XAML content, hence you can draw some UI elements to replace the default pushpin image. The following code snippets show how you can draw an ellipse inside the pushpin and then display an image inside the ellipse:
//---use an ImageBrushobject and fill it with an image from the web---
ImageBrush image = new ImageBrush()
{
  ImageSource = new System.Windows.Media.Imaging.BitmapImage
                    (new Uri("http://www.clker.com/cliparts/e/d/9/9/1206572112160208723johnny_automatic_NPS_map_pictographs_part_67.svg.med.png"))
};

//---draw an ellipse inside the pushpin and fill it with the image---
pin.Content = new Ellipse()
{
  Fill = image,
  StrokeThickness=10,
  Height = 100,
  Width = 100
};

//---add the pushpin to the map---
map1.Children.Add(pin);
Figure 10 shows the new pushpin displayed on the map.
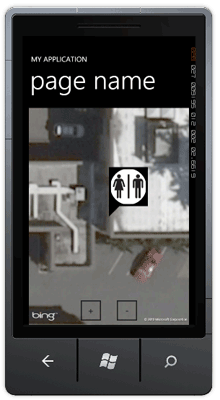
Figure 10. The new customized pushpin
Summary
This article shows how to use the Location Service APIs together with the Bing Maps control in your Windows Phone 7 application. Effective use of these two key technologies allows you to build very compelling applications. In the next article, I will talk about the concepts of launchers and choosers in Windows Phone 7.


