


Many mobile phones today support the Location API for J2ME under JSR-179. Using the location API, you can easily develop useful location based mobile Java applications. In this article, we demonstrate how to develop and test a mobile location based client server application using JSR-179, servlets and Google Maps. The TrackMe application will enable anyone to track a mobile phone’s location on a Google Maps Mashup, and in addition, where available, Google’s Street View will give an impression of the neighborhood.
The first part of the article will show how to build, configure and deploy a MIDlet that captures the mobile phone’s GPS coordinates and updates a web server with the new data using the Generic Connection Framework (GCF) over the HTTP protocol. In the second part you will learn how to calculate the device’s heading and how to visualize the its location on an AJAX powered Google Maps Mashup.
So, let’s get to it!
In order to build the location based application we need of course a Java MIDP2.0 enabled and JSR 179 compliant mobile phone. In theory, the JSR is able to obtain location data from a number of different technologies, such as cell triangulation, WI-FI triangulation or GPS signals. In this example we will focus on the use of GPS positioning, and we will work with the WGS84 data obtained by the phone’s GPS unit. A word of caution: if a device lists the JSR 179 API in its specifications, it does not necessarily mean that it has a built-in GPS unit, but that it provides the javax.microedtition.location package and either has an internal unit or is capable of connecting an external unit, using Bluetooth technology underneath. For example all Nokia devices on the S60 3rd Edition Platform support the API; however only some Nokia devices, such as the E71, E66, N95, N96, 6210 Navigator, have a built-in unit. (Footnote check, http://www.forum.nokia.com/ for full device specifications). When a device is lacking the location JSR, external GPS units can still be used by the Bluetooth API (JSR 82). The technique involves parsing the GPS’ MNEA strings manually but is not covered by this article. Of course outside the J2ME world, there are other solutions to obtain GPS-data, for example the Google Android platform also provides GPS access.
Getting started
For this article we make the assumption that you are somewhat familiar with MIDlets and the corresponding development tools. In the case that you are not, there are many good tutorials online. My personal favorites are Eclipse with the EclipseMe plugin for writing code and the Sun Java Wireless Toolkit 2.2.5 for CLDC or the Motorola iDEN SDK for J2ME (MIDP 2_0) for building, packaging and emulating. Developing location based applications is a bit tricky, and you might not want to do it on a real device right away for one simple reason: GPS signals do no travel inside buildings. And of course if you’d like to see something happen, you’d have to physically move around a lot. Luckily both the WTK and the iDEN SDK support the playback of GPS traces. The downside however is that they both use different file formats. Most GPS units store their data in either NMEA format or in GPX format. A very useful tool is gpsbabel-1.3.3 which can translate many GPS formats, although unfortunately not to the WTK’s format I’m going to use in part one.
Part I: The TrackMe MIDlet
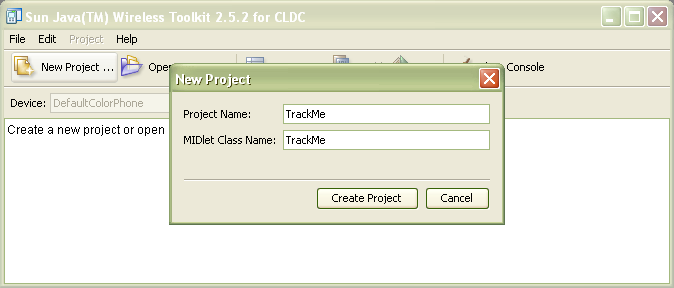
Once you have installed the Sun’s WTK 2.2.5, you can create a “New project…” which will ask you to fill in the project name and the MIDlet class name. Enter “TrackMe” in both fields and click “Create Project” as shown in figure.
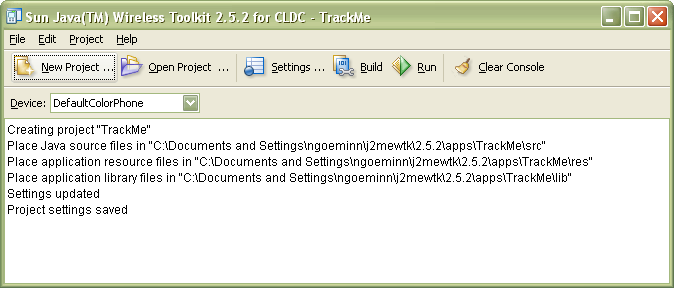
This will bring up the projects settings dialog box. Depending on your phone capabilities choose the “Custom” target platform in the “API Selection” tab. In my case I’ll be targeting the Nokia N95, which has the MIDP 2.0/CLDC 1.1 platform. I checked the Location API and unchecked everything else. Click on “Required” and change the value of MIDlet-Vendor from “unknown” to your name. Since we will use the location API and the network we’ll need to define the MIDlet-permissions. Go to the “Permissions” tab and “Add” the javax.microedition.location.Location and javax.microedition.io.Connector.http permissions. If your MIDlet is signed, these permissions will be automatically granted by the phone, otherwise it will ask the user permission to fetch the location data or make a network connection. Most mobile phones allow three states for setting permissions of non or self-signed MIDlets; “Allow Never”, “Ask Every Time” or “Ask First Time”. Allowing permissions without user interaction cannot be achieved for non- or self-signed MIDlets. If for example you will want to use the javax.microedition.location.Orientenation class in one of your other projects do not forget to add the corresponding permissions here. Finally, once you click “Ok”, the project will be created in a folder called TrackMe, and this will be indicated in the toolkit’s console.
We are now ready to start coding. Create a new java source file called “TrackMe.java” with whatever editor you like and place it in the newly created TrackMe/src subfolder. Since we are creating a small MIDlet, let’s start with the standard skeleton. I’ve added a basic layout: a form, some buttons to start, stop and exit the application, a text field to enter the users email address (which we will upload to the server as well), a text field to input the update interval and finally an information label where we can display the current location. I’ve also added the button’s event code.
Here’s what we have so far:
import java.util.*;

import javax.microedition.midlet.*;
import javax.microedition.lcdui.*;

public class TrackMe extends MIDlet implements CommandListener {

  private Display display;
  private Form form;
  private Command exit = new Command("Exit", Command.EXIT, 1);
  private Command start = new Command("Start", Command.SCREEN, 1);
  private Command stop = new Command("Stop", Command.SCREEN, 1);
  private TextField email =
    new TextField("Email","[email protected]", 50,
                   TextField.EMAILADDR);
  private String emailstr = "[email protected]";
  private TextField interval =
    new TextField("Update Interval(sec)","1", 5, TextField.NUMERIC);
  private int sec = 1;
  private StringItem info = new StringItem("Location:","unknown");

  public TrackMe(){
    display = Display.getDisplay(this);
    form = new Form("TrackMe");
    form.addCommand(exit);
    form.addCommand(start);
    form.setCommandListener(this);
    form.append(email);
    form.append(interval);
    form.append(info);
  }
public void commandAction(Command c, Displayable s) {
    if (c == exit) {
      exit();
    }
    if(c == start){
      form.removeCommand(start);
      emailstr = (email.getString() != null)?
        email.getString() : "[email protected]";
      sec = (interval.getString() != null)?
        Integer.parseInt(interval.getString()) : 5;

      // Start querying GPS data : To Be Done...

      form.addCommand(stop);
    }
    if(c == stop){
      form.removeCommand(stop);

      // Stop querying GPS data : To Be Done...

      form.addCommand(start);
    }
  }

  public void startApp () {
    display.setCurrent(form);
  }

  public void pauseApp () {}

  public void destroyApp (boolean forced) {}

  public void exit(){
    destroyApp(false);
    notifyDestroyed();
  }

}
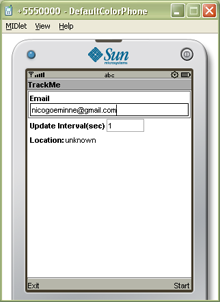 For this example we already have the “Build” and “Run” options. In the emulator hit the “Launch” key, and the application will start and should look like the image to the right.
Until now we haven’t used the location API. First thing we need to do is to fetch a java.microedition.location.LocationProvider based upon a configurable java.microedition.location.Criteria object. These criteria are for example the horizontal or vertical accuracy, the response time, the power consumption, cost allowed, speed and heading, etc… The LocationProvider.getInstance method will return the best matching location provider object based upon the given criteria. In our case we are happy with the default and least restrictive, so we can instead pass null.
So, don’t forget to add the import statement for the javax.microedition.location package, a private field to store the location provider and the initialization code to the constructor.
  import javax.microedition.location.*;

  // ...

  private LocationProvider locationProvider = null;

  public TrackMe(){
    /* … */
    try {
      locationProvider = LocationProvider.getInstance(null);
    } catch (Exception e) {
      exit();
    }
  }
The location provider can be queried for the current location using the getLocation method, which has a timeout parameter indication how long we are willing to wait for the data. As an alternative we can instruct the location provider to notify us with new location information on regular intervals. Since we will upload the coordinates to the server on a regular base, we choose the latter.
To get location update notifications our MIDlet must implement the LocationListener interface which you need to add to the TrackMe class definition. The implementation shown below will update the info label with the new location. The providerStateChanged method notifies us when the location provider goes offline, for example if the GPS unit doesn’t receive the satellite signal anymore.
  public void locationUpdated(LocationProvider provider, Location location){
    if (location != null && location.isValid()) {
      QualifiedCoordinates qc = location.getQualifiedCoordinates();
      info.setText(
        "Lat: " + qc.getLatitude() + "n" +
        "Lon: " + qc.getLongitude() + "n" +
        "Alt: " + qc.getAltitude() + "n"
      );
    }
  }

  public void providerStateChanged(LocationProvider provider,
                                   int newState){
  }
Now there’s only one thing left to do; in the commandAction handler method we must register our TrackMe MIDlet (which now serves as a LocationListener) to the location provider in case the start command is given, and vice versa when the stop button is pressed. The LocationProvider. setLocationListener first argument is the targeted listener, be aware that each location provider instance can only have one listener attached. Subsequent calls will overwrite the registered listener, hence providing null will cause the listener to be unset. The second argument is the interval in seconds. The third and forth arguments are the timeout (indicating how long the API should try to get the information from the hardware) and the max age of the provided data (e.g. it is not relevant if we get locations of an hour ago). Passing -1 in both arguments indicates we are happy with the default values.
So to finish our first functional application let’s set the listener in the start command and unset it in the stop command, and that’s it!
// Start querying GPS data :
locationProvider.setLocationListener(TrackMe.this, sec, -1, -1);
// Stop querying GPS data :
locationProvider.setLocationListener(null, -1, -1, -1);
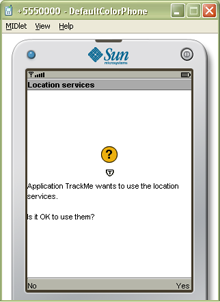 Ok, agreed, this sounds a bit too easy, right? In fact, you are right, there is one small caveat: if you’d try to run the application “as is”, the instant you press the start button, the location listener is set, which causes the location permission dialog box to pop up and ask for the users permission. You’ll notice that the application is in a deadlock state, and pressing either of the yes/no buttons will have no effect.
So what’s going on? Remember that you just pressed the start button. This event is handled by the commandAction event thread. As long as this thread is not finished subsequent button events cannot be fired. In the start button handler we set the location listener, causing the permission dialog to appear and there we wait for the user’s decision. However the yes/no event cannot be fired since we are still in the handling of the start event. To solve this deadlock problem we must set the listener in a new thread, as shown below.
  public void commandAction(Command c, Displayable s) {
    if (c == exit) {
      exit();
    }
    if(c == start){
      form.removeCommand(start);
      String emailstr = (email.getString() != null)?
        email.getString() : "[email protected]";
      int sec = (interval.getString() != null)?
        Integer.parseInt(interval.getString()) : 5;

	// Start querying GPS data :
	new Thread(){
        public void run(){
          locationProvider.setLocationListener(TrackMe.this, sec, -1, -1);
	  }
	}.start();
      form.addCommand(stop);
    }
    if(c == stop){
      form.removeCommand(stop);

      // Stop querying GPS data :
	new Thread(){
        public void run(){
          locationProvider.setLocationListener(null, -1, -1, -1);
	  }
	}.start();
      form.addCommand(start);
    }
  }
Try out our new version, the deadlock is gone and the info label changes form “unknown” to “Lat: 0.0”, “Lon: 0.0” and “Alt: 0.0”. Don’t expect the coordinate to change just jet, we still need to provide the emulator with a GPS trace
Emulating a GPS track.
The WTK’s GPS trace XML format looks like.
<waypoints>
  <waypoint time="0" latitude="37.81" longitude="-122.36" altitude="100" />
  <waypoint time="10000" latitude="37.79" longitude="-122.38" altitude="0" />
</waypoints>
 The emulator interpolates the current location based upon the time stamps and the location of the waypoints. The time stamps are in milliseconds. For example if we should query the location after 5000 ms (5s), the obtained location would be lat=37.8,lon=-122.37, alt=50, which is the coordinate just in between the two originals.
Since manually editing the trace is a time consuming job, I provide a little Google Mashup to create your own traces. On the left you can click to mark a waypoint, you’re route will be drawn in red. On the left you can see the generated trace, which you can copy paste to your text editor. I used a default walking speed of 50km/h. Alternatively, you can use the provided route around the San Francisco Bay area (data/sanfrancisco.xml) for the remainder of this article.
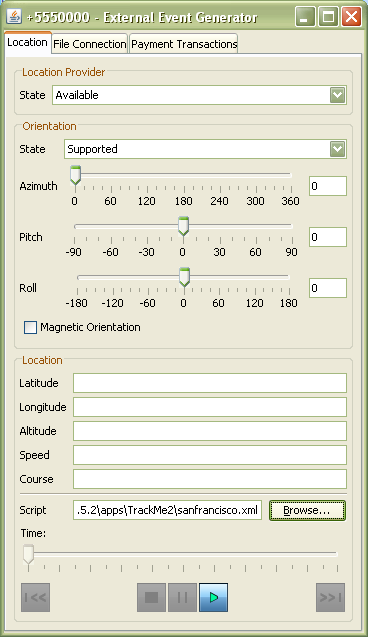
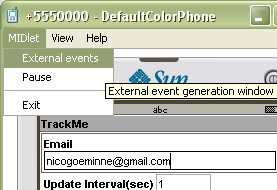
The trace can be selected using the External Event Generator of the emulator. On the emulator click “MIDlet”/”External Events”.
Point the “Script” field in the External Event Generator to the selected xml trace and click the play button. Check how the info field is now being updated.
OK, so far so good! Let’s add the networking code.
Updating the web server
We’ll update/store the location on the web server by setting the query string of the HTTP call, which has the following format:
http://$server:$port/updatelocation.jsp? email=$email&lat=$lat&lon=$lon&alt=$alt
Therefore we need to update the locationUpdated method as shown below.
public void locationUpdated(LocationProvider provider, Location location){
  if (location != null && location.isValid()) {
    QualifiedCoordinates qc = location.getQualifiedCoordinates();
      info.setText(
        "Lat: " + qc.getLatitude() + "n" +
        "Lon: " + qc.getLongitude() + "n" +
        "Alt: " + qc.getAltitude() + "n"
      );
    HttpConnection connection = null;
    try {
      String url = "http://localhost:80/updatelocation.jsp?email=" +
        emailstr +
        "&lat=" + qc.getLatitude() +
        "&lon=" + qc.getLongitude() +
        "&alt=" + qc.getAltitude();
      connection = (HttpConnection) Connector.open(url);
      int rc = connection.getResponseCode();
      connection.close();
    }
    catch(Exception e){}
    finally {
      try {
        connection.close();
      }
      catch(Exception io){
        io.printStackTrace();
      }
    }
  }

}
Notice that the server points to localhost, which we’ll need to change if when we go live, but it is OK for now since we’re still developing. Furthermore I used a servlet to implement the backend, of course you can also use ASP or PHP or any other server side technology; which ever you feel more comfortable with.
The Server Side
Our servlet will be designed to store the email address and the coordinate. Additionally when we issue a
http://$server:$port/updatelocation.jsp?info=true
request, the stored information is retrieved in JSON format. Since the focus of this article is not the server, I’ll just list the servlet’s code here without any further explanation. However since I don’t want you to bother with setting up a web server, deploying the servlet or other stuff, I’ve provided a small ready-to-go OSGi based web server. (download/unzip the resources, go to the bin/trackmewebserver folder and on the command prompt start it with
java -jar framework.jar -config trackme.cfg
import java.io.*;
import java.util.*;

import javax.servlet.*;
import javax.servlet.http.*;

public class UploadLocation extends HttpServlet {

  private String email = "unknown";
  private String lat = "0";
  private String lon = "0";
  private String alt = "0";

  public void doPost(HttpServletRequest request,
                     HttpServletResponse response)
      throws ServletException, IOException {
    doGet(request, response);
  }

  public void doGet(HttpServletRequest request,
                    HttpServletResponse response)
      throws ServletException, IOException {

    response.setStatus(HttpServletResponse.SC_OK);
    String info = request.getParameter("info");
    if (info == null){
      email = (request.getParameter("email") != null)?
        request.getParameter("email") : email;
      lat = (request.getParameter("lat") != null)?
        request.getParameter("lat") : lat;
      lon = (request.getParameter("lon") != null)?
        request.getParameter("lon") : lon;
      alt = (request.getParameter("alt") != null)?
        request.getParameter("alt") : alt;
    }
    else {
      response.setContentType("text/plain");
      String json = "{"info": {" +
         ""email": "" + email + "", " +
         ""lat": " + lat + ", " +
         ""lon": " + lon + " , " +
         ""alt": " + alt + "} }";
      PrintWriter out = response.getWriter();
      out.print(json);
      out.close();
    }
  }
}
Once the server is up and running we are ready to run our TrackMe MIDlet, which will now update the server. You may use your browser and surf to http://localhost:80/updatelocation.jsp?info=true to see the current location of your phone. (try hitting refresh to see the coordinate change). (Do not forget to run the GPS trace)
Deploying the MIDlet on a real device
As I stated before, we’ll need a JSR 179 compliant device. It doesn’t need to have an integrated GPS, but in that case you’ll need a Bluetooth enabled cell phone and external GPS unit. In my case I have a Nokia N95 which can either use its internal unit or my external Holux GPS unit. I’ll cover both scenarios here. To upload the data to the web server you’ll also need an Internet connection (preferable over HSDPA/UMTS). Of course this will cost you depending on what your operating is charging for the internet connection. If you only wish to test the GPS capabilities, you can omit the network code from the TrackMe MIDlet.
Before deploying the MIDlet, do not forget to change the servlet’s URL to your live server. In the WTK choose Project > Package > Create Package to create the MIDlet jar file. The file is located in the bin folder under the projects main directory. Now, connect your phone to your desktop and transfer the just created jar file to the phone. On my N95 I can use the phone’s file explorer (under the tools folder) to select the jar. It will automatically start the installer and ask for confirmation. Since the MIDlet is not signed it will prompt a security warning and ask for an additional confirmation. My N95 allows me to set the location technology (Tools > Settings > General > Positioning > Positioning Methods). I have the option for Bluetooth GPS, Assisted GPS, Integrated GPS and Network Based. See your external GPS unit’s documentation to pair with your cell phone. In my case I’ll just use the internal unit.
To set the MIDlet’s permissions we use the Application Manager in the Applications folder. There you should find our TrackMe MIDlet. Using the options button, set the Network Access, Connectivity and Positioning to “Ask first time”. You’ll see there is no option to set “Ask Never” since the MIDlet is not signed.
Finally start the application by selecting TrackMe in the Applications folder. Go outside and wait about one to five minutes to get a GPS fix (depending on the available satellites). Once the GPS unit got his fix, subsequent location requests are answered without delay. Now anyone can get you’re coordinate by surfing to http://yourserver:yourport/updatelocation.jsp?info=true
Part II: The Google Maps MashUp
In the previous part I showed you how to create a small location based MIDlet. However the graphical interface is not very user friendly and the WGS84 coordinates that the web page offers aren’t so useful in their raw form. I’d rather have a nice marker on a map that shows me the location of the cell phone. Furthermore, the location should be automatically updated. And while we are at it we’ll add pictures of the environment to get you an idea of the context. To achieve these goals I choose Google Maps, so you need to sign up for an API key. Be aware that each API key is valid for only one URL location (e.g. sign up for http://localhost:80/, this will make the key valid for all html files on this location). Of course you can sign up multiple times for different locations. While you are at it you might want to check the Google maps examples or get familiar with JavaScript (ECMAScript). A good place to start learning JavaScript is http://www.w3schools.com/JS/default.asp.
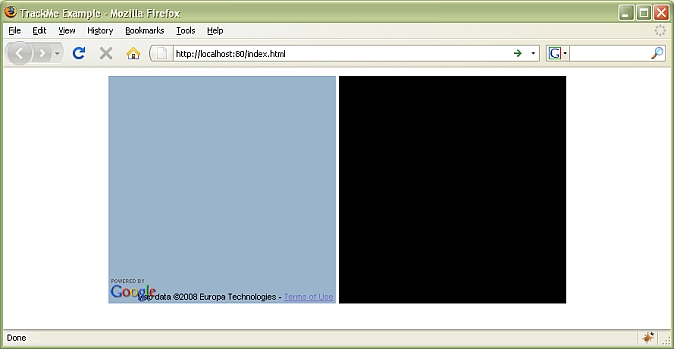
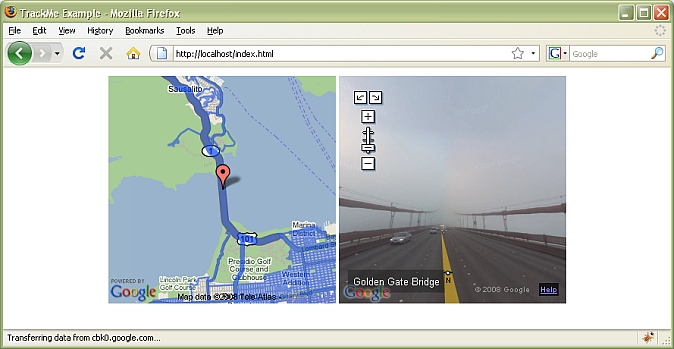
The screenshot below shows what we are trying to achieve. On the left hand side of the web page there’s the Google map centered on the location of the cell phone. On the right hand side there is the Google’s Street View (where available). I’ve initialized the map on the latitude longitude coordinate (0,0).
The web page source is listed below.
<html xmlns="http://www.w3.org/1999/xhtml">
<head>
<title>TrackMe Example</title>
<script src="http://maps.google.com/maps?file=api&v=2&key=yourkey" type="text/javascript"></script>
<script type="text/javascript">
var xmlHttp;
var url = "http://localhost:80/updatelocation.jsp?info=true";
var map;
var marker;
var lastpoint;
var pano;
var panoClient;
var direction;
function load(){
if (GBrowserIsCompatible()) {
map = new GMap2(document.getElementById("map"));
map.setCenter(new GLatLng(0,0), 12);
map.addOverlay(new GStreetviewOverlay());
pano = new GStreetviewPanorama(document.getElementById("pano"));
panoClient = new GStreetviewClient();
setInterval('updatelocation()',3000);
}
}
function updatelocation (){
xmlHttp=null;
xmlHttp=GetXmlHttpObject();
if (xmlHttp==null){
alert ("Browser does not support HTTP Request");
return;
}
xmlHttp.onreadystatechange=stateChanged;
xmlHttp.open("GET",url,true);
xmlHttp.send(null);
}
function stateChanged() {
if (xmlHttp.readyState==4 || xmlHttp.readyState=="complete"){
if (marker != null) map.removeOverlay(marker);
var json = eval('(' + xmlHttp.responseText + ')');
var point = new GLatLng(Number(json.info.lat),Number(json.info.lon));
marker = new GMarker(point);
marker.bindInfoWindowHtml(json.info.email);
map.addOverlay(marker);
map.panTo(point);
setPanorama(point);
}
}
function setPanorama(point){
if (lastpoint != null) {
var o = map.fromLatLngToDivPixel(lastpoint);
var n = map.fromLatLngToDivPixel(point);
direction = getHeading(o.x,o.y,n.x,n.y);
panoClient.getNearestPanoramaLatLng(point, updatePano);
}
lastpoint = point;
}
function getHeading(x1,y1,x2,y2){
return 90 + Math.atan2((y2-y1),(x2-x1)) * 180 / Math.PI;
}
function updatePano(point){
if (point != null && direction != null) {
var pov = {yaw:direction,pitch:-20};
pano.setLocationAndPOV(point, pov);
}
}
function GetXmlHttpObject(){
var objXMLHttp = null;
if (window.XMLHttpRequest){
objXMLHttp = new XMLHttpRequest();
}
else if (window.ActiveXObject){
objXMLHttp = new ActiveXObject("Microsoft.XMLHTTP");
}
return objXMLHttp;
}
</script>
</head>
<body onload="load()" onunload="GUnload()">
<center>
<table>
<tr>
<td>
<div id="map" style="width: 300px; height: 300px;">
</div>
</td>
<td>
<div id="pano" style="width: 300px; height: 300px; background: black;">
</div>
</td>
</tr>
</table>
</center>
</body>
</html>
The HTML code contains two div placeholders, one for the map (id=”map”), and the other one for the street view panorama(id=”pano”). The load function initializes the GMap2 and the street view and GStreetviewPanorama. Of course the street view is only available on those coordinates where Google’s image capturing van passed. However, these are not the exact same coordinates as our MIDlet provides, therefore the Google Maps API foresees the GStreetviewClient object which can find the nearest available street view coordinate (if available) given any coordinate. The last line of the load function instructs the browser to run the updatelocation function every 3000 milliseconds.
The updatelocation function gets a new XMLHttpRequest object (using the cross browser GetXmlHttpObject help method). It then sets the response handler and calls our servlet’s url.
When our servlet returns the information the stateChanged method is called. In case we got all data back from the server we can remove the old marker (set in a previous updatelocation call) and since the data we passed back is in JSON format we can easily parse (eval) it into a JavaScript object. Then we get the coordinate, create a new marker and update the map.
To update the street view however, we need the coordinate, the orientation and the pitch (angle between the earth’s surface and what you are looking at). If you dig into at the JSR 179 API you’ll notice a class called javax.microedition.location.Orientation which provides exactly the information we need. This class is however only an optional part, and to date no real devices support this functionality. The setPanorma method can thus only be based upon the coordinate. Based upon a previous coordinate we can calculate the device’s heading. Of course there is a subtle difference between the device’s heading (the direction in which you are moving) and the orientation (the direction in which you are looking), but it suffices for our purposes. To simplify the calculation I transformed the GLatLng coordinates to points on the screen in a Euclidian system. Finally the getHeading function returns the direction. As I pointed out before not all coordinates have street view, to find the closest one we must use the getNearestPanoramaLatLng method. When the nearest matching coordinate is found the updatePano callback function is invoked which sets the street view based upon the location, direction and default pitch.
Since the example uses AJAX callbacks this web site must be hosted on the same domain of the updatelocation servlet. The small server I provided to host the servlet also hosts this website. You can access it on
http://localhost:80/index.html
If you got the emulator running the San Francisco GPS trace, you can jump to minute 12 of the trace and enjoy the view from the Golden Gate Bridge.
That’s it. I hoped you enjoyed this small tutorial, and that you are ready to start developing your own location based services from now on.


