


As the world gets connected, we see the emergence of a wide variety of sophisticated and personalized mobile devices. Although the number-crunching power of the higher-end devices is very respectable, there is still a need to build applications that use minimal resources, and that are portable.
Java Platform, Micro Edition (Java ME), formerly known as J2ME, with Java’s inherent ‘Build once, run everywhere’ concept has been adapted to build resource constraint applications for these myriad devices.
Java ME Community
This year Java ME marks its 10th anniversary. Since its inception in 1999, J2ME was widely accepted in the Mobile application development community. Java through J2ME provided a highly portable and precise runtime environment for mobile, PDAs as well as other embedded systems that include Smart cards, TVs and Printers.
The market adoption in last 10 years has been tremendous. Almost all mobile handsets from major manufacturers like Nokia, Sony Ericsson, Vodafone, Motorola, Sprint etc. had been Java enabled by 2006. Developers around the world continue to develop applications for Java ME. A number of websites have also been dedicated to Java ME, helping developers in their endeavors.
The J2ME continues to evolve through a Java Community Process. A Java Community Process (JCP) is an open organization that maintains the evolution of Java platform. The J2ME JCP involves the Mobile leaders like Nokia, Sony Ericsson, Vodaphone, Motorola, Sprint, Nextel, IBM and many others thus making any update readily marketable.
The Standard vs the Microedition
Java Micro Edition applications target micro devices that are 16-bit or 32-bit processors and have a memory footprint in the range of 128KB-2MB. In order to implement the same, the Java Virtual Machine (JVM) has been trimmed in the following ways:
- Reduced Object Code size of 50-80 KB.
- Minimal Memory utilization.
- Performance made effective in 16-bit or 32-bit processors.
- Highly portable architecture with minimal platform-specific code.
- System independent Multithreading and Garbage collection.
Java ME Configurations
Before going further in this discussion, let us focus on the definition of Category and Family of devices. A Category is a type of device. As per the definition, cell phones and pagers are different categories of devices.
Multiple categories with similar memory and processing power make a Family of devices. Thus, cell phones, simple pager and simple PDAs make a family of 16-bit processor devices.
The Java ME architecture is based on two configurations:
- Connected Device Limited Configuration (CLDC) – This J2ME Configuration constitute devices that are 16-bit processors and have memory power in the range of 128 KB. The building block of CDLC is k Virtual machine (kVM) which is adapted to perform in the family of most resource constrained devices.
- Connected Device Configuration (CDC) – This Java ME configuration constitutes devices that have comparatively more processing power. The underlying JVM is called C virtual Machine (CVM) targeted to 32-bit processors with a memory footprint of 2MB.
The article will mainly concentrate on CDLC and kVM.
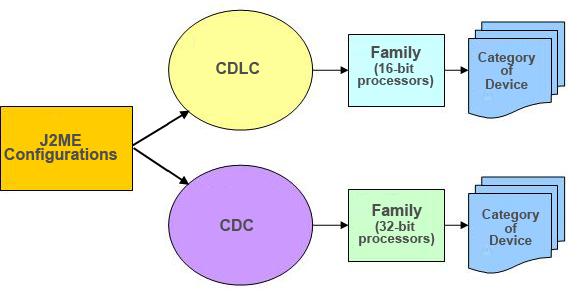
Figure 1 The relationship between Category of devices, Family of devices and Java ME Configurations.
Java ME Midlet
The Java ME Runtime environment consists of the following layers:
- The Connected Device Limited Configuration Layer: This Layer in turn, consists of the following sub-layers:
- The Java Virtual Machine Layer: The Java Virtual Machine Layer acts as an interface between the Java ME application and the host device’s operating system.
- Configuration Layer: This layer consists of Java class and libraries for a particular Category of devices, thus differing in a cell phone and pager. It is less visible to application developers.
- Profile Layer: This Layer consists of Java class and libraries for a particular Family of devices and is most visible to application developers. Thus the Profile Layer will differ in a Cell phone and a Smart phone.
- The Mobile Information Device Profile (MIDP) Layer: This layer consists of Java classes and libraries to address User Interfacing, I/O and Networking and Persistent Storage in Java ME applications.
The building block of the MIDP Layer is a MIDlet. The MIDlet extends the MIDlet Class, allowing the Application Manager to control its activities and properties and request or notify state changes. The MIDlet class can start, stop, pause or terminate by itself and notify the Application Manager of its current state.
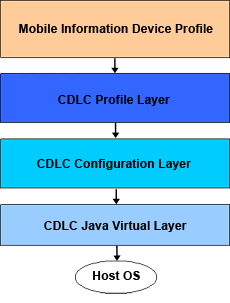
Figure 2 Java ME Runtime Environment
Java ME APIs
The significant Java ME APIs available so far can be categorized as follows:
-
User Interface – The Java ME User Interface APIs allows displaying a succession of screens on mobile phones. Each screen presents a certain amount of data to the users and user commands. It also allows the MIDlet to respond to those commands – be it to display another screen, invoke a function or submit an I/O or Network request.
The Mobile Media API available in the higher versions of MIDP allows the use of audio and video in the phone UI.
-
I/O and Networking – The I/O and Networking APIs allow the MIDlet to be a Web client and interact with Web servers, Database over the web and display real-time data e.g. Stock quotes on the phone screen.
The Java Messaging API in this category allows the Midlet to communicate with a GSM compliant phone in a system independent way.
-
Persistent Storage – The Persistent storage APIs permit a MIDlet to retrieve and store data in a persistent storage called Record Store.
The Personal Information Management (PIM) API allows storage and retrieval of data from other persistent storage like the Address Book, the Calendar or the Task List.
-
Portability – The Portability APIs allows a MIDlet to use the location information of the device.
The Location API allows users to develop applications based on the current location of the phone, measured in terms of latitude and longitude.
The Java ME Internationalization API, available in recent versions, allows a MIDlet to access locale specific information such as Currency, Time zone and Language.
Building an application
In this article, we will develop a MIDlet that will display a Greeting Message with the current Date and Time.
The important components of the MIDlet class have been discussed as follows:
Imports – In order to develop a MIDlet, javax.microedition.midlet is a required import. The package contains the MIDlet class which is instantiated by a MIDlet. It also allows the MIDlet to be managed by an Application Manager in terms of properties and state changes.
The javax.microedition.lcdui package includes all the User Interface components, say Form, Text field, String label etc. to be included in a MIDlet.
import javax.microedition.lcdui.*;
import javax.microedition.midlet.*;
Class Definition – A MIDlet always extends the MIDlet class, thus allowing a MIDlet to interact with its runtime environment. It also implements CommandListener to be able to respond to commands on the screen. A command can be viewed as a button on the screen or a single item from a Menu.
public class Greeting extends MIDlet implements CommandListener
Commands – In this section, all the commands for MIDlet are defined. The three parameters in a Command are the Label, a command type and a priority. A Command type of Command.EXIT defines an Exit command. The other standard command types available are STOP, OK, HELP and CANCEL. The MIDlet uses the priority value to describe the importance of one command relative to other commands on the same screen
private Command exitCommand = new Command("Exit", Command.EXIT, 1);
UI Components – This section describes the Display and all the User Interface Components optionally included in the MIDlet. The Display object represents the Application Manager. It includes methods for retrieving properties of the device and for display of information on the device.
StringItem represents a read-only label while Form defines a particular Screen on the device.< br />
private Display display;
private StringItem label;
private Form form;
Constructor – This section represents the constructor method invoked while creation of the MIDlet application. It includes steps to initialize all objects that would be used while the application is in an Active state.
In this example, we defined the label to be displayed and included it in the initial screen.
display = Display.getDisplay(this);
form = new Form("Hello!");
label = new StringItem("", "Welcome User! Today is: " + new java.util.Date().toString());
form.append(label);
startApp – This method is invoked when a MIDlet is in an Active state. The most common operation performed in this method is to set the initial screen to be displayed.
public void startApp() {

            display.setCurrent(form);

    }
7. pauseApp – The method is invoked when the MIDlet is in a Paused state.
public void pauseApp() {

    }
destroyApp – The method is invoked when the MIDlet is destroyed via the Exit Command from screen. The most common operations performed are clean-up operations.
public void destroyApp(boolean unconditional) {

    }
commandAction – This method is invoked when the user submits any type of Command from the screen. If an Exit Command is submitted, the method in turn invokes the destroyApp() function and notify the Application Manager that the MIDlet has been terminated.
public void commandAction(Command c, Displayable s) {
        if (c == exitCommand) {
            destroyApp(false);
            notifyDestroyed();
   		}
    }
The complete code has been included as follows:
import javax.microedition.lcdui.*;
import javax.microedition.midlet.*;

public class Greeting extends MIDlet implements CommandListener {

    static String userName;

    private Command exitCommand = new Command("Exit", Command.EXIT, 1);

    private Display display;
    private StringItem label;
    private Form form;

    public Greeting() {

        display = Display.getDisplay(this);
        form = new Form("Hello!");
        label = new StringItem("", "Welcome User! Today is: " + new java.util.Date().toString());
        form.append(label);

    }


    public void startApp() {

            display.setCurrent(form);

    }

    public void pauseApp() {

    }

    /**
     * Destroy must cleanup everything not handled
     * by the garbage collector.
     */
    public void destroyApp(boolean unconditional) {

    }

    public void commandAction(Command c, Displayable s) {
        if (c == exitCommand) {
            destroyApp(false);
            notifyDestroyed();
   		}
    }


}
Deploy application
This section will show how to deploy a MIDlet application on Wireless Toolkit 2.5. The below are the steps the above application was created and built:
1. Create a Project: Invoke the Sun Wireless Toolkit 2.5 from the Program Menu. Hit New Project to create a new project or Open Project to open an existing one. Refer Fig-3.

Figure 3 Sun Wireless Toolkit 2.5
On New Project, the dialog as in Fig-4 appears.
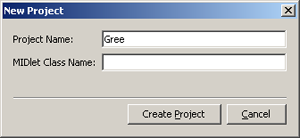
Figure 4 Create a New Project
Once a valid Name has been entered, a dialog for the API selection appears. Refer Fig-5.
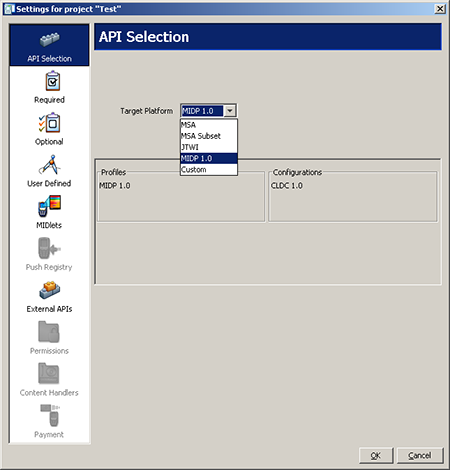
Figure 5 API Selection dialog
We will choose MIDP 1.0 for our examples.
If we select Open Project, the dialog as in Fig-6 appears.
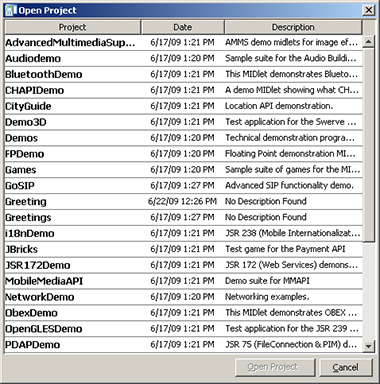
Figure 6 Open a Project
Once a project has been successfully created, a folder by input name is created under C:
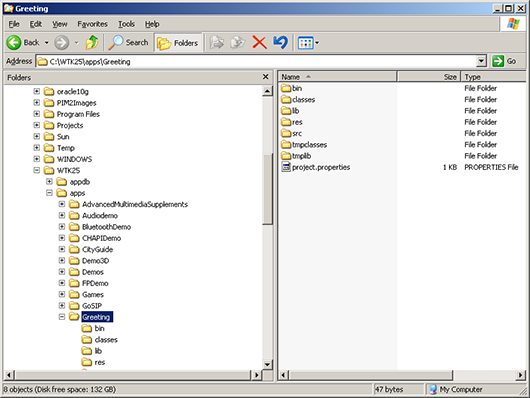
Figure 7 Source Directory
Put the attached source code as Greeting.java under C:
2. Build Project: After project has been created, hit the Build button to build the same. Please revisit the source code, if compilation errors arise. On successful build, the dialog as in Fig-8 appears.

Figure 8 Build Project
3. Run Project: Hit Run button to run the application. You can choose to change the Device from the Device drop-down. Please refer Fig – 9.
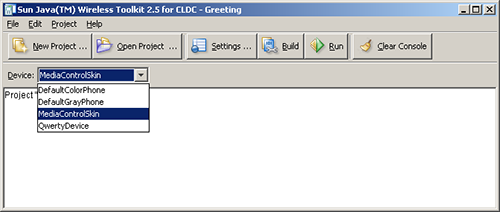
Figure 9 Change Device Type while Run
Once run, the phone screen will display a Greeting message with current date and time. See Fig-10
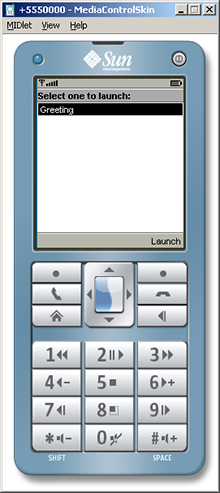
Figure 10 MIDlet loaded
The JAD file created in the process under C:
Conclusion
In this article, we gave an overview of the Java Platform, Mobile Edition, an initiative of Java for the mobile devices. As the mobile world sees an ever increasing introduction of new devices, there is a requirement for applications that are system independent and use minimal resources. Java Mobile edition has the answer.
With the new versions coming up with more advanced API like Media, the Java ME has become a favorite of the Mobile Development community.


Leave a Reply