Development of mobile applications is often highly dependent on the target platform.
If plain old XHTML markup is written from scratch then it is rather easy to switch
between platform and technologies. But if the development process has been accelerated and made comfortable by the use of tools and middleware, it soon becomes difficult or impossible to switch environments e.g. from a LAMP environment to ASP.NET or vice versa.
This problem has been targeted by the Phalanger project. This OpenSource project has developed a PHP compiler that allows to compile whole PHP projects into appropriate .NET assemblies and thus make them available for the Microsoft ASP.NET platform.

The Phalanger compiler has been successfully used to transform the HAWHAW PHP library into a .NET assembly. HAWHAW has already been described a couple of times at mobiForge and is used by many mobile sites including the mobile version
of Wikipedia.
This article describes how the ASP.NET version of HAWHAW (called HAWHAW.NET) can be used to create a ready.mobi compliant mobile ASP.NET website within a few minutes.
Getting started
First we need a Windows machine with the .NET framework and the free Visual Web Developer (VWD) installed. IIS is not required because VWD brings its own small development web server which is sufficient for our purposes. Next we download the HAWHAW.NET zip-file and extract it to a convenient location, and we create a new website in the VWD that will look like this:

The Bin directory contains the follow four DLL’s:
PhpNetCore.dllrepresents the PHP core runtime environmentPhpNetClassLibrary.dllcontains common PHP functions. Those two DLL’s are part of
the Phalanger distribution and come bundled with HAWHAW.NET for the sake of simplicity.HawhawPhpNetClassLibrary.dllis the HAWHAW PHP class library that has been compiled
with the Phalanger compiler into a DLL.- Finally
Hawhaw.dllcontains a set of ASP.NET custom server controls, which basically work as a wrapper objects on top of the HAWHAW PHP classes.
Note that no mobile-specific code has been written in the HAWHAW.NET implementation. Rather, it provides a set of ASP.NET server controls that internally interface with the existing HAWHAW (PHP) code.
So, having now heard a little about how things work under the hood, we can immediately forget it again, since it is not important to the end user!
Hello world
Now let’s create our first Hello World application with HAWHAW.NET: In VWD we create a new web form HelloWorld.aspx and insert code as follows:
<%@ Page Language="C#" Inherits="HawhawPage" %>
<%@ Register Assembly="Hawhaw" Namespace="Hawhaw" TagPrefix="Haw" %>
<Haw:Deck runat="server">
  <Haw:Label runat="server" Text="Hello world!" />
</Haw:Deck>
When we press the View in browser button, VWD starts its internal webserver and opens the predefined web browser that will show a page as shown below:

So, this doesn’t look like rocket-science. But when we upload all this to a ASP.NET production server we can see that almost every mobile and non-mobile device can render this application, from the oldest WAP phone up to the most modern XHTML device on the market.
 Toolbox Integration
So, having edited a simple .aspx file, we can now try to make our development environment a little bit more comfortable. Even though we could build our applications entirely via the text editor, it would be a shame to miss out on the benefits of the VWD toolbox.
With the HelloWorld.aspx file still open, we right-click into the VWD toolbox and select the context menu item Add Tab. We enter HAWHAW as name of the new toolbox tab and fill our new tab simply by dragging the Hawhaw.dll file from the file explorer onto the empty HAWHAW tab. Voilà, the tab gets expanded and now shows all HAWHAW.NET controls which from now on are waiting to get dragged onto our source editor.
The next point of interest is the Properties window, where all properties of a given object are listed and can be modified. With a few clicks here, we are able to enhance the source code without any deeper knowledge about available server control attributes.
Let’s now begin to create a form-based demo application: a very simple flight information system. Starting from our HelloWorld.aspx application we now make some enhancements. We can activate the Deck’s device simulator for a better browsing experience on web browsers, and we create some content: a welcome message, a link to the information page, and a phone number for visitors that prefer to talk! Finally our new welcome.aspx page should look like the code below:
<%@ Page Language="C#" Inherits="HawhawPage" %>
<%@ Register Assembly="Hawhaw" Namespace="Hawhaw" TagPrefix="Haw" %>
<Haw:Deck runat="server" Simulator="Skin">
  <Haw:Label runat="server" Text="Hello Visitor!" Big="True" Bold="True" />
  <Haw:HorizontalRule runat="server" />
  <Haw:Label runat="server" Text="Welcome to our new flight information system." />
  <Haw:Link runat="server" Text="Start ..." NavigateUrl="FlightInfo.aspx" LineBreaks="2" />
  <Haw:PhoneCall runat="server" PhoneNumber="+1 407 386 3678" Title="Call us" />
</Haw:Deck>
… and it should render something like the image below:

Dealing with forms
HAWHAW.NET follows the single-form model of ASP.NET, in contrast to Microsoft’s
Mobile Forms, which obviously have been influenced here by the old WML card mechanism. Viewstate, event handling and postback processing are supported similar as known from the standard server control elements.
As an example, we start with an interactive mobile flight information service. The code of our module FlightInfo.aspx looks like this:
<%@ Page Language="C#" Inherits="HawhawPage" %>
<%@ Register Assembly="Hawhaw" Namespace="Hawhaw" TagPrefix="Haw" %>

<script runat="server">

    protected void Page_Load()
    {
        if (this.IsPostBack)
        {
            info.Visible = true;

            // dataprocessing comes here ...
            if (departure.Value.Equals(arrival.Value))
            {
                info.Text = "No flight connection found between " +
                            departure.Value + " and " + arrival.Value +
                            "!";
            }
            else {
                info.Text = "Sorry, all flights between " +
                             departure.Value + " and " + arrival.Value +
                             " are booked out!";
            }
        }
    }

</script>

<Haw:Deck runat="server" ID="deck" Simulator="Skin">
    <Haw:Label runat="server" Text="Flight Information" Big="True" Underline="True" />
    <Haw:Label runat="server" Text="To be filled later ..." ID="info" Visible="False" />
    <Haw:Form runat="server">
        <Haw:Label runat="server" Text="Departure Airport" />
        <Haw:DropDownList runat="server" ID="departure">
            <Haw:ListItem runat="server" Text="Munich" Value="Munich" />
            <Haw:ListItem runat="server" Text="Dublin" Value="Dublin" />
            <Haw:ListItem runat="server" Text="London" Value="London" />
            <Haw:ListItem runat="server" Text="Paris" Value="Paris" />
        </Haw:DropDownList>
        <Haw:HorizontalRule runat="server" />
        <Haw:Label runat="server" Text="Arrival Airport" />
        <Haw:DropDownList runat="server" ID="arrival">
            <Haw:ListItem runat="server" Text="Munich" Value="Munich" />
            <Haw:ListItem runat="server" Text="Dublin" Value="Dublin" Selected="True" />
            <Haw:ListItem runat="server" Text="London" Value="London" />
            <Haw:ListItem runat="server" Text="Paris" Value="Paris" />
        </Haw:DropDownList>
        <Haw:HorizontalRule runat="server" />
        <Haw:Button runat="server" Text="Submit" />
    </Haw:Form>
</Haw:Deck>
This page works as follows:
The Deck and Label elements already are known from the previous examples. The Form element is new here, which in well-known ASP.NET manner, needs no action attribute because the page posts back to itself. Within the form two DropDownLists are located, each with four list items. The second item in the second list sets the Selected attribute to true, just to make sure that departure and arrival airport don’t show the same value in our initial form.
Another thing worth mentioning is the label with the ID="info". During the initial presentation of our page this label will not be rendered due to its Visible="false" attribute. After the form data has been posted, this label will be filled programmatically as we can see in the script section. In our examples we mix layout and code together in one file, while in more complex systems code-behind techniques are to be preferred.
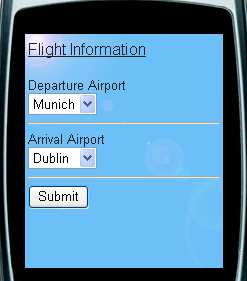
When we point the browser to our flight info system, we will see this:


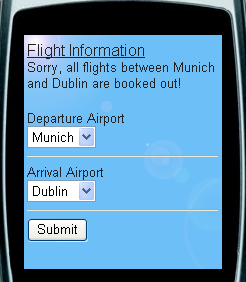
Observant testers will quicklynotice that the selected values of the dropdown list retain their selected value after each submit, even though there is no single piece of code in our script to manage this. The reason for this is ASP.NET’s viewstate, which is propagated automatically from page to page in a hidden field.
This feature makes coding of interactive web applications very straight-forward
and must be implemented manually on other platforms. If you want to
serve old WAP devices too, it is a good idea to place your query result on the top
of your form. Otherwise some WAP browsers would ask the user to fill and submit
the form data again and again and again.
Conclusion
In this article we just scratched the surface of the HAWHAW.NET control set. The examples that come along with the zip-file will provide a more comprehensive overview about all available controls and their related properties. Advanced topics like the usage of click event handlers or data binding are treated in these examples as well. Even though documentation is quite thin at the moment, ASP.NET programmers should find an easy start by following the examples and the
HAWHAW FAQ.
HAWHAW.NET shouldn’t be considered as a replacement for Microsoft’s Mobile Forms. In fact it should be considered more as a proof-of-concept that it’s possible to migrate an existing PHP solution into an ASP.NET environment. There are still some things missing (e.g. a solution how to deal with session management), but all this is still a 0.x version and Rome wasn’t built in a day!


