


While real user testing is critical to almost any web effort, the benefits and speed provided by automated testing make it a powerful addition to any test regime. In this article we’ll be discussing the automation of UI testing with CasperJS, and PhantomJS.
How can you reliably automate testing of web sites and apps? By coding specific test routines that can be run in a browser-like interface. Much like unit tests, a suite of routines can be built up that allow you to run a battery of tests following a code release, or major update. Moments after deploying to your live environment you can view the test results and quickly respond to any problems.
What is a browser-like interface?
PhantomJS is a ‘headless’ browser. This means it is a normal browser stack that has been converted to run from the command line and to be scriptable through a JavaScript API.
Based on WebKit, Phantom is a full browser application but it runs without any visuals to the screen – as a normal browser would. Instead it loads and navigates webpages in memory and logs the results. Since it is a full WebKit browser it supports HTML5, SVG, Ajax, CSS selectors and so on. These qualities make it ideal for running automated tests.
JavaScript test scripts can be written that are fed to PhantomJS, it in turn will load the programmed URLs and perform whatever user interactions have been specified. These scripts are not page assets in the usual sense that you’re probably familar with – instead they are run on your development (or testing) machine and access the live website themselves through Phantom.
The PhantomJS API supports a wide range of user triggered events – including mouse clicks, keyboard events, page navigation, scrolling and just about anything else a user might do.
To give you an idea of how easy it is to control the PhantomJS browser from JavaScript, here is a snippet of code that demonstrates scraping driving directions from Google Maps:
var page = require("webpage").create(), system = require("system");
if (system.args.length < 3) {
console.log("Usage: direction.js origin destination");
console.log("Example: direction.js Paris Brussels");
phantom.exit(1);
} else {
var origin = system.args[1];
var dest = system.args[2];
var url = "http://maps.googleapis.com/maps/api/directions/xml?origin=" + origin + "&destination=" + dest + "&units=imperial&mode=driving&sensor=false";
page.open(encodeURI(url), function (status) {
if (status !== "success") {
console.log("Fatal error: unable to access network");
} else {
var steps = page.content.match(/<html_instructions>(.*)</html_instructions>/ig);
if (steps == null) {
console.log("No data available for " + origin + " to " + dest);
} else {
steps.forEach(function (ins) {
ins = ins.replace(/</ig, "<").replace(/>/ig, ">");
ins = ins.replace(/<div/ig, "n<div");
ins = ins.replace(/<.*?>/g, "");
console.log(ins);
});
console.log("");
console.log(page.content.match(/<copyrights>.*</copyrights>/ig).join("").replace(/<.*?>/g, ""));
}
}
phantom.exit();
});
}
Walking through this snippet, we start by defining the PhantomJS environment and including the required libraries like ‘webpage’ and ‘system’. Next we check the argument count is correct, if not we display a brief help message. All going well we should have the necessary arguments and can start the main code block. Here we tell Phantom to ‘page.open’ the Google Maps URL, which we build using the supplied origin and destination variables. We check that the returned status code is a successful one, then start to parse the page content to retrieve the driving directions.
So, what is CasperJS?
Phantom is a headless browser, but is not specifically targeted to any one use case. Instead it is left as an exercise for the programmer as to how exactly the browser will be used. CasperJS, on the other hand, is a testing framework built on top of PhantomJS. It provides a range of test-specific functionality that make writing UI tests easy and quick.
These test-specific features cover the core testing paradigms like pre-defined test progressions (start, waitFor, then, etc) and also code test concepts (assert, assertVisible, assertEquals, etc). Many of these test concepts are not data-specific but focus on the UI presentation layer, examples include assertTextExists() and assertHttpStatus().
Here is a short code snippet to show you the CasperJS syntax, it runs a simple unit test against Google search results:
casper.test.begin("Checking Google search retrieves 10 or more results", 5, function suite(test) {
	casper.start("http://www.google.com/", function() {
		test.assertTitle("Google", "Google homepage title is the one expected");
		test.assertExists('form[action="/search"]', "Main form is found");
		this.fill('form[action="/search"]', {
			q: "casperjs"
		}, true);
	});

	casper.then(function() {
		test.assertTitle("casperjs - Google Search", "Google title is ok");
		test.assertUrlMatch(/q=casperjs/, "search term has been submitted");
		test.assertEval(function() {
			return __utils__.findAll("h3.r").length >= 10;
		}, "Google search for "casperjs" retrieves 10 or more results");
	});

	casper.run(function() {
		test.done();
	});
});
The code above starts by creating a new test suite with a name, the number of tests being run (5) and a start function. This function loads the Google homepage and checks that it loaded as expected. If any of the asserts fail then the script will crash out with details of the failure – this is the first criteria of test writing, when a failure condition occurs we bail out. Should the Google homepage load correctly we then ‘fill’ the search field with a query, in this case ‘casperjs’. We pass ‘true’ to the ‘fill’ method to have it submit the form once the input is filled. We then test the results page – checking that the title is as expected and that there are at least 10 search results returned.
Real World Example
Time for a real world example, for this we are going to script a straightforward UI test to run against the mobiForge homepage. What a lovely homepage it is, lets see if it’s performing as we expect it to.
If you’d rather dive into the CasperJS documentation first, now would be a good time.
Before we begin we will need to install PhantomJS and CasperJS.
At the time of writing, this is how the mobiForge homepage looked:

Figure 1: mobiForge homepage on Mobile
Lets start by writing a basic load test to make sure the homepage loads correctly:
casper.test.begin("Loading mobiForge homepage", 2, function suite(test) {
	casper.start("http://mobiforge.mobi/", function() {
	});

	casper.then(function() {
		test.assertTitle("mobiForge - Mobile Web Development", "Title is the one expected");
	});

	casper.then(function() {
		test.assertVisible("h1", "H1 tag found");
	});

	casper.run(function() {
		test.done();
	});
});
This simple test attempts to load the mobiForge homepage, checks that the page title is as expected and that the main H1 tag is visible. So this test could be wired into a deployment mechanism, for instance, to check that following a new code release to the site the homepage is still accessible. While this simple test doesn’t drill into the homepage content it does provide a good touch-point to ensure nothing major has broken, and could be easily extended to do more intensive checks.
Casper’s Internals
Casper supports four logging levels: debug, info, warning and error. By default only error level events will be output, although this can be configured at startup:
var casper = require("casper").create({
	verbose: false,
	logLevel: "debug"
});
Simple run-time comments can be output as needed:
casper.test.comment("Beginning test suite...");
Testing HTTP status codes is an invaluable testing metric:
casper.test.assertHttpStatus(200, siteName + " is up");
Casper helpfully supports a CSS selector syntax similar to JavaScript frameworks like jQuery:
casper.test.assertExists('form[id="signup-form"]', siteName + " has a form with id 'signup-form'");
And, if you prefer XPath style selectors:
casper.test.assertExists({type: "xpath", path: '//input[@id="FullName"]' }, "the full name input exists");
XPath syntax allows for more advanced selector combinations:
casper.test.assertExists({
	type: "xpath",
	path: '//button[@id="signup-button"
		and @class="small-button"
		and @type="submit"]'
	}, "the small signup button exists");
Handling failures is always a wise decision, so here is an example of pre-defining handling for common HTTP status errors:
function pageerror(resource) {
	casper.log("Error: cannot open " + resource.url, "error");
};
casper.on("load.failed", pageerror);
casper.on("http.status.400", pageerror);
casper.on("http.status.404", pageerror);
casper.on("http.status.500", pageerror);
Taking screenshots, particularly in the event of test failure, can be incredibly useful for debugging problems. And as you can see from below you can easily capture the entire page, or just a small subset of it:
casper.capture("screenshot.png", {
	top: 0,
	left: 0,
	width: viewport.width,
	height: viewport.height
});
Another powerful option is to screenshot particular page elements only:
casper.captureSelector("form-screenshot.jpg", "#form");
Also possible is to capture a page element and Base64 encode the resulting image. This means you can store the Base64 hash to check against future test runs – spotting changes in an automated and low-cost way:
casper.captureBase64("png", "#form")
Automating the Automation
Drafting an entire suite of tests by hand might sound fairly tedious, particularly for a pre-existing website. Luckily there is an excellent Chrome plugin called Resurrectio which can be used to “record” user behavior and transform it into a Casper test script.
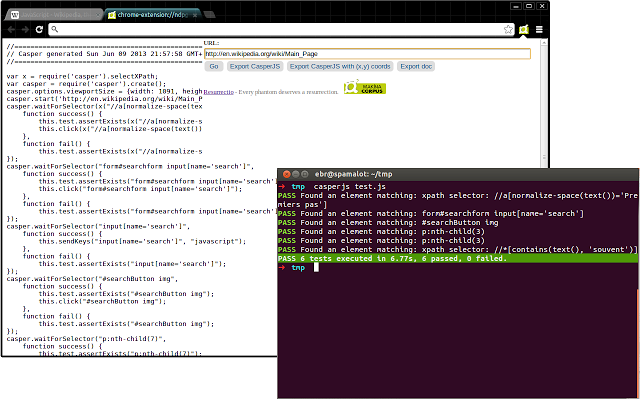
Figure 2: Resurrectio Chrome plugin
First, install the Resurrectio plugin in Chrome. Then navigate to the starting page and click the plugin’s ‘Go’ button and begin a simple navigation. An easy way to approach this is, while Resurrectio is recording, click on all the major page elements. Click on the search input field, the H1 title tag, the hero image, and so on. When finished click the plugin’s ‘Export’ button and it will show you the Casper test code.
You now have the option of reviewing the test code and making any chances you feel necessary.
Because you clicked all the important page elements, the generated test code will check for all of these and fail in the event that any are not found. As an automated page test that took only a few minutes to create, that is pretty powerful.
And what about Mobile?
So far, the material covered is fairly general advice on UI testing. But Casper (and Phantom) are capable of much more. They can be configured to present what appears to be a mobile browser, in effect letting you run tests against desktop and mobile versions of your site. For instance, if your site makes use of Responsive design then one test suite might work well for mobile and desktop testing. If your site is served differently to mobile and desktop devices using RESS, then you may end up with two or more test suites.
First we will specify the viewport size, as this is often a key indicator of the device type being used. By restricting the viewport size you are effectively recreating the experience of browsing on a small screen size, like that of a phone or tablet.
var casper = require("casper").create({
	viewportSize: { width: 800, height: 960 }
});
And here we effectively mask the built-in CasperJS User-Agent string with a mobile device user-agent instead:
var casper = require("casper").create();
casper.start();

casper.userAgent("Mozilla/5.0 (iPhone; CPU iPhone OS 5_0 like Mac OS X) AppleWebKit/534.46 (KHTML, like Gecko) Version/5.1 Mobile/9A334 Safari/7534.48.3)");
casper.thenOpen("http://google.com/", function() {
	this.echo("Google accessed using iPhone user-agent.");
});

this.userAgent("Mozilla/5.0 (compatible; MSIE 10.0; Windows Phone 8.0; Trident/6.0; IEMobile/10.0; ARM; Touch; NOKIA; Lumia 820)");
this.thenOpen("http://google.com/", function() {
	this.echo("Google accessed using Nokia Lumia user-agent.");
});

casper.run();
To illustrate the different results possible, here are side-by-side screenshots of mobiForge taken by Casper – the first is using no specific settings (ie. desktop) and the second is using iPhone specific settings:

Figure 3: Desktop vs. Mobile
Detecting Responsive Web Design
A worthy test of any mobile offering is whether it correctly handles different device types and sizes. Here is a short test that checks to see if the webpage is rendering with a horizontal scroll bar. If a horizontal scroll bar is displayed it suggests that the site has not responded as expected to the mobile device.
var casper = require("casper").create({
	viewportSize: { width: 200, height: 960 }
});

casper.start('http://craigslist.org', function() { });

casper.then(function() {
	this.page.injectJs('/home/user/jquery-1.10.1.min.js');
	var res = this.evaluate(function () {
		if ($(document).width() > $(window).width()) {
			return "Scrollbar visible! Not responsive!";
		}
		return "No scrollbar visible, site appears to be responsive.";
	});
	this.echo(res);
});

casper.run(function() {
    this.echo('Done.').exit();
});
Notice how the viewport size is deliberately restrictive at 200px wide. This is to simulate a particular small mobile form factor. And I picked the Craigslist site because it is a good example of a popular site not optimized for smaller devices.
Also worth pointing out is that this test injects the jQuery library onto the page. Often times using a particular JavaScript library, one which you are familiar with, will make writing tests easier. In this case I’m using jQuery’s width() method to compare the body element’s width to the actual window width, or viewport width. One caveat is that injecting JavaScript libraries can only be done with local files, you cannot include network addresses or URLs.
This test also includes a new method of accessing the page, the evaluate() function. This is a largish topic that is covered well by the Casper documentation, but for our purposes let me explain that evaluate() runs the encapsulated code within the confines of the page itself – meaning you can run arbitrary code on the page as if you ran it in your browser’s console window.
Command Line
While Casper can be scripted to run in an automated manner, ultimately it is spawned from the command line. Here are some examples straight from the console:
# Run the speficied JS code using the test language subset:

casperjs test mobiforge-homepage-test.js

# Run with pre-defined pre/post scripts, and include a command JS script:

casperjs user-agent-test.js --pre=before.js --post=after.js --includes=environment.js

# Passing in command line arguments is trivial:

casperjs test1.js arg1 arg2 arg3

# Specify log level:

casperjs --log-level=[debug|info|warning|error]
Other Notes
If you already have a NodeJS architecture then there is SpookyJS, a library for driving Casper from within Node. This can make the upgrading of a NodeJS deployment mechanism simple and straightforward.
When discussing UI testing it is often crucial to do cross-browser testing. And luckily we have that covered as well, in the form of SlimerJS which is a compatible library to Casper but uses the Gecko browser engine, the Mozilla Firefox stack rather than the Webkit/Chrome one. Since it’s compatible SlimerJS will run your CasperJS test scripts and produce near-identical results. The command line arguments are different, so bear that in mind.
Summary
By now you know the basics of testing with CasperJS and you know how to customize that effort to produce mobile test suites as well. There are lots of other configuration options and testing features within Casper and I encourage you to read through the API document online. There are a selection of pre-made test scripts available which show the best approach to structuring tests and handling edge-cases.
Many website operators use some form of testing on their public-facing assets, even if it’s just a quick pass after deployment to ensure here are no overt problems. But isn’t it time your mobile web assets had the same attention? Well with CasperJS it’s never been easier.


Leave a Reply