By now most people have heard of Google's App Engine (GAE). In case you haven't, GAE lets you run your own web applications on Google's extensive network of servers meaning that you can scale your application as traffic demands, with no hardware headaches, no machine provisioning, no LAMP stacks, no Apache configurations. So far the buzz has been very positive — with some notable exceptions (Python only for now, no way to schedule tasks on the server) GAE has been well-received by desktop web developers.
But What About Mobile?
So what about the 1.3 billion mobile web devices? Can GAE be used for that also? The short answer is yes, of course, GAE can be made to emit mobile pages also. But to create a mobile web application that really delivers a good experience to end users you need to build in device detection. Device detection is serves two main purposes in this case:
- To distinguish between desktop browsers and mobile browsers. You will likely want to give a different presentation of your site depending on whether the user is using a mobile or desktop browser
- To fine-tune the presentation of the mobile site so that it works well on the target device.
Diversity of characteristics on PCs is relatively limited: there are about 3 or 4 popular browsers, almost every PC has a keyboard and mouse, and you can assume with a good degree of confidence that you are dealing with a screen resolution of 1024×768, or greater. On mobile by comparison, the matrix of characteristics is wildly varied by comparison: there are countless different browsers, device screen resolutions, aspect ratios, and input devices are very diverse.
To navigate this complex landscape you need a good way to identify the requesting device and determine its capabilities. This article describes how to do this with GAE and dotMobi's DeviceAtlas device database. Why use DeviceAtlas?
- It's accurate and comprehensive – DeviceAtlas incorporates device knowledge from a variety of sources such as WURFL, Volantis, ArgoGroup etc.,
- It's very fast – several thousand recognitions per second on moderate hardware
- It's cheap – free for developers
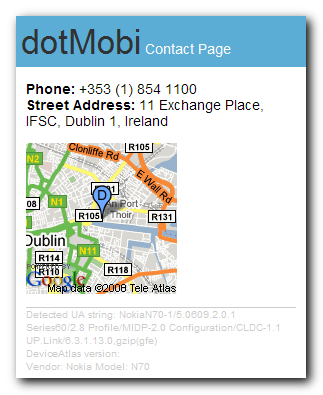
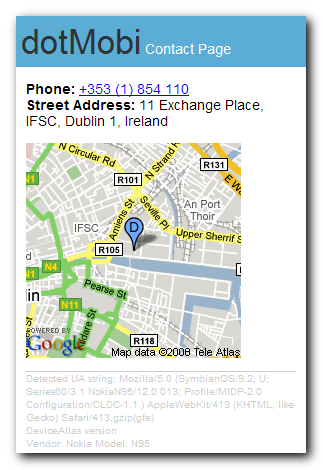
Note that this is not an article on how to use GAE, rather it is an article on how to add device detection capabilities to a GAE application. I'll demonstrate how to build a mobile and desktop application by building a functional but trivial application that detects device type, and serves up a different experience accordingly. All the application does is show you a Google map of the location of dotMobi HQ in Dublin, sized accordingly, with a click-to-call link if supported (hey, I said it was trivial!).

Getting Started
First things first: use the normal GAE procedure to create your application directory and YAML config file. We'll call this application "contact-dotmobi".
Next, we need to add the module for device detection to the base GAE scaffolding. This article uses the Python API for DeviceAtlas. Using the DeviceAtlas API with GAE is simply a matter of dropping the API and exceptions modules and the JSON device information file into your GAE application directory.
api.py – the main DeviceAtlas module
daExceptions.py – exceptions for above
DeviceAtlas.json – the device data
For simplicity, we'll place these in the root directory of the GAE application.
Finally, the DeviceAtlas API depends on a Python module called SimpleJson to parse our devices files. Since this module isn't included in the standard GAE Python version we need to add this also. The simplest way to do this is to download it from http://www.undefined.org/python/ and drop the SimpleJson module directory into the GAE application directory. At this point the application looks something like this:
api.py
app.yaml
daExceptions.py
DeviceAtlas.json
index.yaml
simplejson <DIR>
Now for some code. For simplicity, we'll just map one URL to a method in this application and to be tidy we'll add something for the favicon also. This gives the following YAML file:
application: contact-dotmobi
version: 1
runtime: python
api_version: 1

handlers:
- url: /
  script: contact-dotmobi.py
- url: /favicon.ico
  static_files: favicon.ico
  upload: favicon.ico
The First Code
Config done, it's now time to write some proper code, in a file called contact-dotmobi.py. First of all, some standard GAE imports:
import wsgiref.handlers
from google.appengine.ext import webapp
from google.appengine.ext.webapp import template
Now we need to import DeviceAtlas:
import api
And read in the device data:
# instantiate API and read in the JSON
TREEFILE = 'DeviceAtlas.json'
da = api.DaApi()
tree = da.getTreeFromFile(TREEFILE)
This code instantiates the DeviceAtlas class and loads the data from TREEFILE. This code runs once and makes available the DeviceAtlas API for all subsequent operations. This is important because loading and parsing the JSON is a relatively slow task (typically a couple of seconds), and not something that you want to do for each request to the application. Once loaded however, the Patricia-tree structure of the data allows for lightning-fast lookups with minimal overhead.
Now that we have our device properties tree ready, we can write some code to handle HTTP requests. We start with some standard boiler-plate:
.
.
class MainPage(webapp.RequestHandler):
    def get(self):
        self.response.headers['Content-Type'] = 'text/html'
        ua = self.request.user_agent
.
.
This code simply subclasses the webapp.RequestHandler, sets the response header, and picks up the User-Agent string from the HTTP request for use later — nothing too exciting here. The UA string is important for us since this is the piece of data that DeviceAtlas uses to identify the requesting device. Now for the interesting bit:
props = da.getPropertiesAsTyped(tree, ua)
This queries the DeviceAtlas API by passing it the existing JSON device database tree and the UA string from the requesting device. The getPropertiesAsTyped method returns a strongly-typed Python dictionary containing everything that DeviceAtlas knows about the requesting device. This dictionary of properties allows us to start making presentation choices for our user. The first thing to do is to decide if this device is a mobile device or not:
        mobileDevice = False
             if props.has_key('mobileDevice'):
                         if props['mobileDevice']:
                             mobileDevice = True
Now that we know if the device is mobile or not, we can decide how big to make our map image:
        mapWidth = 512 # default max for Google maps
        mapHeight = 512

        if mobileDevice:
            mapWidth = 128 # default, in case no screen size information available
            mapHeight = 128
            if props.has_key('displayWidth'): #otherwise base it on width
                mapWidth = mapHeight = props['displayWidth'] - 25
This code sets a default map size, and reduces it down as appropriate by querying the DeviceAtlas displayWidth property. Since most mobile devices have portrait aspect ratios, we are using the width of the device screen as the contraining factor, and setting the height to the same value to give a square image. Subtracting 25 pixels from the width allows for scrollbars and other intrusions into the view port.
Now we have pretty much everything we need to start rendering the markup so we create a dictionary of values to pass to the template:
        template_values = {
            'props': props,
            'mapWidth': mapWidth,
            'mapHeight': mapHeight,
            'zoom': zoom,
            'ua': ua,
        }
The zoom variable here is a tweak to set the Google map zoom level appropriately for the pixel size of the map (the Google static maps API doesn't scale the map as you reduce its pixel size).
Templates
In general, you are better off sending XHTML Mobile Profile or Basic markup to a mobile device. Desktop browser are much less fussy about markup and a richer presentation can / should be used. For this reason it often makes sense to use entirely different templates depending on wether you are serving pages to a mobile or fixed user:
        if mobileDevice:
            self.response.out.write(template.render('index.xhtml', template_values))
        else:
            self.response.out.write(template.render('index.html', template_values))
That code passes the data to the template and sends the response to the device. The XHTML template (the one for mobile devices) looks like this:
<?xml version="1.0" encoding="ISO-8859-1"?>
<!DOCTYPE html PUBLIC "-//WAPFORUM//DTD XHTML Mobile 1.0//EN" "http://www.wapforum.org/DTD/xhtml-mobile10.dtd">
<html xmlns="http://www.w3.org/1999/xhtml">
<head>
<title>Contact dotMobi</title>
</head>
.
.
<strong>Phone: </strong>
{% if props.uriSchemeTel %} <a href="tel:+35318541100">+353 (1) 854 110</a> {% else %} +353 (1) 854 1100 {% endif %}
.
.
<img src="http://maps.google.com/staticmap?center=53.348592,-6.247315&zoom={{zoom}}&maptype=mobile&size={{mapWidth}}x{{mapHeight}}&markers=53.348592,-6.247315,blued&key=xxx" width="{{mapWidth}}" height="{{mapHeight}}" alt="map" />
.
.
Detected UA string: {{ua}}
DeviceAtlas version: {{apiRevision}}
Vendor: {{props.vendor}}
Model: {{props.model}}
There are three interesting things to note in this template:
- We use the uriSchemeTel property from DeviceAtlas to determine if a tel: link for the dotMobi phone number should be displayed. If not, a plain text alternative is used
- The size of the Google maps image is determined by the mapWidth variable passed to the template
- We have some debugging information in the footer of the page. This lists the detected UA string, DeviceAtlas version and vendor/model of the phone
The desktop version of the template (index.html) is simpler, since there are fewer choices to make.

Wrapping it Up
Now all there is left to do is wrap this up with code to map requests to our class and tell Google to run it:
def main():
    application = webapp.WSGIApplication( [('/', MainPage)], debug=True)
    wsgiref.handlers.CGIHandler().run(application)

if __name__ == "__main__":
    main()
The entire application now looks like this:
api.py
app.yaml
daExceptions.py
DeviceAtlas.json
favicon.ico
contact-dotmobi.py
index.html
index.xhtml
index.yaml
simplejson
So there you have it! A desktop and mobile aware application that delivers a tailored experience to both classes of browser, and scores a perfect 5 on ready.mobi! Once uploaded to Google, this application takes about a second or two to spin up and then serves requests very rapidly indeed. You can try it live at this address: http://contact-dotmobi.appspot.com
Another Example
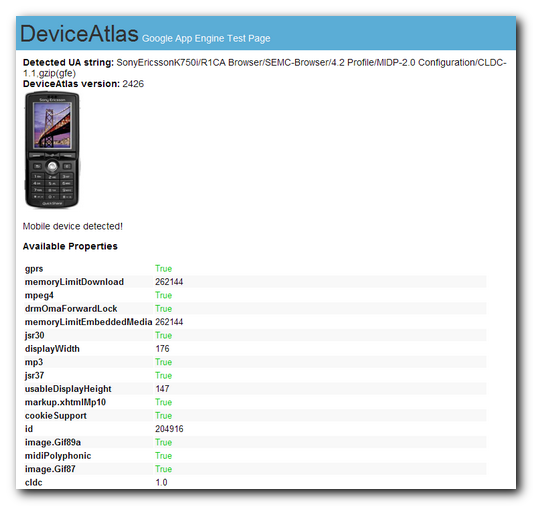
For people experimenting with DeviceAtlas, we've also put together another sample application that lists all known properties for the requesting device.

The code for this application is even simpler:
.
.
    def get(self):
        self.response.headers['Content-Type'] = 'text/html'
        ua = self.request.user_agent
        apiRevision = da.getApiRevision()

        props = da.getPropertiesAsTyped(tree, self.request.user_agent)

        if props.has_key('vendor') and props.has_key('model'):
            imgSrc = 'https://deviceatlas.com/sites/deviceatlas.com/themes/eris/img/device_images//.jpg' % (props['vendor'].lower(), props['model'].lower())
        else:
            imgSrc = False


        template_values = {
            'apiRevision': apiRevision,
            'props': props,
            'imgSrc': imgSrc,
            'ua': ua,
            't': True,
            'f': False,
        }
.
.
This checks to see if we have a vendor and model for the phone, and if so, constucts a link to the corresponding device image on deviceatlas.com. The corresponding template looks like this:
.
.
            {% if imgSrc %}
                <img src="{{ imgSrc }}" alt="Device Image" />
            {% else %}
                <p>No image available</p>
            {% endif %}
.
.


            <strong>Available Properties</strong>

            <table style="font-size:0.9em;">
            {% for prop in props.items %}
                <tr style="background-color: #{% cycle fff,f8f8f8 %};">
                    <td>
                        <strong>{{ prop.0 }}</strong>
                    </td>
                    <td>
                        {% ifequal prop.1 t %}
                            <span style="color: #0c0;">{{ prop.1 }}</span>
                        {% else %}
                            {% ifequal prop.1 f %}
                                <span style="color: #c00;">{{ prop.1 }}</span>
                            {% else %}
                                 prop.1
                            {% endifequal %}
                        {% endifequal %}
                    </td>
                </tr>
            {% endfor %}
            </table>
.
.
This template simply displays a device image if available, and lists the known device properties in a simple table. You can try this application live on http://deviceatlas.appspot.com.
The source for both of these applications is included as an attachment to this article. The files are listed as .txts – you will need to rename them to .zips after you download. If you want to run this application yourself you'll need a valid GAE invite and a Google map key. We can't help you with that, sorry.
What’s Next
The Python version of the DeviceAtlas API will be made available soon – watch this space. In the meantime, feel free to try out the Java/.net/PHP versions available free at deviceatlas.com


