


In one of my previous articles, I talked about embedding Google Maps in Android applications. Much has changed as Google went about revamping a lot of existing APIs in Android. In version 1 of Google Maps for Android, Google used the MapView to display map data. In version 2, the MapView is deprecated; instead, you have to use a MapFragment. In addition, you no longer need to create a project that targets the Google APIs platform, as Google has migrated a lot of services into Google Play services.
In this article, I will walk you through the steps needed to get Google Maps v2 for Android to work, and show you some of the new APIs you can use in your applications.
Install the Google Play Services Library
The first step in using Google Maps v2 for Android is to download the Google Play Services SDK. The Google Play Services SDK contains the APIs needed by Google Maps and hence you need to download this and reference it in your Android application.
- In Eclipse, select Windows > Android SDK Manager.
- Check the Google Play services item located under the Extras folder (see Figure 1):
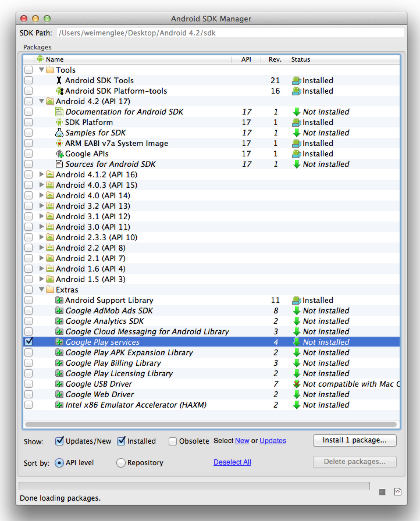
Figure 1 – Downloading the Google Play services SDK - Click the Install 1 package… button
- This will install the Google Play services library onto the following folder:
<android-sdk-folder>/extras/google/google_play_services/libproject/google-play-services_lib
Import the Google Play Services Library project into your workspace
The next step is to import the Google Play Service Library project into your workspace so that you can import it into your Android project.
- In Eclipse, select File > Import…
- Select Android > Existing Android Code, and browse to location of the Google Play services library.
- In the Import Projects dialog, check the Copy projects into workspace option and then click Finish (see Figure 2):
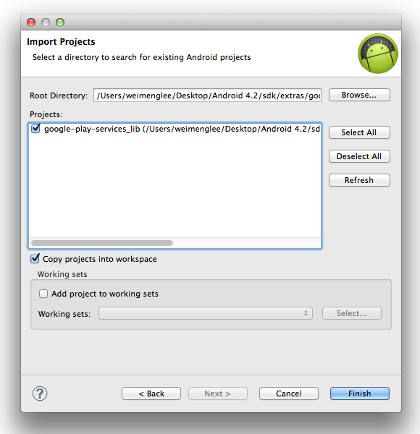
Figure 2 – Importing the Google Play Services Library into the workspace - You should now see the
google-play-services_libproject imported into your workspace (see Figure 3).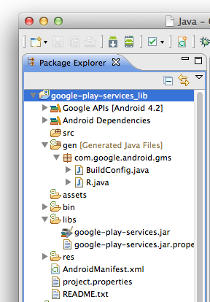
Figure 3 – The imported Google Play Services Library
Create the Android Project
You are now ready to create an Android Project to use the new Google Maps v2.
- In Eclipse, create an Android Application Project and name it as follows (see Figure 4):
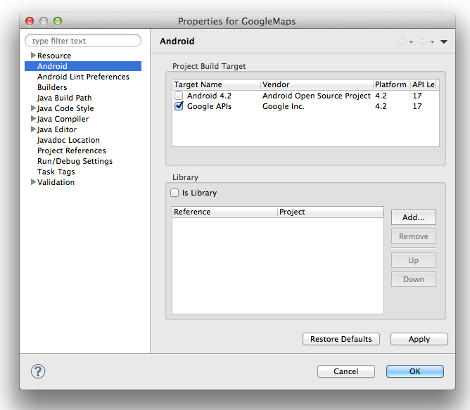
Figure 4 – Creating the Android ProjectAs mentioned earlier, it is not necessary to choose the Google APIs for using Google Maps v2 for Android.
- Click on the Next button and then the Finish button for the next couple of dialogs.
- Right-click on the GoogleMaps project and select Properties.
- Select the Android item on the left and click the Add… button on the right (see Figure 5):
Figure 5 – Adding a Library to the project - Select the
google-play-services_libproject and click OK and then OK (see Figure 6):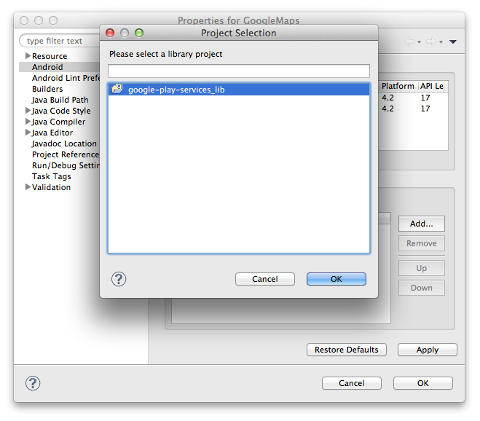
Figure 6 – Selecting the Google Play Services Library
Enabling Google Maps for your Application
To use Google Maps v2 for Android, you need to enable it in the Google APIs Console window.
- Using the Web browser on your computer, go to the Google APIs Console located at https://code.google.com/apis/console.
- Click the Create… item to create a new API project (see Figure 7):
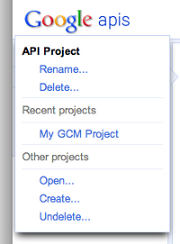
Figure 7 – Creating a new project in the Google APIs Console window - Give a name to your project and click the Create project button (see Figure 8):
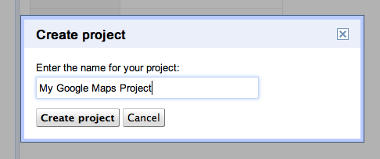
Figure 8 – Naming the project - You will now be able to see a list of services available. Locate the Google Maps Android API v2 item and turn on the service (see Figure 9):
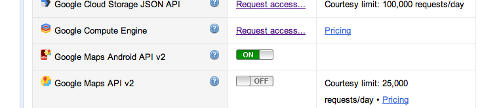
Figure 9 – Turning on the Google Maps v2 for Android service
Getting the Maps API Key
In order to use Google Maps v2 for Android, you need to apply for a Maps API key. In order to apply for a Maps API key, you need to pass Google the SHA1 hash of the certificate that you will use for signing your app.
- For Mac users, launch a Terminal window and follow the instruction in the next step. For Windows users, launch a Command window and cd to the bin folder of the Java installation folder. The bin folder is typically in the following directory:
C:Program FilesJavajdk1.7.0_21bin>
- Issue the following command to extract the SHA1 hash on your keystore (see Figure 10):
keytool -list -alias androiddebugkey -keystore "<path of debug.keystore>" -storepass android -keypass android –v
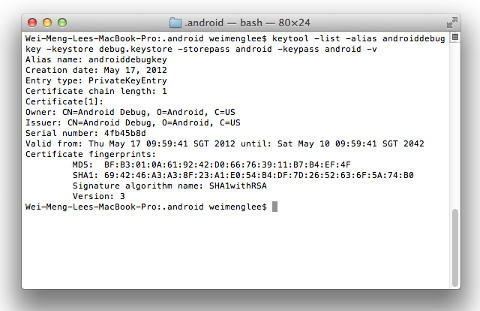
Figure 10 – Extracting the SHA1 hash from the certificate - Back in the Google APIs Console page, click on the API Access item on the left and click the Create new Android key… button (see Figure 11):
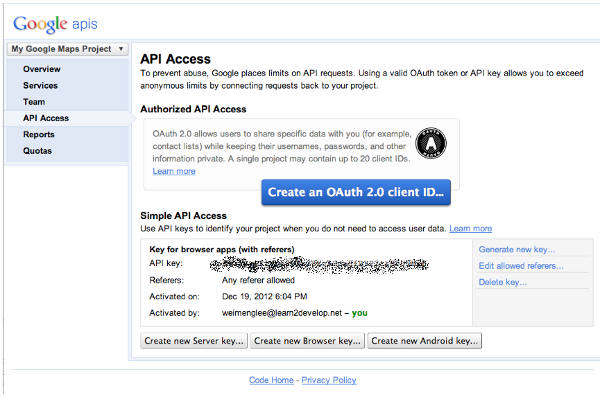
Figure 11 – Generating a new Android key - Enter the SHA1 key obtained previously followed by a “;” and then the package name of your project. Click Create (see Figure 12):

Figure 12 – Entering the SHA1 hash and package name - You will now obtain the Google Maps API key (see Figure 13):
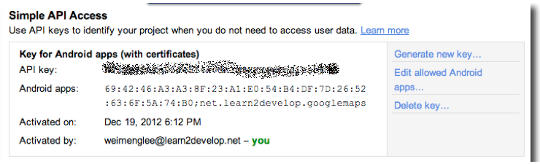
Figure 13 – Obtaining the Google Maps API key - Copy the Maps API key and save it somewhere. You will need this key later on.
- Back in Eclipse, enter the following code in
AndroidManifest.xml. Be sure to take note of the package name of your project as well as put it the Maps API key that you have obtained in the previous step:<?xml version="1.0" encoding="utf-8"?> <manifest xmlns:android="http://schemas.android.com/apk/res/android" package="net.learn2develop.googlemaps" android:versionCode="1" android:versionName="1.0" > <uses-sdk android:minSdkVersion="8" android:targetSdkVersion="16" /> <uses-feature android:glEsVersion="0x00020000" android:required="true" /> <permission android:name="net.learn2develop.googlemaps.permission.MAPS_RECEIVE" android:protectionLevel="signature" /> <uses-permission android:name="net.learn2develop.googlemaps.permission.MAPS_RECEIVE" /> <uses-permission android:name="android.permission.INTERNET" /> <uses-permission android:name="android.permission.WRITE_EXTERNAL_STORAGE" /> <uses-permission android:name= "com.google.android.providers.gsf.permission.READ_GSERVICES" /> <uses-permission android:name= "android.permission.ACCESS_COARSE_LOCATION" /> <uses-permission android:name="android.permission.ACCESS_FINE_LOCATION" /> <application android:allowBackup="true" android:icon="@drawable/ic_launcher" android:label="@string/app_name" android:theme="@style/AppTheme" > <activity android:name="net.learn2develop.googlemaps.MainActivity" android:label="@string/app_name" > <intent-filter> <action android:name="android.intent.action.MAIN" /> <category android:name="android.intent.category.LAUNCHER" /> </intent-filter> </activity> <meta-data android:name="com.google.android.maps.v2.API_KEY" android:value="<Your_MAPS_API_KEY>" /> </application> </manifest> - In the
activity_main.xmlfile, replace the content of the file with the following statements:<fragment xmlns:android="http://schemas.android.com/apk/res/android" android:id="@+id/map" android:layout_width="match_parent" android:layout_height="match_parent" class="com.google.android.gms.maps.MapFragment" /> - Deploy the application onto a real Android device.
At the moment, the Android emulator does not support Google Maps v2 for Android as it needs access to Google Play on the emulator.
- You should see the map as shown below (see Figure 14):
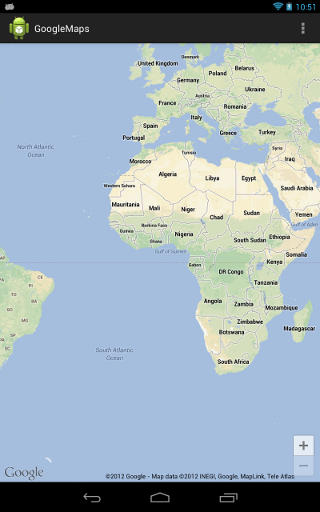
Figure 14 – The Google Maps displaying in your Android application
Using the Android Support Package for Google Maps
To ensure that your application is able to run on older Android devices, it is necessary to change the MapFragment class in your activity_main.xml file to use the SupportMapFragment class from the Android Support Package.
- Update
activity_main.xmlto look like:<fragment xmlns:android="http://schemas.android.com/apk/res/android" android:id="@+id/map" android:layout_width="match_parent" android:layout_height="match_parent" class="com.google.android.gms.maps.SupportMapFragment" /> - Add the following statements to the
MainActivity.javafile:import android.support.v4.app.FragmentActivity; ... public class MainActivity extends FragmentActivity {
Your Google Maps will now be able to run on older versions of Android.
Programmatically Manipulating the Map
In the following sections, I will show you some of the common operations that you can perform with Google Maps.
- Add the following statements in the
main.xmlfile located in theres/menufolder:<menu xmlns:android="http://schemas.android.com/apk/res/android" > <item android:id="@+id/menu_sethybrid" android:orderInCategory="100" android:showAsAction="never" android:title="Hybrid Mode"/> <item android:id="@+id/menu_showtraffic" android:orderInCategory="100" android:showAsAction="never" android:title="Show Traffic"/> <item android:id="@+id/menu_zoomin" android:orderInCategory="100" android:showAsAction="never" android:title="Zoom In"/> <item android:id="@+id/menu_zoomout" android:orderInCategory="100" android:showAsAction="never" android:title="Zoom Out"/> <item android:id="@+id/menu_gotolocation" android:orderInCategory="100" android:showAsAction="never" android:title="Go to a location"/> <item android:id="@+id/menu_addmarker" android:orderInCategory="100" android:showAsAction="never" android:title="Add a marker"/> <item android:id="@+id/menu_getcurrentlocation" android:orderInCategory="100" android:showAsAction="never" android:title="Get Current Location"/> <item android:id="@+id/menu_showcurrentlocation" android:orderInCategory="100" android:showAsAction="never" android:title="Show Current Location"/> <item android:id="@+id/menu_lineconnecttwopoints" android:orderInCategory="100" android:showAsAction="never" android:title="Line connecting 2 points"/> <item android:id="@+id/menu_settings" android:orderInCategory="100" android:showAsAction="never" android:title="@string/menu_settings"/> </menu> - Update
MainActivity.javawith the following code:package net.learn2develop.googlemaps; import android.os.Bundle; import android.support.v4.app.FragmentActivity; import android.view.Menu; import android.widget.Toast; import com.google.android.gms.maps.GoogleMap; import com.google.android.gms.maps.SupportMapFragment; public class MainActivity extends FragmentActivity { GoogleMap map; @Override protected void onCreate(Bundle savedInstanceState) { super.onCreate(savedInstanceState); setContentView(R.layout.activity_main); map = ((SupportMapFragment) getSupportFragmentManager() .findFragmentById(R.id.map)).getMap(); if (map == null) { Toast.makeText(this, "Google Maps not available", Toast.LENGTH_LONG).show(); } } @Override public boolean onCreateOptionsMenu(Menu menu) { // Inflate the menu; this adds items to the action bar if it is // present. getMenuInflater().inflate(R.menu.activity_main, menu); return true; } }
The above code creates a set of option menu items in your application. In addition, it also programmatically checks to see if Google Maps is able to load in your application.
Changing Map Mode
This section shows how to change the Google Maps to display the map in different view modes.
- Update
MainActivity.javawith the following code:package net.learn2develop.googlemaps; import android.os.Bundle; import android.support.v4.app.FragmentActivity; import android.view.Menu; import android.view.MenuItem; import android.widget.Toast; import com.google.android.gms.maps.GoogleMap; import com.google.android.gms.maps.SupportMapFragment; public class MainActivity extends FragmentActivity { GoogleMap map; @Override protected void onCreate(Bundle savedInstanceState) { super.onCreate(savedInstanceState); setContentView(R.layout.activity_main); map = ((SupportMapFragment) getSupportFragmentManager() .findFragmentById(R.id.map)).getMap(); if (map == null) { Toast.makeText(this, "Google Maps not available", Toast.LENGTH_LONG).show(); } } @Override public boolean onCreateOptionsMenu(Menu menu) { // Inflate the menu; this adds items to the action bar if it is // present. getMenuInflater().inflate(R.menu.activity_main, menu); return true; } @Override public boolean onOptionsItemSelected(MenuItem item) { switch (item.getItemId()) { case R.id.menu_sethybrid: map.setMapType(GoogleMap.MAP_TYPE_HYBRID); break; } return true; } } - Deploy the application onto a real Android device. Select the Hybrid Mode menu item and observe the map (see Figure 15):
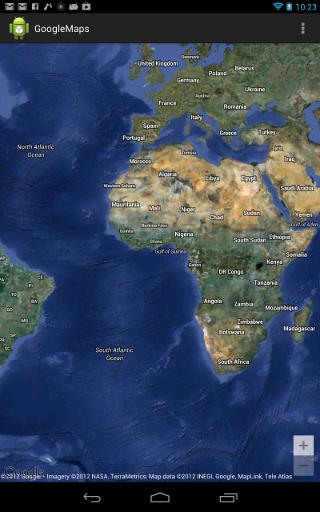
Figure 15 – Displaying the map in hybrid mode
Displaying Traffic
This section shows how to make Google Maps display traffic conditions.
- Add the following statements to the
MainActivity.javafile:@Override public boolean onOptionsItemSelected(MenuItem item) { switch (item.getItemId()) { case R.id.menu_sethybrid: map.setMapType(GoogleMap.MAP_TYPE_HYBRID); break; case R.id.menu_showtraffic: map.setTrafficEnabled(true); break; } return true; } - Deploy the application onto a real Android device. Select the Show Traffic menu item and observe the map (see Figure 16):
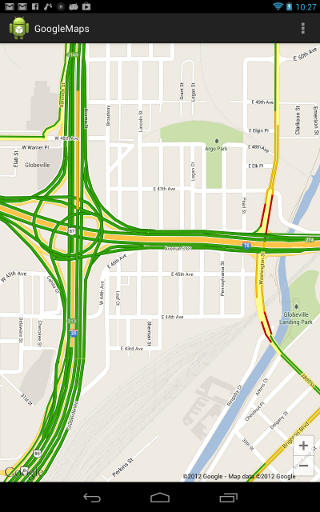
Figure 16 – Displaying traffic on the map
Zooming In and Out
This section shows how to programmatically zoom in or out of Google Maps.
- Add the following statements to the
MainActivity.javafile:case R.id.menu_zoomin: map.animateCamera(CameraUpdateFactory.zoomIn()); break; case R.id.menu_zoomout: map.animateCamera(CameraUpdateFactory.zoomOut()); break;So that the full file listing is:
package net.learn2develop.googlemaps; import android.os.Bundle; import android.support.v4.app.FragmentActivity; import android.view.Menu; import android.view.MenuItem; import android.widget.Toast; import com.google.android.gms.maps.CameraUpdateFactory; import com.google.android.gms.maps.GoogleMap; import com.google.android.gms.maps.SupportMapFragment; public class MainActivity extends FragmentActivity { GoogleMap map; @Override protected void onCreate(Bundle savedInstanceState) { super.onCreate(savedInstanceState); setContentView(R.layout.activity_main); map = ((SupportMapFragment) getSupportFragmentManager() .findFragmentById(R.id.map)).getMap(); if (map == null) { Toast.makeText(this, "Google Maps not available", Toast.LENGTH_LONG).show(); } } @Override public boolean onCreateOptionsMenu(Menu menu) { // Inflate the menu; this adds items to the action bar if it is // present. getMenuInflater().inflate(R.menu.activity_main, menu); return true; } @Override public boolean onOptionsItemSelected(MenuItem item) { switch (item.getItemId()) { case R.id.menu_sethybrid: map.setMapType(GoogleMap.MAP_TYPE_HYBRID); break; case R.id.menu_showtraffic: map.setTrafficEnabled(true); break; case R.id.menu_zoomin: map.animateCamera(CameraUpdateFactory.zoomIn()); break; case R.id.menu_zoomout: map.animateCamera(CameraUpdateFactory.zoomOut()); break; } return true; } } - Deploy the application onto a real Android device. Select the Zoom In and Zoom Out menu items and observe the map
Navigating to a Location
This section shows how to make Google Maps display a particular geographical location.
- Add the following statements to the
MainActivity.javafile:package net.learn2develop.googlemaps; import android.os.Bundle; import android.support.v4.app.FragmentActivity; import android.view.Menu; import android.view.MenuItem; import android.widget.Toast; import com.google.android.gms.maps.CameraUpdateFactory; import com.google.android.gms.maps.GoogleMap; import com.google.android.gms.maps.SupportMapFragment; import com.google.android.gms.maps.model.CameraPosition; import com.google.android.gms.maps.model.LatLng; public class MainActivity extends FragmentActivity { GoogleMap map; private static final LatLng GOLDEN_GATE_BRIDGE = new LatLng(37.828891,-122.485884); ... @Override public boolean onOptionsItemSelected(MenuItem item) { switch (item.getItemId()) { case R.id.menu_sethybrid: map.setMapType(GoogleMap.MAP_TYPE_HYBRID); break; case R.id.menu_showtraffic: map.setTrafficEnabled(true); break; case R.id.menu_zoomin: map.animateCamera(CameraUpdateFactory.zoomIn()); break; case R.id.menu_zoomout: map.animateCamera(CameraUpdateFactory.zoomOut()); break; case R.id.menu_gotolocation: CameraPosition cameraPosition = new CameraPosition.Builder() .target(GOLDEN_GATE_BRIDGE) // Sets the center of the map to // Golden Gate Bridge .zoom(17) // Sets the zoom .bearing(90) // Sets the orientation of the camera to east .tilt(30) // Sets the tilt of the camera to 30 degrees .build(); // Creates a CameraPosition from the builder map.animateCamera(CameraUpdateFactory.newCameraPosition( cameraPosition)); break; } return true; } } - Deploy the application onto a real Android device. Select the Go to a location menu item and observe the map (see Figure 17):
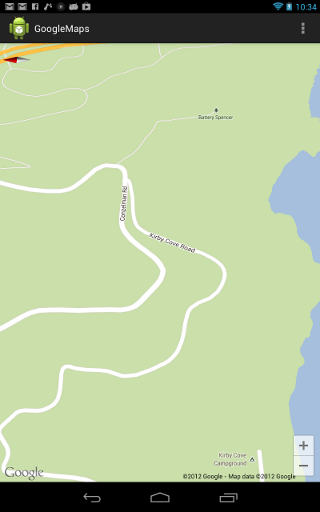
Figure 17 – Displaying the map of a specific location
Adding a Marker
This section shows how to add a marker (commonly known as a push pin) to Google Maps.
- Add the following statements to the
MainActivity.javafile:package net.learn2develop.googlemaps; import android.os.Bundle; import android.support.v4.app.FragmentActivity; import android.view.Menu; import android.view.MenuItem; import android.widget.Toast; import com.google.android.gms.maps.CameraUpdateFactory; import com.google.android.gms.maps.GoogleMap; import com.google.android.gms.maps.SupportMapFragment; import com.google.android.gms.maps.model.BitmapDescriptorFactory; import com.google.android.gms.maps.model.CameraPosition; import com.google.android.gms.maps.model.LatLng; import com.google.android.gms.maps.model.MarkerOptions; public class MainActivity extends FragmentActivity { GoogleMap map; private static final LatLng GOLDEN_GATE_BRIDGE = new LatLng(37.828891,-122.485884); ... @Override public boolean onOptionsItemSelected(MenuItem item) { switch (item.getItemId()) { case R.id.menu_sethybrid: map.setMapType(GoogleMap.MAP_TYPE_HYBRID); break; case R.id.menu_showtraffic: map.setTrafficEnabled(true); break; case R.id.menu_zoomin: map.animateCamera(CameraUpdateFactory.zoomIn()); break; case R.id.menu_zoomout: map.animateCamera(CameraUpdateFactory.zoomOut()); break; case R.id.menu_gotolocation: CameraPosition cameraPosition = new CameraPosition.Builder() .target(GOLDEN_GATE_BRIDGE) // Sets the center of the map to // Golden Gate Bridge .zoom(17) // Sets the zoom .bearing(90) // Sets the orientation of the camera to east .tilt(30) // Sets the tilt of the camera to 30 degrees .build(); // Creates a CameraPosition from the builder map.animateCamera(CameraUpdateFactory.newCameraPosition( cameraPosition)); break; case R.id.menu_addmarker: // ---using the default marker--- /* map.addMarker(new MarkerOptions() .position(GOLDEN_GATE_BRIDGE) .title("Golden Gate Bridge") .snippet("San Francisco") .icon(BitmapDescriptorFactory .defaultMarker(BitmapDescriptorFactory.HUE_AZURE))); */ map.addMarker(new MarkerOptions() .position(GOLDEN_GATE_BRIDGE) .title("Golden Gate Bridge") .snippet("San Francisco") .icon(BitmapDescriptorFactory .fromResource(R.drawable.ic_launcher))); break; } return true; } } - Deploy the application onto a real Android device. Select the Add a Marker menu item and observe the map (see Figure 18):
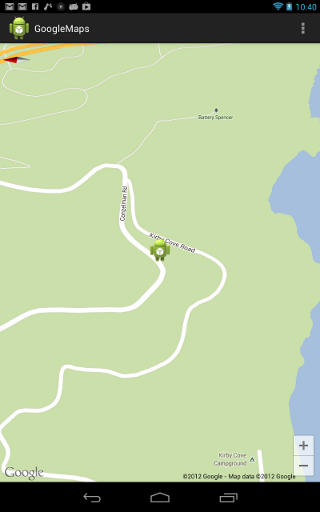
Figure 18 – Displaying a marker
Getting Your Current Location
This section shows how to get Google Maps to find your current location and then move the map to your current location.
- Add the following statements to the
MainActivity.javafile:package net.learn2develop.googlemaps; import android.location.Location; import android.os.Bundle; import android.support.v4.app.FragmentActivity; import android.view.Menu; import android.view.MenuItem; import android.widget.Toast; import com.google.android.gms.maps.CameraUpdateFactory; import com.google.android.gms.maps.GoogleMap; import com.google.android.gms.maps.SupportMapFragment; import com.google.android.gms.maps.model.BitmapDescriptorFactory; import com.google.android.gms.maps.model.CameraPosition; import com.google.android.gms.maps.model.LatLng; import com.google.android.gms.maps.model.MarkerOptions; public class MainActivity extends FragmentActivity { GoogleMap map; private static final LatLng GOLDEN_GATE_BRIDGE = new LatLng(37.828891,-122.485884); ... @Override public boolean onOptionsItemSelected(MenuItem item) { switch (item.getItemId()) { case R.id.menu_sethybrid: map.setMapType(GoogleMap.MAP_TYPE_HYBRID); break; case R.id.menu_showtraffic: map.setTrafficEnabled(true); break; case R.id.menu_zoomin: map.animateCamera(CameraUpdateFactory.zoomIn()); break; case R.id.menu_zoomout: map.animateCamera(CameraUpdateFactory.zoomOut()); break; case R.id.menu_gotolocation: CameraPosition cameraPosition = new CameraPosition.Builder() .target(GOLDEN_GATE_BRIDGE) // Sets the center of the map to // Golden Gate Bridge .zoom(17) // Sets the zoom .bearing(90) // Sets the orientation of the camera to east .tilt(30) // Sets the tilt of the camera to 30 degrees .build(); // Creates a CameraPosition from the builder map.animateCamera(CameraUpdateFactory.newCameraPosition( cameraPosition)); break; case R.id.menu_addmarker: // ---using the default marker--- /* map.addMarker(new MarkerOptions() .position(GOLDEN_GATE_BRIDGE) .title("Golden Gate Bridge") .snippet("San Francisco") .icon(BitmapDescriptorFactory .defaultMarker(BitmapDescriptorFactory.HUE_AZURE))); */ map.addMarker(new MarkerOptions() .position(GOLDEN_GATE_BRIDGE) .title("Golden Gate Bridge") .snippet("San Francisco") .icon(BitmapDescriptorFactory .fromResource(R.drawable.ic_launcher))); break; case R.id.menu_getcurrentlocation: // ---get your current location and display a blue dot--- map.setMyLocationEnabled(true); break; case R.id.menu_showcurrentlocation: Location myLocation = map.getMyLocation(); LatLng myLatLng = new LatLng(myLocation.getLatitude(), myLocation.getLongitude()); CameraPosition myPosition = new CameraPosition.Builder() .target(myLatLng).zoom(17).bearing(90).tilt(30).build(); map.animateCamera( CameraUpdateFactory.newCameraPosition(myPosition)); break; } return true; } } - Deploy the application onto a real Android device. Select the Get Current Location menu item and then followed by the Show Current Location menu item. Observe the map.
Drawing Lines on the Map
This section shows how to draw a line on Google Maps connecting two different locations.
- Add the following statements to the
MainActivity.javafile:package net.learn2develop.googlemaps; import android.graphics.Color; import android.location.Location; import android.os.Bundle; import android.support.v4.app.FragmentActivity; import android.view.Menu; import android.view.MenuItem; import android.widget.Toast; import com.google.android.gms.maps.CameraUpdateFactory; import com.google.android.gms.maps.GoogleMap; import com.google.android.gms.maps.SupportMapFragment; import com.google.android.gms.maps.model.BitmapDescriptorFactory; import com.google.android.gms.maps.model.CameraPosition; import com.google.android.gms.maps.model.LatLng; import com.google.android.gms.maps.model.MarkerOptions; import com.google.android.gms.maps.model.PolylineOptions; public class MainActivity extends FragmentActivity { GoogleMap map; private static final LatLng GOLDEN_GATE_BRIDGE = new LatLng(37.828891,-122.485884); private static final LatLng APPLE = new LatLng(37.3325004578, -122.03099823); ... @Override public boolean onOptionsItemSelected(MenuItem item) { switch (item.getItemId()) { case R.id.menu_sethybrid: map.setMapType(GoogleMap.MAP_TYPE_HYBRID); break; case R.id.menu_showtraffic: map.setTrafficEnabled(true); break; case R.id.menu_zoomin: map.animateCamera(CameraUpdateFactory.zoomIn()); break; case R.id.menu_zoomout: map.animateCamera(CameraUpdateFactory.zoomOut()); break; case R.id.menu_gotolocation: CameraPosition cameraPosition = new CameraPosition.Builder() .target(GOLDEN_GATE_BRIDGE) // Sets the center of the map to // Golden Gate Bridge .zoom(17) // Sets the zoom .bearing(90) // Sets the orientation of the camera to east .tilt(30) // Sets the tilt of the camera to 30 degrees .build(); // Creates a CameraPosition from the builder map.animateCamera(CameraUpdateFactory.newCameraPosition( cameraPosition)); break; case R.id.menu_addmarker: // ---using the default marker--- /* map.addMarker(new MarkerOptions() .position(GOLDEN_GATE_BRIDGE) .title("Golden Gate Bridge") .snippet("San Francisco") .icon(BitmapDescriptorFactory .defaultMarker(BitmapDescriptorFactory.HUE_AZURE))); */ map.addMarker(new MarkerOptions() .position(GOLDEN_GATE_BRIDGE) .title("Golden Gate Bridge") .snippet("San Francisco") .icon(BitmapDescriptorFactory .fromResource(R.drawable.ic_launcher))); break; case R.id.menu_getcurrentlocation: // ---get your current location and display a blue dot--- map.setMyLocationEnabled(true); break; case R.id.menu_showcurrentlocation: Location myLocation = map.getMyLocation(); LatLng myLatLng = new LatLng(myLocation.getLatitude(), myLocation.getLongitude()); CameraPosition myPosition = new CameraPosition.Builder() .target(myLatLng).zoom(17).bearing(90).tilt(30).build(); map.animateCamera( CameraUpdateFactory.newCameraPosition(myPosition)); break; case R.id.menu_lineconnecttwopoints: //---add a marker at Apple--- map.addMarker(new MarkerOptions() .position(APPLE) .title("Apple") .snippet("Cupertino") .icon(BitmapDescriptorFactory.defaultMarker( BitmapDescriptorFactory.HUE_AZURE))); //---draw a line connecting Apple and Golden Gate Bridge--- map.addPolyline(new PolylineOptions() .add(GOLDEN_GATE_BRIDGE, APPLE).width(5).color(Color.RED)); break; } return true; } } - Deploy the application onto a real Android device. Select the Line connecting 2 points menu item and observe the map (see Figure 19):
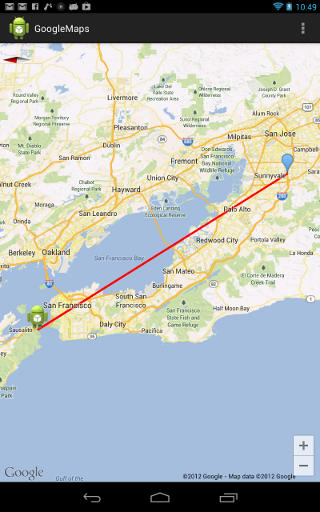
Figure 19 – Drawing a line connecting two points
Summary
In this article, you learned how to display and manipulate the new Android Google Maps v2.0 in your Android application. Specifically, you have learned the following:
- How to apply for a Maps API key
- How to use the MapFragment to display Google Maps
- How to change the map mode
- How to display traffic on the map
- How to programmatically zoom in and out of the map
- How to navigate to a location
- How to add a marker to the map
- How to obtain your current location
- How to display your current location
- How to draw lines on the map


