


Developers new to the Mac platform, or new to mobile, might find getting started with iPhone development a little tricky at first. In this article we take a look at the tools involved and go through the main steps in getting your first “Hello World!” iPhone app off the ground.
Although developing for the iPhone arguably has a higher barrier to entry than the Android platform, you may take comfort in the knowledge that Apple has provided a complete suite of tools to make the task a little easier.
Preparing for your iPhone Adventure
Before you can explore the tools, you need to get your hands on them first. The first thing you will need is an Intel-based Mac running Mac OS X Leopard version 10.5.4 or later. You don’t need a blazing fast machine – even a Mac mini will do, although a minimum of 2GB RAM is recommended.
Next, you should join the Apple Developer Connection (ADC) http://connect.apple.com/. The most basic membership is free, but there are also paid accounts available which offer benefits such as early access to the latest iphone SDK releases, and discounts on Mac hardware. For this tutorial, the free account will suffice.
The next thing to do is to download the iPhone SDK (http://developer.apple.com/iphone/index.action). You will need to have your Apple ID ADC membership that you signed up with earlier. For this tutorial, I used the 2.2.1 SDK, but it should work with version 2 and later. This is a hefty download, 1.8GB last time I looked, so don’t forget to bring your bandwidth, and now might be a good time to put the kettle on.
Once the download has completed, install the SDK by double-clicking on the .dmg file. Among the interesting goodies contained in this download are:
- Xcode – Apple’s IDE
- Interface Builder – drap & drop UI builder
- iPhone Simulator – for running and testing your applications before loading onto a real device
There are a host of other goodies too, but these are the ones we are concerned with for the moment.
Creating your first iPhone Application
So now we should be ready to create our first iPhone app. Start up Xcode. The default install location for Xcode is in the /Macintosh HD/Developer/Xcode.app
Next, when Xcode has loaded, select File > New Project from the main menu, and a dialog will open. On the left side, choose Application under the iPhone OS section. Xcode has a range of Project templates for you to choose from:
- Navigation-Based Application
- OpenGL ES Application
- Tab Bar Application
- Utility Application
- View Based Application
- Window Based Application
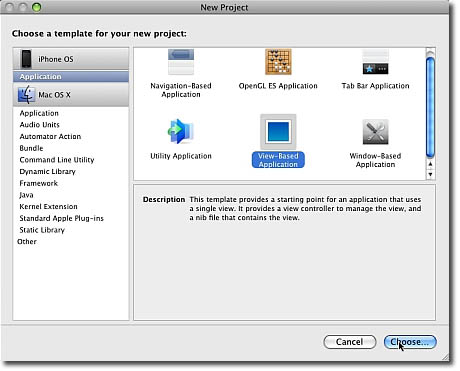
Figure 1 Project templates
If you click once on each of these you will see a short summary of what each does. Each template will set up a new project in a different way, according to the type of template you have selected. We will be using the View-based application template.
Create a Project in Xcode
There are many different ways that one might create a “Hello World!” iPhone app, and each has its own merit. In this tutorial we choose an approach which is very simple, achieving the “Hello World!” message without getting distracted by more complicated tasks, but which also gives a good tour of the suite of tools available to iPhone developers.
In this tutorial we use the View-based template – select it, and click Choose. You will now be prompted to enter a name for your project. Enter HelloWorld and click Save.
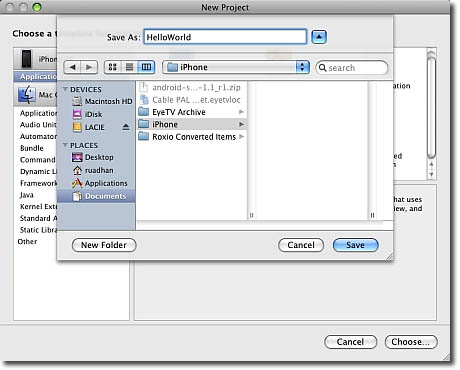
Figure 2 Create Project HelloWorld
Xcode will now generate your project files, and the new project will be opened in the Xcode project window. The project window consists of three panes and a toolbar. The left pane, called Groups and Files is essentially a project navigator, and gives access to all the project’s resources. On the top right is the Detail View pane. As its name suggests, this pane gives more detail on the item that is selected in the Groups and Files pane. On the bottom right is the Editor pane. Selected files will open in the Editor, and you can edit and modify your files from here.
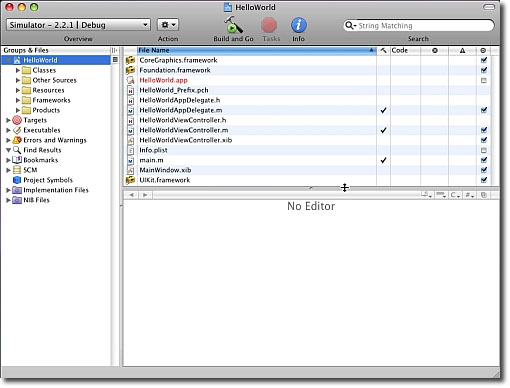
Figure 3 Xcode Project Window
In the Detail View pane there are a number of project files that Xcode has created for us. So what are all these files for?
- *.framework Standard sets of classes included in your project which give access to various functions and features:
UIKit.frameworkprovides the classes needed to construct and manage an application’s user interface,Foundation.frameworkhas the core classes and methods used by iPhone applications, andCoreGraphics.frameworkgives access to various graphics functions - HelloWorld_Prefix.pch: A “precompiled headers” file. Xcode will pre-compile the list of header files from external frameworks that are used by your project. This makes for faster building when you are ready to test your application
- main.m: Contains the
main()function of your application. Usually you won’t need to change this - HelloWorldViewController.xib: This file is used by the Interface Builder program, and contains all the information about the user interface of your application
- Info.plist: A properties list file. It contains a number of properties as key-value pairs which affect the compilation of your application
- MainWindow.xib: This is the main Interface Builder file for the application.
- HelloWord.app: This file is generated when we compile the application, and which is deployed to the Simulator or real device.
Note that .xib files are often referred to as nib files. A nib file is a compiled .xib file. For the purposes of this tutorial there is no distinction.
The Interface Builder
We now turn our attention to creating our “Hello World!” message. We will achieve this by creating a View graphically in the Interface Builder. This view will display our message. First, launch the Interface Builder by double-clicking the Hello_WorldViewController.xib file.

Figure 4 The Interface Builder
There will now be several windows visible in the Interface Builder:
- HelloWorldViewController.xib This window contains top level objects (i.e. objects with no parents). It should contain three icons: File’s Owner, First Responder, and View (explained below).
- Library Shows the UI compnents that we can use in Interface Builder. To add a component to your view, you simply drag the desired item to the View window, and an instance of that class will be added to your application.
- View The main window which shows what the
.xibfile currently looks like. It can be used to build and arrange our interface elements - Inspector This window gives access to a variety of information about an object, and lets you change this information. This window has four tabs: Attributes, Connections, Size, Identity. The Inspector window can be opened by selecting
Tools > Inspectorfrom the menu.
Within the HelloWorldViewController window, there are a number of icons. Each icon that will appear in this window (with the exception of File’s Owner, and First Responder) will represent an object that is created automatically for you from the nib file.
- File’s Owner This is always the first icon in a nib file, and it refers to the object that manages the nib file, and which owns this copy of the nib file (usually the appplication or a view controller). You don’t need to worry about this for now.
- First Responder This represents the control or interface object with which the user is currently interacting, and therefore changes over time. It might be helpful to think of the First Responder as the current focus of the user. For instance, while the user enters text in a textfield, then the text field is current First Responder. You don’t need to worry about this for now.
- View This represents the View of our application, that is, it represents what the users of your application can see
We will use the Interface Builder to build our view. Of course, you could build the view programmatically but the Interface Builder is designed to take away some of the pain of this by providing an intuitive drag and drop tool for building user-interfaces. So, instead of writing code to create our UI components, with the Interface Builder, you could simply drag an object from the Library window to the View window as we will see shortly.
Adding our Message
In the Library window of the Interface Builder there are many objects that can be added to your app. These are from the iPhone UIKit framework.
To display our “Hello World!” message we are going to add a Label object to our app. A Label is essentially an uneditable textfield that can be displayed on the iPhone. Find the Label object in the list in the Library window. To add it, simply drag it from the Library window to the View window as indicated by the arrow in the image below.
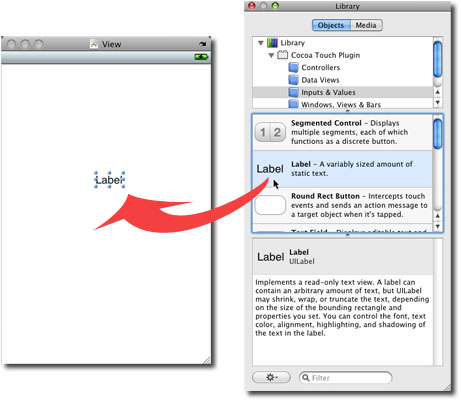
Figure 5 Adding a Label to our View
To change the text, double-click the Label you just added in the View window, and you can now type some text. Enter “Hello World!”.
That’s it! Select File > Save in the Interface Builder main menu, and we are now ready to build and test our application.
Build and Run
To build the app you need to go back into Xcode. From the Xcode project window toolbar, simply click the Build and Go button and Xcode will do the rest. Your application will now be compiled. If there are no errors, the Simulator will be launched and your app will be loaded into it. If everything has gone to plan, you should now see our “Hello World!” message on the iPhone screen as in the image below. That’s it, mission accomplished!
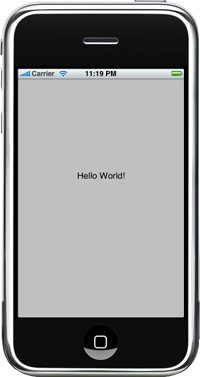
Figure 6 Running your app on the simulator
Tweaking our App
We mentioned earlier that the Inspector of the Interface Builder can be used to view and change data associated with our objects. We will now use the Inspector window to adjust the display properties of our “Hello World!” message.
The Inspector is context-sensitive. That is, it will display the data associated with the currently selected object, and what it displays will change when we select a different object.
So, we will first change the colour of our label. Close the Simulator (if it is still open), and switch back over to the Interface Builder. Select the “Hello World!” label in the View window by clicking on it once. Now, if the Inspector window is not open, launch it by selecting Tools > Inspector from the main menu.
The Inspector should now display all data associated with our label. From here we can change the font size, color, and various other properties.
Click on the field next to the Color attribute in the Inspector, and a color-picker should appear. Choose a new color (I chose white).
Next, we will change the background color of our app. To do this we click in the View window anywhere other than on our label. The Inspector will bring up the attributes for the main window.
Click on the field next to the Background attribute in the Inspector, and again a color-picker will appear, and you can choose a new color (I chose black!).

Figure 7 The Inspector window (left) showing attributes for selected label in the View window (right), and color-picker (middle)
Feel free to make changes to both the Window and the Label, and when you are happy with how it looks, save it, and then go back to Xcode and click the “Build and Run” button again to view your changes in the Simulator.
Customizing the Application Icon
![]() Right now your application icon is pretty bland – a featureless white square. It would be nice to have something a little fancier. The good news is that you can use any 57×57 pixel PNG image as your application icon. In this tutorial we use the mobiForge logo (right) as our app icon.
Right now your application icon is pretty bland – a featureless white square. It would be nice to have something a little fancier. The good news is that you can use any 57×57 pixel PNG image as your application icon. In this tutorial we use the mobiForge logo (right) as our app icon.
To add your icon image to the project, select from the main menu bar: Project > Add to Project, and navigate to the image file that you want to use for your icon.
Xcode will ask you if you want to copy the file into the project. You should select ‘Yes’.
Next you need to specify that this image should be used as the icon. Open the Info.plist file in Xcode. Recall from earlier that this file contains a list of key-value properties associated with your project.
In the Key column, locate the ‘Icon file’ key. In the Value column associated with this key, double click and enter icon.png or whatever the name of your icon image file is (see image below).
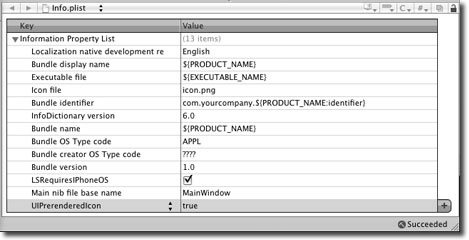
Figure 8 Editing the Info.plist properties file
Note that when creating an icon for your app, you do not need to try to replicate the glossy, rounded effect of the typical iPhone icons. The iPhone will automatically add the gloss effect and round the corners by default. If you do not want the iPhone to apply these effects then you can prevent this by adding the key UIPrerenderedIcon and setting its value to true (see highlighted row in image above). This will tell the iPhone not to apply gloss and bevel effects to the icon.
![]()
Figure 9 New app icon on iPhone home screen, with effects (left), and with UIPrerenderedIcon=true (right)
Conclusion
So we have written a simple “Hello World!” iPhone application, and we have tested it on the iPhone simulator. We have also had a brief tour of the main tools used to build iPhone apps, which include Xcode, the Interface Builder, and the Simulator. You should now be ready to move onto more complicated topics, such as user interaction and event handling which we will cover in the future.


