


With the widespread adoption of touchscreen devices, HTML5 brings to the table, among many other things, a set of touch-based interaction events. Mouse-based events such as hover, mouse in, mouse out etc. aren’t able to adequately capture the range of interactions possible via touchscreen, so touch events are a welcome and necessary addition to the web developer’s toolbox.
Use cases for the touch events API include gesture recognition, multi-touch, drag and drop, and any other touch-based interfaces.
The Touch Events API
We’ll get some of the technical details of the API out of the way first, before moving on to some real examples. The API is
defined in terms of Touches, TouchEvents, and TouchLists.
Each Touch describes a touch point, and has the following attributes:
| Attribute | Description |
|---|---|
identifier |
unique numeric identifier |
target |
the DOM element that is the event target of the touch, even if the touch has moved outside of this element |
screenX |
horizontal coordinate relative to screen |
screenY |
vertical coordinate relative to screen |
clientX |
horizontal coordinate of point relative to viewport, excluding scroll offset |
clientY |
vertical coordinate of point relative to viewport, excluding scroll offset |
pageX |
horizontal coordinate of point relative to page, including scroll offset |
pageY |
vertical coordinate of point relative to page, including scroll offset |
The main touch events defined in the specification are outlined in the table below. The target of the event is the element in which the touch was detected, even if the touch has moved outside this element.
| Event | Description |
|---|---|
touchstart |
triggered when a touch is detected |
touchmove |
triggered when a touch movement is detected |
touchend |
triggered when a touch is removed e.g. the user’s finger is removed from the touchscreen |
touchcancel |
triggered when a touch is interrupted, e.g. if touch moves outside of the touch-capable area |
Three lists of touches, TouchLists, are associated with each of the events. These are:
| List | Description |
|---|---|
touches |
all current touches on the screen |
targetTouches |
all current touches that started on the target element of the event |
changedTouches |
all touches involved in the current event |
Touch Events example
We’ll cover just the basics in this example. There are plenty of more complex examples to be found on the web already, such as the canvas fingerpaint demo by Paul Irish et al. Here we demonstrate simply how to capture and inspect a touch event. Of the available data from the API, we’ll use only the touchstart event, and the pageX and pageY attributes.
First, some HTML. We define a touch-sensitive div to which we will attach an event listener. We also define a div at the top where we will display the screen coordinates of the most recent touch.
  <div id="coords"></div>
  <div id="touchzone"></div>
Next we add some JavaScript to register the event listener, and add a handler function to do something with the touch data:
function init() {
  // Get a reference to our touch-sensitive element
  var touchzone = document.getElementById("touchzone");
  // Add an event handler for the touchstart event
  touchzone.addEventListener("touchstart", touchHandler, false);
}
So, here we’re simply identifying the touchzone div, attaching a listener for the touchstart event, and registering a handler function: touchHandler.
In the touchHandler function we grab the x and y coordinates of the touch, and write them to the coords div:
function touchHandler(event) {
  // Get a reference to our coordinates div
  var coords = document.getElementById("coords");
  // Write the coordinates of the touch to the div
  coords.innerHTML = 'x: ' + event.touches[0].pageX + ', y: ' + event.touches[0].pageY;
}
And now we’re ready to go. If you are viewing this page on a device which supports touch events, you should be able to see the screen coordinates of your touches below.
Live Demo – display touch coordinates
Click the area to the right to activate the live demo. Depending on your device, you should be able to see the the coordinates of your touch points.
(Note: this demo, and the other demos on this page, are listening for touch AND mouse events, and so they should also work on non-touch enabled devices).

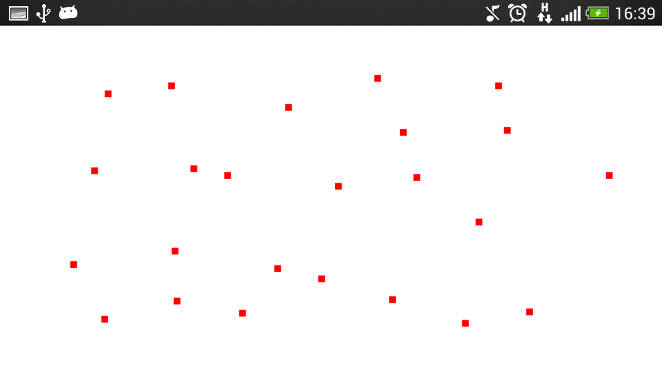
Display touches on screen
So now we know how to grab and display some basic touch data. Let’s go one step further and display the touch position information visually, by displaying a dot on the screen at the point where it was touched.
There are a couple of extra things we need to do to get this working. For the display, we’ll make use of another HTML5 feature: the canvas element. For now, all we need to say about canvas is that it facilitates drawing graphics in a web page without much difficulty.
To define the canvas element, we use the following (we’ve set the size, and added a border too):
  <canvas id="mycanvas" width="662" height="373" style="border: 1px solid #ccc">
    Canvas element not supported<br />
  </canvas>
We also need to modify the handler function from the last example, so that we now draw on this canvas element. To do this, we need to:
- Find the canvas element in the DOM
var canvas = document.getElementById('mycanvas'); - Get the 2D drawing context from the canvas element; this provides the methods and properties we need to draw on the canvas
var ctx = canvas.getContext("2d"); - Use the drawing context to draw something; we’ll draw a small rectangle
ctx.fillRect(event.touches[0].pageX-offset.left, event.touches[0].pageY-offset.top, 5, 5);
That’s it! The full code is displayed below:
<!DOCTYPE html>
<html>
  <head>
    <title>HTML5 input </title>
    <script type='text/javascript'>

    function init() {
      var touchzone = document.getElementById("mycanvas");
      touchzone.addEventListener("touchstart", draw, false);
    }

    function draw() {
      var canvas = document.getElementById('mycanvas');

      if(canvas.getContext) {
        var ctx = canvas.getContext("2d");
        ctx.fillRect (event.touches[0].pageX, event.touches[0].pageY, 5, 5);
      }
    }
    </script>

  </head>
  <body onload="init()">
    <canvas id="mycanvas" width="500" height="500">
      Canvas element not supported.
    </canvas>
  </body>
</html>
Touch the image below to activate the live demo, and then touch the area below to display your touches!
Touch coordinate and screen coordinate conversion
A short note on coordinates and element positions. There is a small trick – to do with coordinate frames – that was glossed over in the above example. The above example will work fine if the canvas element is the only element on the page, and it is aligned with the top left of the page. However, most of the time in your webapps the element that you are interested in will not benefit for the luxury of sitting in this top-leftmost position – more likely it will be embedded in the page some distance down and across. That is, it will be offset by a certain amount from the left of the viewport, and a certain amount from the top of the viewport. We can call these values offsetLeft and offsetTop respectively.
These values must be taken into account when we want to convert the reported touch event coordinates to usable screen coordinates. Incorporating the offset is quite simple; we use something like touch.pageX-offsetLeft, and touch.pageY-offsetTop. So how do we get the offsets? To do this, I refer to the method outlined on the Quirskmode blog. The trick is to start with the element we are interested in, and to traverse up the DOM tree, accumulating the offset of each element from its parent until the top is reached. Then we have the total offset that we can use in our app.
A function to compute this offset looks like this:
function getOffset(obj) {
  var offsetLeft = 0;
  var offsetTop = 0;
  do {
    if (!isNaN(obj.offsetLeft)) {
      offsetLeft += obj.offsetLeft;
    }
    if (!isNaN(obj.offsetTop)) {
      offsetTop += obj.offsetTop;
    }
  } while(obj = obj.offsetParent );
  return {left: offsetLeft, top: offsetTop};
}
From single touches to swipes and gestures: the touchmove event
In the last example we saw how we could visualise single touches as dots, using the canvas element and the touchstart event. Now we’ll take a look at what we can do when we add the touchmove event into the mix. The touchstart event was useful to capture single point touches. But with touchmove we can capture swipes and other gestures.
The first thing we can try is to simply use the touchmove event in place of the touchstart event, and leave the rest of our code the same. So, each time the touchmove event is fired during a touch, we will draw a dot (small rectangle) at the point reported by the event. This should, in theory, trace out the entire touch as a path on the screen.
In our init function, we will have:
canvas.addEventListener("touchmove", draw, false);
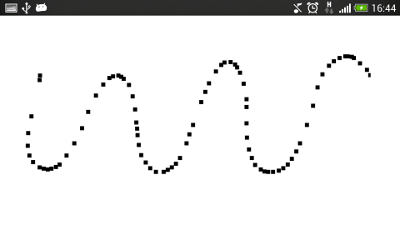
So we can now draw freeform shapes. However, because we are only drawing points, if we move too fast, then the result will be a broken path, as depicted in the image on the right.
If we want instead a nice continuous path, we need to be a little smarter. Instead of simply drawing a dot at the reported touch position, we draw a line between the last two touchpoints. This should fill the gaps we saw in the image above. We can achieve this with the code below:
      ctx.beginPath();
      // Start at previous point
      ctx.moveTo(lastPt.x, lastPt.y);
      // Line to latest point
      ctx.lineTo(e.touches[0].pageX, e.touches[0].pageY);
      // Draw it!
      ctx.stroke();

      //Store latest touchpoint
      lastPt = {x:e.touches[0].pageX, y:e.touches[0].pageY};
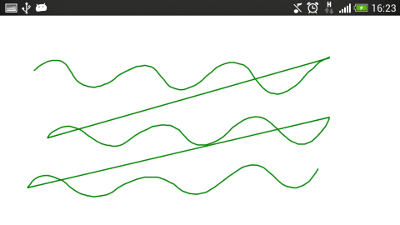
Finally, we don’t want to continue the path we are drawing across separate touches where the finger has been lifted from the screen, or we will end up with all paths joined up – as shown in the image to the right, in which there are three separate paths that are incorrectly joined. For this, we need to figure out when the touch has ended, and to terminate the path we are drawing. Enter the touchend event!
First, we will register a handler function for the touchend event. In this function, we need to perform any necessary actions that should occur at the end of the touch. In this case we are drawing the path of the touches on the screen, so for the touchend event, we need to terminate the current path, and to ensure that it is not associated with the next touch that occurs.
So, to attach the handler:
touchzone.addEventListener("touchend", endTouch, false);
In our example, whenever the touchmove event is triggered, we store the last point so that we can join up the last two points. So, to end the path of a touch, we simply forget about the last point by setting it to null:
  function endTouch(e) {
    e.preventDefault();
    lastPt=null;
  }
The full code then for the example is:
<!DOCTYPE html>
<html>
  <head>
    <title>HTML5 Touch Tracing </title>
    <script type='text/javascript'>
      var canvas;
      var ctx;
      var lastPt=null;

      function init() {
        var touchzone = document.getElementById("mycanvas");
        touchzone.addEventListener("touchmove", draw, false);
        touchzone.addEventListener("touchend", end, false);
        ctx = touchzone.getContext("2d");
      }

      function draw(e) {
        e.preventDefault();
        if(lastPt!=null) {
          ctx.beginPath();
          ctx.moveTo(lastPt.x, lastPt.y);
          ctx.lineTo(e.touches[0].pageX, e.touches[0].pageY);
          ctx.stroke();
        }
        lastPt = {x:e.touches[0].pageX, y:e.touches[0].pageY};
      }

      function end(e) {
        e.preventDefault();
        // Terminate touch path
        lastPt=null;
      }
    </script>
  </head>
  <body onload="init()">
    <canvas id="mycanvas" width="500" height="500">
      Canvas element not supported.
    </canvas>
  </body>
</html>
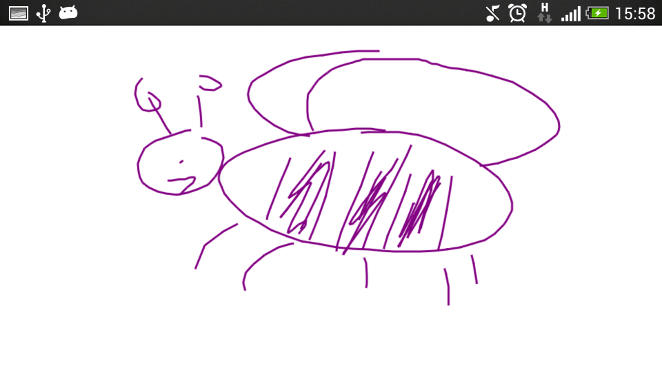
Activate the touchmove example by touching the purple bumblebee, and draw something in the box below.
HTML5 multi-touch example
So, now we can handle single touches and swipes, what about mutliple simultaneous touch interactions, or, in the parlance of our times, multi-touch?
We can determine the number of touch events by checking the length of the list of touches, using e.touches.length. In the previous examples we assumed just one touch, and so we referenced touches[0] to get at the data for this touch. So, to add multi-touch support to our demo, we can iterate over the touches array, and perform an appropriate action for each of the touches in the array. This amounts to wrapping our previous code in a loop, and instead of storing the last point for a single touch, we store an array of the last points for all the registered touches.
Finally, to help the visualisation, we’ll add a splash of colour with:
var colours = ['red', 'green', 'blue', 'yellow', 'black'];
Then we can set the colour of a line with:
ctx.strokeStyle = colours[id];
Maintaining the list of latest points is a little trickier when when want to know which touch path to terminate. For this we can make use of the identifier attribute of the touch object. We will maintain an associative array of the last points of all touches, keyed by the identifier attribute of the respective touch.
We define our associative array as an Object:
var lastPt = new Object();
We can get the identifier of a touch with:
var id = e.touches[i].identifier;
And we can add new items into the array, using the touch identifier as the key, with:
lastPt[id] = {x:e.touches[i].pageX, y:e.touches[i].pageY};
Finally, we need to remove entries in the array when we detect the touchend event. To do this, we make use of the changedTouches touchList. This array includes all the touches associated with the current event. So, when we detect the touchend event, we can iterate over this array, and remove the entries in the lastPt associative array that match the identifiers of the touches in the changeTouches array:
  function end(e) {
    e.preventDefault();
    for(var i=0;i<e.changedTouches.length;i++) {
      var id = e.changedTouches[i].identifier;
      delete lastPt[id];
    }
  }
The full code listing is below:
<!DOCTYPE html>
<html>
  <head>
  <title>HTML5 multi-touch</title>
  <script type='text/javascript'>
    var canvas;
    var ctx;
    var lastPt = new Object();
    var colours = ['red', 'green', 'blue', 'yellow', 'black'];

    function init() {
      var touchzone = document.getElementById("mycanvas");
      touchzone.addEventListener("touchmove", draw, false);
      touchzone.addEventListener("touchend", end, false);
      canvas = document.getElementById('mycanvas');
      ctx = canvas.getContext("2d");
    }

    function draw(e) {
      e.preventDefault();

      //Iterate over all touches
      for(var i=0;i<e.touches.length;i++) {
        var id = e.touches[i].identifier;
        if(lastPt[id]) {
          ctx.beginPath();
          ctx.moveTo(lastPt[id].x, lastPt[id].y);
          ctx.lineTo(e.touches[i].pageX, e.touches[i].pageY);
          ctx.strokeStyle = colours[id];
          ctx.stroke();

        }
        // Store last point
        lastPt[id] = {x:e.touches[i].pageX, y:e.touches[i].pageY};
      }
  }

  function end(e) {
    e.preventDefault();
    for(var i=0;i<e.changedTouches.length;i++) {
      var id = e.changedTouches[i].identifier;
      // Terminate this touch
      delete lastPt[id];
    }
  }

  </script>
  </head>
  <body onload="init()">
    <canvas id="mycanvas" width="500" height="500">
      Canvas element not supported.
    </canvas>
  </body>
</html>
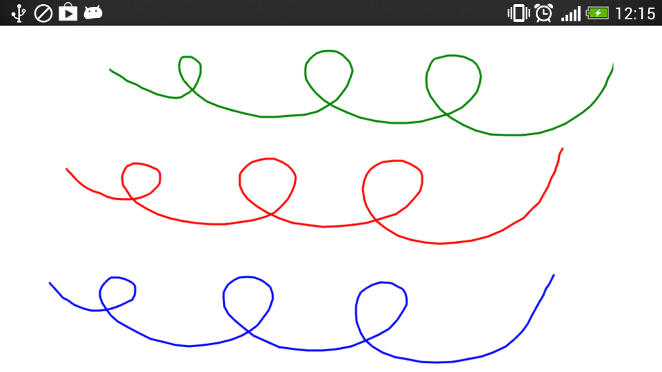
Touch the squiggly lines below to activate the live multitouch demo; then move multiple fingers around the screen at the same time!
Browser support and fallbacks
Touch events are widely supported among mobile devices. However, unless specifically targeting touch devices, a fallback should be implemented when touchevents are not supported. In these cases, the traditional click etc. events can be bound to, but as discussed below, care is needed when deciding which events to support instead of the touch events.
| Android | iOS | IE Mobile | Opera Mobile | Opera Classic | Opera Mini | Firefox Mobile | Chrome for Android | |
|---|---|---|---|---|---|---|---|---|
| Touch support | ||||||||
| (Sources: caniuse.com, DeviceAtlas, mobilehtml5.org) | ||||||||
Touch and mouse events
Since touch events may not be supported on a user’s device – indeed, the user may not even be accessing your app on a touchscreen device – this contingency should be planned for. You may want to enable your app to support particular mouse events instead. Care should be taken here as there is not a one-to-one correspondance between mouse events and touch events, and the behaviour differences can be subtle. For a good overview of the issues involved take a look at the article Touch and Mouse by Chris Wilson and Paul Kinlan.
Best practices
Care should also be taken implementing touch events that the events don’t interfere with typical browser behaviours such as scrolling and zooming – thus there is an argument for disabling these default browser behaviours if you are making use of touch events. Boris Smus outlines these and other potential pitfalls to look out for over on HTMLRocks.
Conclusion
In this article we’ve taken a look at the how the HTML5 Touch Events API enables touch interactions for your web apps. We saw how to access raw touch data, and how we can manage multi-touch interactions. While we worked through some examples to demonstrate how to access and display touches on the screen (with a little help from our friend, the canvas element), it’s worth mentioning that there are open source libraries available which take care of the some of the lower level details for you, such as the very useful Hammer.js, a JavaScript library for multi-touch gestures. That’s all for now, stay tuned for our follow up articles in our HTML5 series.
Update Live examples updated to work with mouse events as well as touch events for illustration purposes
Links and references
- W3C HTML5 Touch Events Specification
- Multi-touch Web Development by Rob Smus on HTML5Rocks.com
- Touch And Mouse by Chris Wilson and Paul Kinlan
- Hammer.js – a JavaScript library for multi-touch gestures by Jorik Tangelder
Download
The code examples in this article can be downloaded below.


Leave a Reply