


In this final installation of the Android Views series of articles, we shall continue our exploration of another category of views – Menu views, and some additional cool views. The views discussed include:
- Context Menu
- Options Menu
- AnalogClock
- DigitalClock
- WebView
Note: for all the examples in this article, you shall use the project created in the previous article.
Menus
Menus are useful for displaying additional options that are not directly visible on the main UI of an application. There are two main types of menus in Android:
- Context Menu – displays information related to a particular view on an activity. In Android, to activate a context menu you press and hold on to it.
- Options Menu – displays information related to the current activity. In Android, you activate the options menu by pressing the MENU key.
Figure 1 shows an example of an options menu in the Browser application. The option menu is displayed whenever the user presses the MENU button. The menu items displayed is dependent on the current activity that is running.
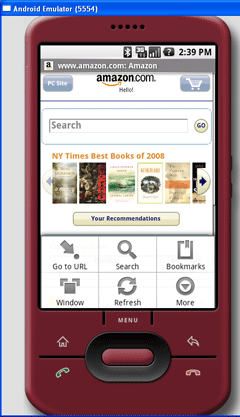
Figure 1 – The options menu in the Browser application
Figure 2 shows a context menu that is displayed when the user presses and holds on a hyperlink displayed on the page. The menu items displayed are dependent on the component or view currently selected. To activate the context menu, the user selects an item on the screen and either presses and holds it or simply presses the center button on the directional keypad.
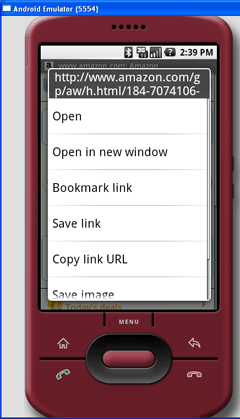
Figure 2 – The context menu in the Browser application
To see how to implement menus in Android, add a new file to the res/layout folder and name it as menu.xml. Populate it with the following element:
<?xml version="1.0" encoding="utf-8"?>
<LinearLayout xmlns:android="http://schemas.android.com/apk/res/android"
    android:orientation="vertical"
    android:layout_width="fill_parent"
    android:layout_height="fill_parent"
    >

    <Button android:id="@+id/btn1"
        android:layout_width="fill_parent"
        android:layout_height="wrap_content"
        android:text = "Hello, world!"
        />

</LinearLayout>
Then, add a new class to the src/net.learn2develop.AndroidViews folder and name it as MenuExample.java. You will leave this file alone for now. Modify the AndroidManifest.xml file to register the new activity:
<?xml version="1.0" encoding="utf-8"?>
<manifest xmlns:android="http://schemas.android.com/apk/res/android"
      package="net.learn2develop.AndroidViews"
      android:versionCode="1"
      android:versionName="1.0.0">
    <application android:icon="@drawable/icon" android:label="@string/app_name">
        <activity android:name=".ViewsActivity"
                  android:label="@string/app_name">
            <intent-filter>
                <action android:name="android.intent.action.MAIN" />
                <category android:name="android.intent.category.LAUNCHER" />
            </intent-filter>
        </activity>

        <activity android:name=".MenuExample"
                  android:label="@string/app_name" />

    </application>
</manifest>
Creating the Helper Methods
For the examples in this section, you will create two helper methods in the MenuExample.java file. They are CreateMenu() and MenuChoice(). Define the two helper methods and the onCreate() method as shown below:
package net.learn2develop.AndroidViews;

import android.app.Activity;
import android.os.Bundle;
import android.view.Menu;
import android.view.MenuItem;
import android.widget.Button;
import android.widget.Toast;

public class MenuExample extends Activity
{
    @Override
    public void onCreate(Bundle savedInstanceState)
    {
        super.onCreate(savedInstanceState);

        setContentView(R.layout.menu);
        Button btn = (Button) findViewById(R.id.btn1);
        btn.setOnCreateContextMenuListener(this);
    }

    private void CreateMenu(Menu menu)
    {
        menu.setQwertyMode(true);
        MenuItem mnu1 = menu.add(0, 0, 0, "Item 1");
        {
            mnu1.setAlphabeticShortcut('a');
            mnu1.setIcon(R.drawable.alert_dialog_icon);
        }
        MenuItem mnu2 = menu.add(0, 1, 1, "Item 2");
        {
            mnu2.setAlphabeticShortcut('b');
            mnu2.setIcon(R.drawable.ic_popup_reminder);
        }
        MenuItem mnu3 = menu.add(0, 2, 2, "Item 3");
        {
            mnu3.setAlphabeticShortcut('c');
            mnu3.setIcon(R.drawable.icon);
        }
        MenuItem mnu4 = menu.add(0, 3, 3, "Item 4");
        {
            mnu4.setAlphabeticShortcut('d');
        }
        menu.add(0, 3, 3, "Item 5");
        menu.add(0, 3, 3, "Item 6");
        menu.add(0, 3, 3, "Item 7");
    }

    private boolean MenuChoice(MenuItem item)
    {
        switch (item.getItemId()) {
        case 0:
            Toast.makeText(this, "You clicked on Item 1",
                Toast.LENGTH_LONG).show();
            return true;
        case 1:
            Toast.makeText(this, "You clicked on Item 2",
                Toast.LENGTH_LONG).show();
            return true;
        case 2:
            Toast.makeText(this, "You clicked on Item 3",
                Toast.LENGTH_LONG).show();
            return true;
        case 3:
            Toast.makeText(this, "You clicked on Item 4",
                Toast.LENGTH_LONG).show();
            return true;
        case 4:
            Toast.makeText(this, "You clicked on Item 5",
                Toast.LENGTH_LONG).show();
            return true;
        case 5:
            Toast.makeText(this, "You clicked on Item 6",
                Toast.LENGTH_LONG).show();
            return true;
        case 6:
            Toast.makeText(this, "You clicked on Item 7",
                Toast.LENGTH_LONG).show();
            return true;
        }
        return false;
    }
}
The CreateMenu() method creates a list of menu items and modifies the behavior of each menu item. The parameters for the add() method are: groupid, itemid, order, and title. The setAlphabeticShortcut() method assigns a keyboard shortcut to the menu item so that when the user presses a specific key, the menu item would be selected. The setIcon() method assigns an icon to the menu item.
The MenuChoice() method displays the selected menu item using the Toast class. Next, copy two images (as shown in Figure 3) into the res/drawable folder.
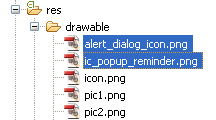
Figure 3 – Adding images to the res/drawable folder
Options Menu
To display the options menu for your activity, you need to override two methods – onCreateOptionsMenu() and onOptionsItemSelected(). The onCreateOptionsMenu() method is called when the MENU button is pressed. In this event, you would call the CreateMenu() helper method to display the options menu. When a menu item is selected, the onOptionsItemSelected() method will be called. In this case, you call the MenuChoice() method to display the menu item selected (and do whatever you need to do):
public class MenuExample extends Activity
{
    @Override
    public void onCreate(Bundle savedInstanceState)
    {
        super.onCreate(savedInstanceState);

        setContentView(R.layout.menu);
    }

    private void CreateMenu(Menu menu)
    {
        //...
    }

    private boolean MenuChoice(MenuItem item)
    {
        //...
    }

    //---only created once---
    @Override
    public boolean onCreateOptionsMenu(Menu menu) {
        super.onCreateOptionsMenu(menu);
        CreateMenu(menu);
        return true;
    }

    @Override
    public boolean onOptionsItemSelected(MenuItem item)
    {
         return MenuChoice(item);
    }

}
Modify the ViewsActivity.java file as follows to start the MenuExample activity:
package net.learn2develop.AndroidViews;

import android.app.Activity;
import android.os.Bundle;
import android.content.Intent;

public class ViewsActivity extends Activity {
    /** Called when the activity is first created. */
    @Override
    public void onCreate(Bundle savedInstanceState) {
        super.onCreate(savedInstanceState);
        setContentView(R.layout.main);

        startActivity(new Intent(this, MenuExample.class));
    }
}
Press F11 to debug the application. When you press the MENU key, you will see the options menu as shown in Figure 4.
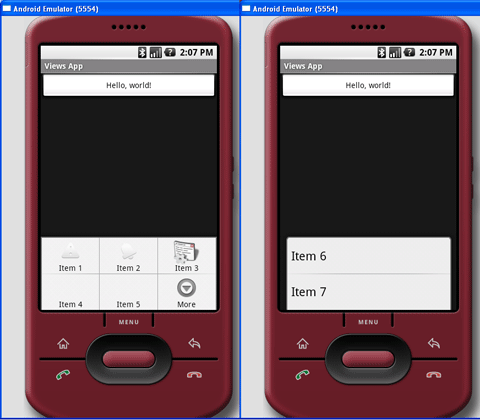
Figure 4 – Displaying a options menu in your application
Observe the icons displayed for menu item 1, 2 and 3. Also, if the options menu has more than six items, there will be a More menu item to represent the additional menu items. The right of Figure 3-24 shows pressing the More item displays the additional menu items as a list.
Context Menu
If you want to associate a context menu to a view on an activity, you need to call the setOnCreateContextMenuListener() method of that particular view. For example, the following code shows how you can associate a context menu with the Button view:
package net.learn2develop.AndroidViews;

import android.app.Activity;
import android.os.Bundle;
import android.view.ContextMenu;
import android.view.Menu;
import android.view.MenuItem;
import android.view.View;
import android.view.ContextMenu.ContextMenuInfo;
import android.widget.Button;
import android.widget.Toast;

public class MenuExample extends Activity
{
    @Override
    public void onCreate(Bundle savedInstanceState)
    {
        super.onCreate(savedInstanceState);
        setContentView(R.layout.menu);

        Button btn = (Button) findViewById(R.id.btn1);
        btn.setOnCreateContextMenuListener(this);
    }

    private void CreateMenu(Menu menu)
    {
        //...
    }

    private boolean MenuChoice(MenuItem item)
    {
        //...
    }

    //---only created once---
    @Override
    public boolean onCreateOptionsMenu(Menu menu)
    {
        super.onCreateOptionsMenu(menu);
        CreateMenu(menu);
        return true;
    }

    @Override
    public boolean onOptionsItemSelected(MenuItem item)
    {
         return MenuChoice(item);
    }

    @Override
    public void onCreateContextMenu(ContextMenu menu, View view,
    ContextMenuInfo menuInfo)
    {
         super.onCreateContextMenu(menu, view, menuInfo);
         CreateMenu(menu);
    }

    @Override
    public boolean onContextItemSelected(MenuItem item)
    {
         return MenuChoice(item);
    }

}
Like the Options menu, you need to override the onCreateContextMenu() and onContextItemSelected() methods. Press F11 in Eclipse to debug the application. Press the Button view and hold for a few seconds. You will now see the context menu (see Figure 5). Observe the keyboard shortcuts for menu items 1 to 4 shown below the menu names.
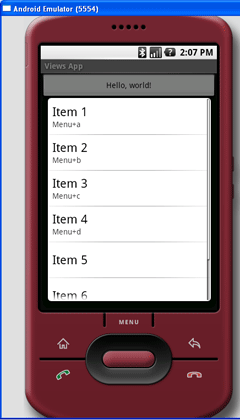
Figure 5 – Displaying context menu in your application
Some Additional Views
Besides the standard views that you have seen up to this point, the Android SDK also provides some interesting views that make your applications much more interesting. In the following sections, you will learn more about the following views:
- AnalogClock
- DigitalClock
- WebView
AnalogClock and DigitalClock Views
The AnalogClock view displays an analog clock. Populate the main.xml file with the following element:
<?xml version="1.0" encoding="utf-8"?>
<LinearLayout xmlns:android="http://schemas.android.com/apk/res/android"
    android:orientation="vertical"
    android:layout_width="fill_parent"
    android:layout_height="fill_parent"
    >

    <AnalogClock android:id="@+id/clock1"
        android:layout_width="wrap_content"
        android:layout_height="wrap_content"
        />

</LinearLayout>
In the ViewsActivity.java file, ensure that the main.xml file is loaded as the UI for the activity:
package net.learn2develop.AndroidViews;

import android.app.Activity;
import android.os.Bundle;

public class ViewsActivity extends Activity
{
    /** Called when the activity is first created. */
    @Override
    public void onCreate(Bundle savedInstanceState)
    {
        super.onCreate(savedInstanceState);
        setContentView(R.layout.main);

    }
}
When you press F11 now, you will see the analog clock as shown in Figure 6.
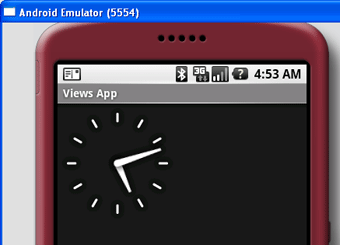
Figure 6 – The AnalogClock in action
Instead of an analog clock, you can display a digital clock instead using the DigitalClock view.
Add the DigitalClock element to main.xml as shown below:
<?xml version="1.0" encoding="utf-8"?>
<LinearLayout xmlns:android="http://schemas.android.com/apk/res/android"
    android:orientation="vertical"
    android:layout_width="fill_parent"
    android:layout_height="fill_parent"
    >

    <AnalogClock android:id="@+id/clock1"
        android:layout_width="wrap_content"
        android:layout_height="wrap_content" />

    <DigitalClock android:id="@+id/clock2"
        android:layout_width="wrap_content"
        android:layout_height="wrap_content" />

</LinearLayout>
Press F11 in Eclipse. Figure 7 shows the analog clock and the digital clock.
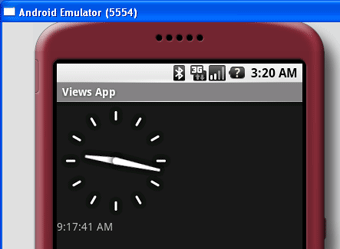
Figure 7 – The DigitalClock in action
WebView
The WebView view allows you to embed a web browser in your Android applications. Add a new file to the res/layout folder and name it as webview.xml and populate it with the following element:
<?xml version="1.0" encoding="utf-8"?>
<LinearLayout xmlns:android="http://schemas.android.com/apk/res/android"
    android:orientation="vertical"
    android:layout_width="fill_parent"
    android:layout_height="fill_parent"
    >

    <WebView android:id="@+id/webview1"
        android:layout_width="wrap_content"
        android:layout_height="wrap_content"
        android:text = "Hello, world!"
        />

</LinearLayout>
Add a new class to the src/net.learn2develop.AndroidViews folder and name it as WebViewExample.java. Populate it as follows:
package net.learn2develop.AndroidViews;

import android.app.Activity;
import android.os.Bundle;
import android.webkit.WebView;

public class WebViewExample extends Activity
{
    /** Called when the activity is first created. */
    @Override
    public void onCreate(Bundle savedInstanceState)
    {
        super.onCreate(savedInstanceState);
        setContentView(R.layout.webview);

        WebView wv = (WebView) findViewById(R.id.webview1);
        wv.loadUrl("http://www.mobiforge.com");
    }
}
The loadUrl() method of the WebView class loads the page of a given URL. Modify the AndroidManifest.xml file to register the new activity as well as to request for the INTERNET permission:
<?xml version="1.0" encoding="utf-8"?>
<manifest xmlns:android="http://schemas.android.com/apk/res/android"
      package="net.learn2develop.AndroidViews"
      android:versionCode="1"
      android:versionName="1.0.0">
    <application android:icon="@drawable/icon" android:label="@string/app_name">
        <activity android:name=".ViewsActivity"
                  android:label="@string/app_name">
            <intent-filter>
                <action android:name="android.intent.action.MAIN" />
                <category android:name="android.intent.category.LAUNCHER" />
            </intent-filter>
        </activity>

        <activity android:name=".WebViewExample"
                  android:label="@string/app_name" />

    </application>

    <uses-permission android:name="android.permission.INTERNET">
    </uses-permission>

   <uses-sdk android:minSdkVersion="3" />

</manifest>
For the WebView view to work, you need to add the INTERNET permission to the AndroidManifest.xml file. Modify the ViewsActivity.java file as follows to start the WebViewExample activity:
package net.learn2develop.AndroidViews;

import android.app.Activity;
import android.os.Bundle;
import android.content.Intent;

public class ViewsActivity extends Activity {
    /** Called when the activity is first created. */
    @Override
    public void onCreate(Bundle savedInstanceState) {
        super.onCreate(savedInstanceState);
        setContentView(R.layout.main);
        startActivity(new Intent(this, WebViewExample.class));
    }
}
Press F11 to debug the application on the Android emulator. Figure 8 shows the WebView view in action.

Figure 8 – The WebView displaying a web page
You can also dynamically formulate a HTML string and load it into the WebView view, using the loadDataWithBaseURL() method:
		WebView wv = (WebView) findViewById(R.id.webview1);

        final String mimeType = "text/html";
        final String encoding = "UTF-8";
        String html = "<H1>A simple HTML page</H1><body>" +
            "<p>The quick brown fox jumps over the lazy dog</p>";

        wv.loadDataWithBaseURL("", html, mimeType, encoding, "");
Figure 9 shows the WebView with the HTML string loaded.
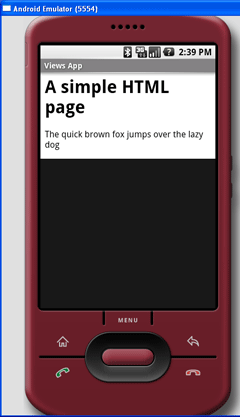
Figure 9 – Displaying the content of a HTML string
If you have static pages that you want to load directly from your project, you can save the HTML pages under the assets folder of your package. Figure 10 shows that I have added a page named Index.html under the assets folder.
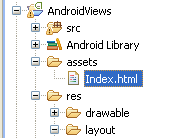
Figure 10 – Adding a HTML page in the assets folder
The content of the Index.html is as follows:
<h1>A simple HTML page</h1>
<body>
   <p>The quick brown fox jumps over the lazy dog</p>
   <img src='https://www.google.com/logos/Logo_60wht.gif'/>
</body>
To load the WebView using the content stored in the Index.html file, use the loadUrl() method as follows:
	    WebView wv = (WebView) findViewById(R.id.webview1);
	    wv.loadUrl("file:///android_asset/Index.html");
Figure 11 shows the content loaded in the WebView view.
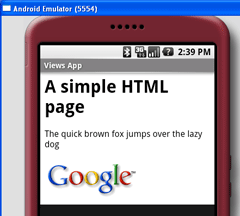
Figure 11 – Loading the HTML page using WebView
Summary
In this article, you have seen how to implement context and option menus in your Android applications. In addition, you have also seen how to use some of the other cool views, such as the AnalogClock and DigitalClock. And this concludes the series of Android views. I hope you now have a great grasp of how views work in Android. Have a great Android application experience!


