


Web push notifications are the best thing to hit the web since the hyperlink! No kidding, this technology is going to be huge. Until recently web developers could only dream of push enabled web apps. Things have changed however, and web push notifications, the asynchronous delivery of messages to a user’s device from a website, even when the website is not open in the browser, are now a reality thanks to a number of HTML5 APIs:
- Notifications API: handles notification display
- Service Workers API: handles the push message when it arrives in the background
- Push API: enables users to subscribe, unsubscribe and receive push messages
- Web app manifest specification: configures meta information about a webapp
Using these APIs together, we can build push notifications into our web apps: some possible use cases are listed below.
- a business can notify customers about special offers
- a notification can be sent when a particular task or job is finished
- a news website can notify subscribers when new content has been published (we’ll implement something like this in this article!)

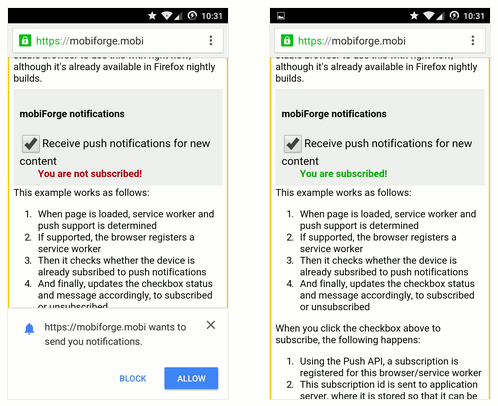
mobiForge web push notifications on mobile (left) and desktop (overlay)
It’s worth stating upfront that this technology is great! One of its strengths is that you will receive notifications on supported devices even if you don’t have the originating site open in your browser. This is where the Service Worker API comes in. While a web app might not be open in your browser, when a push message comes through, a service worker springs into action to handle it.
Another strength is that it offers a near frictionless way to communicate directly with users, without them having to give up any personal data such as a phone number or an email address.
In this article we’ll set up web push notifications on this site, mobiForge, so that whenever we publish new content, subscribers will receive a notification with a link back to the new content, and we’ll document the whole process of what we needed to do to get it up and running.
Web push notifications example
To set up web notifications on this website we’ll need an interface to manage whether a visitor is subscribed or not. We’ll use a simple checkbox for this. For the impatient, the finished result is live below. If your browser doesn’t support push or service workers, then you won’t be able to view the example. Sorry! Chrome is the only stable browser to use this with right now, although it’s already available in Firefox nightly builds.
Once you are signed up, whenever mobiForge publishes new content, you should receive a clickable push message that will arrive on the desktop or homescreen of any subscribed device, and will look something like the image above, depending on the device. Let us know if and how it works for you. When Firefox, Opera and other browsers support push notifications, we’ll implement it for those browsers too!
This example works as follows:
- When page is loaded, service worker and push support is determined
- If supported, the browser registers a service worker
- Then it checks whether the device is already subsribed to push notifications
- And finally, updates the checkbox status and message accordingly, to subscribed or unsubscribed
When you click the checkbox above to subscribe (or unsubscribe), the following happens:
- Using the Push API, a subscription is registered (or unregistered) for this browser/service worker
- This subscription id is sent to (or removed from) the application server, where it is stored so that it can be used to send a push message to later
Finally, when a push message is sent
- The server makes a request to the push messaging server for specific subscription ids
- The push messaging server sends the message out to devices with matching subscription id
- The service worker on the device picks up the message and displays a notification
To get up and running as quickly as possible, we’ll run through the basics of each of the APIs involved as we need them. Hold on to your hats, this is wonderful technology, but it can be tricky to implement, and not for the faint-hearted, but it’s worth the effort!
There are some requirements to be aware of before we begin:
- HTTPS required Because Service Workers can expose man-in-the-middle attacks in an unsecured system, they can only be registered on an HTTPS enabled domain. This can cause problems during development; here are some workarounds:
- Firefox nightly provides a config option to disable the HTTPS check
- Test on localhost. This may not suit many development environments
- GitHub supports HTTPS, so this is a free option too
- Service Workers, Notification, and Push APIs must all be supported: if any isn’t then this won’t work. Right now Chrome is the only stable browser which will run this
- Push Messaging service: Messages must be routed through a messaging service, such as Google Cloud Messaging (GCM) service
- This means it will work on most Android devices. However, Android forks without GCM APIs will need a different solution
Web push notifications: sequence diagram
There are three main flows we need to think about. They are illustrated in the sequence diagram below.
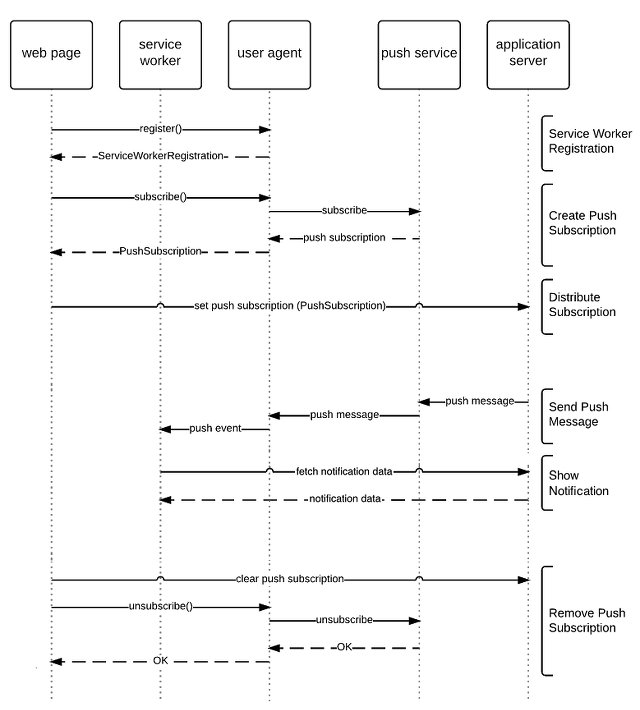
Web push sequence diagram (based on Push API spec)
The first is the subscribe flow, where a service worker is registered, a subscription is created, and that subscription is stored on our application server, so that we know who to send notifications to later.
The second is the push flow, where a push message is initiated on the application server, sent via the messaging server, and arrives at the user’s device. After receiving the push message, we need to fetch the actual notification data from the appserver, and then display a notification on the device.
And finally, we have the unsubscribe flow, where we must handle the case where a user unsubscribes: we remove the subscription from the server, and from the messaging server.
Web push notifications: subscribe flow
In the subscribe flow, we need to allow the user to subscribe to push notifications. As we saw earlier, we’re going to manage this with a simple checkbox, so we will use the checkbox both to control the subscribing (and unsubscribing) and to indicate the current status (subscribed or unsubscribed). Let’s start by looking at the Push API.
The Push API
A good place to start with this API is the first line of the spec.
The Push API provides webapps with scripted access to server-sent messages, for simplicity referred to here as push messages, as delivered by push services. A push service allows an application server to send messages to a webapp, regardless of whether the webapp is currently active on the user agent. The push message will be delivered to a Service Worker, which could then store the message’s data or display a notification to the user.
This allows users to subscribe to receive notifications from a web page, and whether their device is currently running the webapp or not, they will still receive the update. Note also the dependency on the Service Workers API, so if your browser doesn’t support service workers, then you’re out of luck.
The Push API defines the PushManager interface, which has a few methods that we’re interested in:
- subscribe/unsubscribe: used to subscribe/unsubscribe a user to receive notifications
- getSubscription: can use this to check if any subscription exists already, i.e. is the user already subscribed
- permissionState: returns the current push permission status, one of
granted,denied,prompt
Back to our implementation: we should check for support for the Push API, check the current subscription status, and if a push subscription already exists, then we need to set the status of our subscribed checkbox as checked; and if no subscription exists, then it should be unchecked so that the user can check it to subscribe.
First we check if Push is supported:
  if('PushManager' in window) {
    //Push supported!
  }
To check the subscription status, and to subscribe or unsubscribe, we need to now look at the Service Worker API, since the Push API relies on it.
Service Workers
Service workers are a key part of getting push notifications up and running. They offer offline capabilities by providing a way for a web page to run scripts in the background without having the page open. This makes it possible to build rich offline experiences previously only possible with native apps. For a good tutorial on service workers, see this article on HTML5Rocks.
To register a service worker, first check for support, then call the register() method.
  //check for support
  if ('serviceWorker' in navigator) {
  navigator.serviceWorker.register('sw.js').then(function(registration) {
    // Registration was successful
  }).catch(function(err) {
    // registration failed :(
  });
}
Now we have a service worker that we can use. The service worker code will be in the sw.js file in this case. This file will be validated when the service worker is first registered. We’ll come back to this file later.
Next, since service worker and push are supported, we will show the subscribe interface; we’ll hide the interface if not supported. Then, we want to check the current subscription status, to see if the user is already subscribed, and update the interface accordingly. So we’ll write a new function called checkSubscription() and execute it when the service worker has been registered. We’ll also add an event handler to the checkbox so that we can subscribe or unsubscribe the user. And all of this will happen after the page has loaded:
window.onload = function() {
  if ('serviceWorker' in navigator) {
    navigator.serviceWorker.register('/sw.js').then(function(registration) {
      // Registration was successful, show interface
      document.getElementById('not-status').innerHTML = '<h4>mobiForge notifications</h4><input type="checkbox" name="pushStatus" id="pushStatus" value="false" /><label for="pushStatus">Receive push notifications for new content</label><div id="pushStatusMsg"></div>';

      //Check subscription state
      checkSubscription();

      //Attach listener
      document.getElementById("pushStatus").addEventListener('click', function(){
        subUnsubPush();
      });
    }).catch(function(err) {
      // registration failed :(
      console.log('ServiceWorker registration failed: ', err);
    });
  }
  else {
    console.log("ServiceWorker not supported :-(");
    document.getElementById('not-status').innerHTML = 'ServiceWorker not supported :-(';
  }
};
In our checkSubscription function we can use the getSubscription() method of the PushManager we saw earlier. If a subscription exists, it will be returned.
  function checkSubscription() {
    navigator.serviceWorker.ready.then(function(serviceWorkerRegistration) {
      serviceWorkerRegistration.pushManager.getSubscription().then(
        function(pushSubscription) {
          if(!!pushSubscription) {
            //Send subscription to application server
            sendSub(pushSubscription);

            //Manage interface
            pushStatus = true;
            document.getElementById("pushStatus").checked = true;
            document.getElementById("pushStatusMsg").innerHTML = '<span>You are subscribed!</span>';
          }
          else {
            //Manage interface
            pushStatus = false;
            document.getElementById("pushStatus").checked = false;
            document.getElementById("pushStatusMsg").innerHTML = '<span>You are not subscribed!</span>';
          }
        }.bind(this)).catch(function(e) {
          console.error('Error getting subscription', e);
        });
    });
  }
If a subscription is returned from the getSubscription function call then we know that the user is already subscribed to push notifications, so we must update the status of our user-interface, i.e. we must check the checkbox and its message text to indicate this status. Additionally, we’ll update the status of a variable that we’ll use to keep track of the status.
If no subscription exists already, we can subscribe the user with the subscribe method of the service worker PushManager:
serviceWorkerRegistration.pushManager.subscribe() {...}
The subscribe call returns a promise, so we provide a callback where we can access the details of the subscription. And all of this is invoked in the callback of the promise returned by the service worker ready method.
function subscribePush() {
  navigator.serviceWorker.ready.then(function(serviceWorkerRegistration) {
    serviceWorkerRegistration.pushManager.subscribe({userVisibleOnly: true})
      .then(function(pushSubscription) {
        //Store this subscription on application server
        sendSub(pushSubscription);

        //Update status of interface
        document.getElementById("pushStatus").checked = true;
        document.getElementById("pushStatusMsg").innerHTML = '<span>You are subscribed!</span>';
        pushStatus = true;
      })
      .catch(function(e) {
        console.error('Unable to register push subscription', e);
      });
  });
}
We use a simple fetch to push the subscription id to the server. Note that we have a little work to do to separate the subscription id from the endpoint. Right now, we’re only using the GCM push messaging service, and so we’re only storing the subscription id on the server, as there is no need to store the endpoint as there is only one. In the future however, when other push messaging services become widely available, we’ll need to be able to handle different endpoints as well as subscription ids:
function sendSub(pushSubscription) {
  console.log(pushSubscription);
  //get endpoint
  const endPoint = pushSubscription.endpoint.slice(pushSubscription.endpoint.lastIndexOf('/')+1);
   fetch("https://mobiforge.com/subscribe/"+endPoint).then(function(res) {
      res.json().then(function(data) {
        console.log(data);
      }).catch(function(e) {
          console.error('Error sending subscription to server:', e);
        });
    })
}
Note earlier we added a click handler to the checkbox. This calls a function subUnsubPush() which determines the current push subscription status, and subscribes (as above), or unsubscribes (see next section) the user.
function subUnsubPush() {
  //Get current status
  if(!pushStatus) subscribePush();
  else unsubscribePush();
}
So, with this code, we can subscribe to receive push notifications from this website. But what about obtaining notification permission? Shouldn’t was have done that first? Yes, but a subtle point is that, if we look at the part of the Push specification about the PushManager interface, we’ll see that calling the subscribe method above will automatically make the request to the user: the browser must [a]sk the user whether they allow the webapp to receive push messages, unless a prearranged trust relationship applies or the user has already granted or denied permission explicitly for this webapp. So that’s that taken care of for us, as illustrated in the image below:
Requesting push notification permission (left) and after permission is granted (right)
At this point, if you were to output the subscription to the console, it would look something like this, notably showing the endpoint and subscription id:
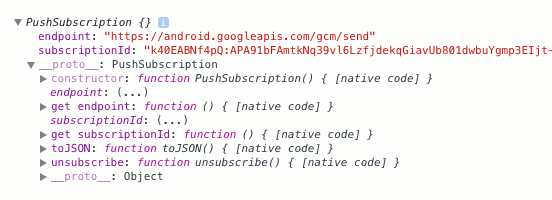
Finally, now that we have the subscription, looking back at the sequence diagram, we still want to store it on the server, so that when the server decides to do a push, it has all ids for the target subscriptions (Distribute Subscription in the diagram). To keep things simple here, we’ll just make an XHR or Fetch request to a server script which will store the subscription ids in a text file or database table. Then, when the server wants to do a push, it will send all of these ids along with the push request to the messaging server (GCM in this case).
To send the subscription id to the application server (you’ll need to swap in the URL for your own server application to manage subscription ids):
function sendSub(pushSubscription) {
  fetch("https://mobiforge.com/subscribe/"+pushSubscription.id).then(function(res) {
    res.json().then(function(data) {
      // Log the data for illustration
      console.log(data);
    })
  })
}
On the application server we store the subscription id in a MySQL table, letting MySQL worry about any duplicates. You don’t necessarily need to use MySQL here. Any implementation will do so long as you can add and remove subscriptions.
Web push notifications: unsubscribing
Although the next flow in the diagram above is the push flow, we’ll jump straight to unsubscribing, since it’s quite similar to the subscribe flow that we’ve just run through. When the user unchecks the checkbox, we want to remove the subscription from the application server, and then call the unsubscribe method of the pushManager to remove it from the message server and service worker. But first, we should check that we have a subscription to unsubscribe in the first place.
function unsubscribePush() {
  console.log('unsubscribing...');
  navigator.serviceWorker.ready.then(function(serviceWorkerRegistration) {

    serviceWorkerRegistration.pushManager.getSubscription().then(
      function(pushSubscription) {
        // Check we have a subscription to unsubscribe
        if (!pushSubscription) {
          // Nothing to unsubscribe, set checkboox interface unchecked...
          document.getElementById("pushStatus").checked = false;
          document.getElementById("pushStatusMsg").innerHTML = '<span>You are not subscribed!</span>';
          pushStatus = false;
          return;
        }

        // We have a subscription, so remove it from applications server...
        cancelSub(pushSubscription);

        //... and unsubscribe it
        pushSubscription.unsubscribe().then(function() {
          //User unchecked the checkbox, but let's make sure
          document.getElementById("pushStatus").checked = false;
          document.getElementById("pushStatusMsg").innerHTML = '<span>You are not subscribed!</span>';
          pushStatus = false;
        }).catch(function(e) {
          console.log('Error unsubscribing: ', e);
        });
      }).catch(function(e) {
        console.error('Error unsubscribing.', e);
      });
  });
}
To remove the subscription from the application server, we make a similar request to the one we made when we added the subscription to the application server. This time the server simply removes the subscription from the database.
function cancelSub(pushSubscription) {
  const endPoint = pushSubscription.endpoint.slice(pushSubscription.endpoint.lastIndexOf('/')+1);
  fetch("https://mobiforge.com/unsubscribe/"+endpoint).then(function(res) {
    res.json().then(function(data) {
      console.log(data);
    })
  })
}
Web push notifications: the push flow
Looking at the client side of the push flow diagram, we now need to set up the client to listen for push messages. So we need to check that we have permission to show notifications, and we need to set up the push event listener (and of course we need to check that notification and push APIs are supported). This code will live in the service worker file that we registered earlier: sw.js.
We need to listen for the push event, and when this event is triggered, we must retrieve the actual notification data from the application server. This is an extra step that may not be necessary in the future, but right now this is a limitation of the messaging server: there is no way to send a payload with the push message. In our example, we’ll keep it really simple and fetch the notification data from a predefined URL on the server that always delivers a JSON payload with the latest data. So, in our sw.js file:
self.addEventListener('push', function(e) {
  console.log('push received');

  // Get the notification data, then display notification
});
We’ll fetch the notification data with the Fetch API. (You could also use traditional XHR here too, but the Fetch API is easier to use, and if your browser supports service workers, it also supports fetch). If the fetch succeeds, we show the notification.
  fetch("https://mobiforge.github.io/push/sw/latest.json").then(function(res) {
    res.json().then(function(data) {
          // Show notification
    })
  })
In practice, using this code meant that we sometimes pulled a cached version of the data from the server. So we add some HTTP headers to make sure we always get fresh data for the notification:
    var httpHeaders = new Headers();
    httpHeaders.append('pragma', 'no-cache');
    httpHeaders.append('cache-control', 'no-cache');

    var fetchInit = {
      method: 'GET',
      headers: httpHeaders,
    };

    fetch("https://mobiforge.com/push/latest.json", fetchInit).then(function(res) {
      res.json().then(function(data) {
        // Show notification
    })
  })
The notification data that we fetch is a simple JSON payload that contains the latest post title and URL, and icon, but this could contain any data really, a special offer or event notification for example, and it could be tailored for each specific subscriber if you pass the subscription id to the application server. It looks like this:
{"data":{"title":"New article on mobiForge","body":"Why HTML5 is killing Flash: It's the devices people!","icon":"icon","tag":"tag","url":"https://mobiforge.com/node/8796"}}
So now that we have this data, we want to show a notification on the user’s device. Let’s take a quick look at the Web Notifications API.
Web Notifications API
The Notifications API brings native-like notifications to the web. It’s pretty easy to get up and running. First, we can check for notifications support with the following code:
  if ('Notification' in window) {
    // Notifications supported! Yay!
  }
Another prerequisite to using web notifications is that the user has given permission to display notifications. The easiest way to do this is with the function:
Notification.requestPermission();
We can check the notification permission status with the Notification.permission property. It can have one of three string values:
defaultequivalent todenied, but user has explicitly made a choice yetgrantednotifications can be displayeddeniednotifications cannot be displayed
For displaying notifications there are a number of fields we are interested in:
titleused as title textbodyused as body texticonURL used to pull icon for the notification
So now we’re ready to display a notification. We pass in the JSON data we just fetched, and populate the various properties as shown with notificationData.data.title and notificationData.data.body, and display the notification:
    // Check for permission
    if(Notification.permission=='granted') {
        // Get service worker to show notification
         self.registration.showNotification(notificationData.data.title, {
            body: notificationData.data.body,
            icon: 'favicon.ico'
        });
    }
    else {
      //We need to ask permission
      Notification.requestPermission(function(permission) {
        if(permission=='granted') {
          self.registration.showNotification(notificationData.data.title, {
            body: notificationData.data.body,
            icon: 'favicon.ico'
          });
        }
      });
    }
Now, when the notification is clicked, we want to bring the user to the URL in the fetched data. So we need to add a click handler, and our notification code will be complete. Note that we use the notificationclick event, rather than the usual click event. You might also be tempted to use window.open to open the notification URL, but the service worker does not have access to this. Instead you can use clients.openWindow(...).
    self.addEventListener('notificationclick', function(e) {
      if (clients.openWindow) {
        clients.openWindow(notificationData.data.url);
      }
    });
The service worker code should be saved in a file that matches the path and filename given in the navigator.serviceWorker.register('...') call—so it’s sw.js in our case. The final code listing for our service worker is given at the end of the article.
Now we’re all set up to receive and respond to notifications. Referring back to our push sequence flow, all that’s left to do is send out a push message from the application server, via the push messaging server.
Sending a Push notification with GCM
We’re going to use the Google Cloud Messaging (GCM) messaging server. This involves a visit to the Google Developer console, and setting up a new app.
Let’s set up the GCM service:
- Visit Google Developers Console project page and create a new project; give it any name you want.
- On the next page, click APIs & Auth > APIs, and enable the Cloud Messaging For Android and Google Cloud Messaging for Chrome (You may have to use the search box to find this one)
- Note your project number
- On the left menu, visit Credentials and generate and note your (Public API Access) API key
To send a message via the messaging server we need to make an HTTP request to the messaging server, and include the API KEY, and the subscription ids of the users who subscribed, with the request. These are the ids that we received earlier and stored in a MySQL database. So before we send our push message, we need to retrieve all of these ids and wrap them up in the request. This code is called every time something new is published on our site, so that a notification is sent out to all subscribers for all new content. As mentioned earler, we could tweak this so that you could subscribe to a single topic, but for now, it’s an all or nothing opt-in.
Since our server is running PHP, we can use the PHP curl library to make this request. The function to achieve this is given below:
function send_push_message($subscription_ids)
  // Set GCM endpoint
  $url = 'https://android.googleapis.com/gcm/send';

  $fields = array(
      'registration_ids' => $subscription_ids,
  );

  $headers = array(
      'Authorization: key=' . GOOGLE_API_KEY,
      'Content-Type: application/json'
  );

  $ch = curl_init();

  // Set the url, number of POST vars, POST data
  curl_setopt($ch, CURLOPT_URL, $url);
  curl_setopt($ch, CURLOPT_POST, true);
  curl_setopt($ch, CURLOPT_HTTPHEADER, $headers);
  curl_setopt($ch, CURLOPT_RETURNTRANSFER, true);

  curl_setopt($ch, CURLOPT_SSL_VERIFYPEER, false);
  curl_setopt($ch, CURLOPT_POSTFIELDS, json_encode($fields));

  // Execute post
  $result = curl_exec($ch);
  if ($result === FALSE) {
      die('Push msg send failed in curl: ' . curl_error($ch));
  }

  // Close connection
  curl_close($ch);
}
Note that we don’t have a payload, just the registration ids. This is because we can’t actually send any message data with our push message via GCM as mentioned above. This will be addressed by GCM at a later date, but in the meantime, it means when the push notification arrives, the actual meat of the notification needs to be fetched from the application server. We showed how to do this earlier. For more information about making requests to GCM, see the GCM documentation.
There’s one more step to get this up and running. To get web push notifications to work, we need to specify a web application manifest file.
Web app manifest
A web app manifest is a JSON-based manifest that holds metadata associated with a web application. The manifest file allows us to specify certain aspects of how the web app will behave as an app. For instance, we can specify launcher icons, and whether the web app is installable, that is, whether it can be added to the homescreen or launcher of a device. In this example we also need to specify some details of the GCM messaging server to be able to send push messages. In particular we need to include the app id of the Google Developers app we set up earlier.
So, let’s add this information to the manifest:
{
  "name": "mobiForge Push",
  "short_name": "mobiForge push",
  "start_url": "/",
  "display": "standalone",
  "gcm_sender_id": "YOUR_GOOGLE_DEVELOPERS_APP_ID",
  "gcm_user_visible_only": true
}
You can find out more in the specification for web app manifest files, and there’s also useful information in our previous article about web app manifests and progressive apps.
We link this file from the head of the webpage:
<link rel="manifest" href="manifest.json">
And that’s it! Phew!
Debugging Service Workers
Two useful URLs for when you are trying to debug your web app in Chrome are:
chrome://inspect/#service-workerschrome://serviceworker-internals/
The first displays a list of running service works, that you can inspect. The second shows a list of all registered service workers, running or not, and gives some options including stop, push, and unregister. The push button here is very handy as it simulates a push event, i.e. receiving a push message, so you don’t have to generate a real push message and wait for it to be delivered via the messaging server.
Some further debugging tips are given in the Chromium Service Worker Debugging FAQ.
This web push article by Matt Gaunt on Google Developers, proved very useful in getting push notifications up and running.
Push subscription errors
A couple of errors you might experience during the subscription process are to do with the manifest:
- “no sender id provided“: This can occur if you don’t include the manifest into your webpage
- “push service error“: This can occur if you don’t have a valid APP_ID in your manifest file
Another point to note is that browser implementation is somewhat in flux (at the time of writing). Updating to a newer version of Chrome for mobile broke the mobiForge implementation, with the message below:
CORS and mixed active content issues
Some other problems you might run into include CORS and mixed active content issues. CORS is a cross domain issue, preventing fetch or XHR requests for requesting data from different domains for security reasons.
The simplest way to deal with the CORS issues is to have your application server and webpages on the same domain. If they need to be on different domains, then some possible workarounds are to add CORS headers on your application server, to set up a proxy script, or to make JSONP XHR requests.
The best way to solve mixed content issues is by having the whole application served over HTTPS.
Web push notifications: platform support
This technology is great! While there are a lot of moving parts, and dependencies, it is definitely possible right now to roll out web push notifications for web apps on some platform and browser combinations, namely Chrome for desktop and Chrome for Android.
It seems like a universal solution will be difficult to attain, without outsourcing to a third-party service provider that handles all the platform differences for you. Even if all major browser vendors implement more or less the same functionality, even then the push system will likely require a different push messaging service for different platforms and regions. For example, even on Android alone, GCM will be missing from non-licensed Android versions (unofficial forks). In the current setup you need to sign up with Google Cloud Messaging and provide credentials to send messages, so there will likely be multiple accounts for multiple platforms required.
So what about the other platforms and browsers? Well, push notifications are supported in OSX/Safari. It’s just not the W3C version, but an Apple version instead, called Apple Push Notifications. Because of this, Mobile Safari will likely get web push notifications too, so while the reach of web push notifications will increase, it will unfortunately require separate code in your webpages to support Apple Push Notifications too.
Firefox is playing nicer than Apple, and is committed to implementing the W3C version. If you try the code outlined here on Firefox nightly or developer builds right now, and take a look at the console, you’ll see that nearly all works. The missing piece is a usable free messaging service. Apparenlty it should work end to end, but I’ve yet to see a message delivered.
Microsoft and Opera are both building the key components such as service workers, so it’s likely we’ll see web push notifications in their respective browsers too in the near future.
So, with current limited platform support, is this viable technology? Absolutely! It’s possible to roll this out on Chrome for Android and desktop right now, and on other platforms the functionality can be hidden until they are supported. Web push notifications are definitely usable today, and you can be sure it’s being rolled out on a site near you right now! As we said at the start, this is the best thing to hit the web since the hyperlink; we might just be on the cusp of a Cambrian explosion of push enabled web sites!
Useful links
- Push notifications on the open web by Matt Gaunt on Google Developers
- GCM documentation
- Chromium Service Worker Debugging FAQ
- Web app manifest specification
- Fetch API specification
- Push API specification
- Service Workers Specification
Download
Download the push notifications source code below:
- Service worker: sw.js
- Web page/javascript: push.htm
- Web app manifest: mainfest.json


Leave a Reply