The much-anticipated BlackBerry 10 operating system is already creating a splash with customers, analysts and developers alike. In this tutorial, BlackBerry developer evangelist Luca Sale teaches us how to develop a Web app for the new OS that hooks into the native functions of BlackBerry devices such as the camera and the ever-popular BlackBerry Messenger (BBM).
From 0 to BlackBerry 10
Three or four years ago the mobile app ecosystem was dominated by native languages such as C, C++ and Java. Web-based languages were mostly reserved for mobile sites that struggled to rival the user experience of a native app. But with the evolution of HTML5, JavaScript, CSS3 and the on-going ratification/publication of APIs that allow browsers to access the handset’s native functions – camera, messaging, storage etc – Web apps have now come of age.
What can be achieved today using HTML5 in a mobile environment is far more exciting than what could be done three or four years ago – thanks to the hard work of the W3C (which has worked for years to bring the HTML5 specification to completion) and the mobile browser vendors that have been quick to adopt the standard and implement JavaScript APIs that enable access to the hardware (e.g. getUserMedia).
This article will show you how easy it is to develop a mobile Web app that can be hosted on a Website or downloaded to the user’s device (like a native app) – depending on what the developer prefers. We’ll start with the basics, then gradually add the BlackBerry 10 look and feel, and then finally move on to adding advanced device features such as camera integration and the ability to share an image using BBM. And this will all be done using Web technologies.
Stage 1: Tools for the job
In this article we will begin from the most common starting point: Hello World!
To build the app we will use the popular framework jQuery Mobile with the BlackBerry 10 theme (see the BlackBerry UI guidelines for more details), then slowly implement advanced device features using the BlackBerry APIs.
The requirements for this exercise are:
- Knowledge of HTML5 and JavaScript.
- A good text editor (use your favorite).
- Ripple emulator for Chrome. Using the Ripple emulator, you can point to a website (local or remote) that’s running your app and emulate the entire BlackBerry environment without compiling your code or launching a simulator. Testing with the Ripple emulator provides a similar experience to desktop browser development. So, making changes is as simple as editing your source code and pressing refresh in the Ripple emulator. Download Ripple here.
- BlackBerry 10 WebWorks SDK. This software development kit contains all the tools you need to build and package your Web app for the BlackBerry smartphones and tablets. Download the WebWorks SDK here.
Stage 2: Getting started
So, let’s start from the basics.
The first step is to set up all required tools, so we don’t have to worry about it later.
- Open Chrome browser and point it to https://developer.blackberry.com/html5/downloads/fetch/ripple_ui.crx.
- Click on the “Settings” menu, click on Tools -> Extensions. Once the “Extensions” tab opens drag and drop the downloaded ripple_ui.crx file onto it.
- Done! Ripple has been now installed.
If you don’t already have a Web server installed, you can take advantage of Ripple services. This is included in the Ripple extension we’ve just downloaded and serves up locally stored Web content. Create a folder called “RippleSites” as follows:
Windows XP: C:Documents and Settings<Username>RippleSites

Windows 7: C:Users<Username>RippleSites

Mac OS: /Users/<Username>/RippleSites
Create a new folder called “HelloWorld” in the above location and we are ready to go.
Next, let’s install the WebWorks packager.
- Point your browser to https://developer.blackberry.com/html5/download and scroll to WebWorks SDK. Download the latest available version.
- The only requirement for the SDK is Java JRE 1.6. You need this specific version. Avoid Java JRE 1.7, as there is a known conflict.
- OSX users just need to double click the SDK installer and the system will automatically download and install the appropriate version.
- Windows users should browse to http://www.java.com/en/download/manual_v6.jsp. Now install the SDK by double clicking on the WebWorks installer.
Stage 2: Let’s get coding!
Using your favorite code editor create a new .html file called index.html and write the main structure of an HTML page:
<html>
<head>
	<title>Hello BlackBerry!</title>
</head>
<body>
	Hello World
</body>
</html>
Admittedly this isn’t very exciting so far, but we’re just getting started! Test the page in Chrome – you should see Hello World on a white background.
Stage 3: Packaging the app
Before we can package our simple Web page into a deployable application, we must first create a configuration document in XML as defined by the W3C here.
This concept will be familiar to developers who have used Adobe PhoneGap or Apache Cordova, but when it comes to BlackBerry development there are some additional attributes you need to consider.
There is extensive documentation on each of the elements available for used in a full-blown BlackBerry Web app here. But for this tutorial we’re keeping it simple so we only require the creation of a basic config.xml, like this one here.
Go ahead, create a new file in the same folder named
config.xml
and populate it with the following content. The elements and attributes included will be explained afterwards.
<?xml version="1.0" encoding="utf-8"?>

<widget xmlns="http://www.w3.org/ns/widgets" xmlns:rim=http://www.blackberry.com/ns/widgets version="1.0.0.0" id="helloWorld">

<author href="http://www.example.com/" rim:copyright="Copyright 1998-2012 My Corp">My Corp</author>

<name>HelloWorld</name>

<description>
    A sample application to demonstrate some features.
  </description>

<content src="index.html"/>

</widget>
Let’s examine some of the attributes and elements we have used in this file:
- The “id=” and “version=” are two fundamental pieces of information necessary for the packaging and signing of your application. Increase the version number as you release new updates.
- The “content” tag tells the WebWorks framework what page is to be displayed on start-up of the application.
Stage 4: Testing the app
You now have a fully functional, yet minimal, BlackBerry 10 application. It’s time to test it out on Ripple.
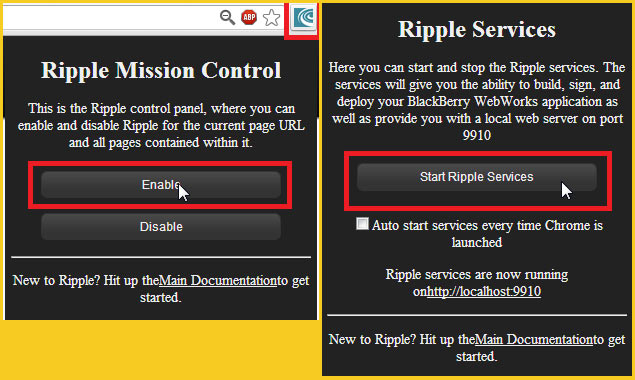
If you are using a local Web server point your browser to http://localhost/helloWorld/ and once the page is loaded enable “Ripple” extension.

Figure 1: Testing your BlackBerry 10 Web app with Ripple
If you are using Ripple services make sure “Ripple services” has been started.
- Click Ripple extension -> Start Ripple Services.
- Point your browser to http://localhost:9910/helloWorld/index.html.
- If prompted, select the BlackBerry 10 WebWorks platform/runtime to test your application.
Stage 5: Adding some BlackBerry 10 sexiness
The Hello World sample we just created is somewhat minimal. Let’s add some BlackBerry look and feel to it. You can do this with minimal effort by using the jQuery Mobile BlackBerry 10 theme. You can grab a copy from the GitHub repository here.
The only files that you will need to import in your project are located in the “dist” directory and are:
BlackBerry-JQM-all.min.css

BlackBerry-JQM-all.min.js
Copy these into your helloWorld folder and add the following lines in the head of your index.html:
<link rel="stylesheet" href="BlackBerry-JQM-all.min.css" />
<script src="BlackBerry-JQM-all.min.js"></script>
Developers who are already familiar with jQuery and jQuery Mobile will have no problems in understanding the following few lines. For those that don’t the next step provides the default structure of a typical jQuery page through the data-role element. This includes the page, header, content and, in our case, a footer too. The footer element will be particularly useful to display the actionbar item as per the BlackBerry UI guidelines).
Modify the body of your index.html as follows:
<body>
<div data-role="page">
	<div data-role="header">Hello World</div>
		<div data-role="content"></div>
		<div data-role="footer"></div>
	</div>
</div>
</body>
For those developers who are unfamiliar with the data-role attribute, I strongly recommend reading up on the jQuery site.
Now refresh the Chrome window. You should see the new UI theme already being applied to your Web app. Thanks to the flexible nature of this framework, it is easy to add and remove complex elements with the least amount of coding possible.
Stage 6: Getting in on the action

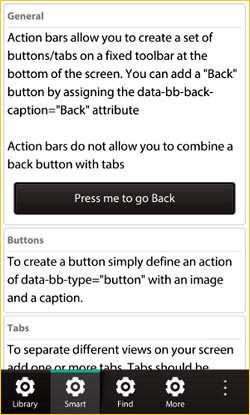
Figure 2: Adding the action bar at the bottom of the BB10 device screen.
If you wish to add an action bar, insert the following div in the footer element:
<div data-role="footer">
  <div data-role="actionbar">
	<div data-role="back"></div>
  </div>
</div>
This adds an “actionbar” element, along with a back button, that is already a fully functional item. In fact, if you refresh your browser window, you can see how the “back” button is actually mapped to a back action.
Since this isn’t very useful just at the moment, let’s take it out and add a functional button:
<div data-role="footer">
  <div data-role="actionbar">
    <div id="b1" data-role="action">
	  <img src="img/action1.png" alt="" />
	  <p>Click me</p>
	</div>
  </div>
</div>
You can define the icon of the action button by modifying the
tag.
Go ahead, refresh your page and see the app changing before your eyes.
Stage 7: Going native with BlackBerry APIs
So far, we have created a Web app with a BlackBerry 10 look and feel, which is ready to be packaged with the WebWorks SDK. But the real power of the BlackBerry 10 platform is the WebWorks APIs, which provide access to native hardware features.
But, before you can use any of the BlackBerry JavaScript APIs you will need to include an additional JavaScript file:
<script src="local:///chrome/webworks.js" type="text/javascript"></script>
As you may have noticed, this loads a local:/// file called webworks.js, which is automatically injected by the WebWorks packager once you build your app.
To ensure we only call the BlackBerry JavaScript APIs when the library has finished loading, we now have to listen to the ‘webworksready’ event.
<script>
window.addEventListener("load", function(e) {
         document.addEventListener("webworksready", function(){
		console.log(“You can now use the WebWorks APIs”);
		//do something with the WebWork APIs
	});
      }, false);
</script>
All the BlackBerry APIs are listed here, with exhaustive documentation. Take your pick!
For the purposes of this tutorial, we will use one of the most exciting features of the platform: the invocation framework with cards and the share framework. Our task today is to snap a photo and send it to one of our BBM contacts.
When you use hardware or platform features you may need to declare the correct permissions in the config.xml. This is to ensure that when the application starts up the user is prompted to allow access to camera, shared files, BBM and anything else you may need. The required permissions should always stated at the top of each API page.
Let’s modify our config.xml by adding the following line:
[…]
<content src="index.html"/>
<feature id="blackberry.invoke" />
</widget>
Let’s move to our index.html to implement the camera-card functionality and attach the invocation to the action button we created earlier. You will notice we will implement the invocation and two callbacks.
<script>
window.addEventListener("load", function(e) {
         document.addEventListener("webworksready", function(){
		console.log(“You can now use the WebWorks APIs”);
		//do something with the WebWork APIs
	});
      }, false);
function onInvokeSuccess() {
                console.log("Invocation successful!");
            }

    function onInvokeError(error) {
        console.error("Invocation failed, error: " + error);
    }
    $('#b1').click(function() {
	blackberry.invoke.invoke({
		target: "sys.camera.card"
	}, onInvokeSuccess, onInvokeError);
    });
</script>
Using jQuery’s .click() method, we will now map the click event to the ‘Click me’ button.
Now refresh and try it on Ripple.
Unfortunately Ripple can’t show you the camera card, but by pressing the button you should see a popup letting you know that the invocation was successful. We won’t be able to test it on a real device until the app is packaged and signed – and, in this tutorial, that’s going to be the last step. For now, let’s assume the above code is perfectly working.

Figure 3: Ripple popup window shows your invocation has been successful.
When you close the camera card the BlackBerry 10 platform can be notified that you are done. In order to implement this we just need to add an event listener:
function sharePhoto(request){
	//do something with request.data
}
blackberry.event.addEventListener("onChildCardClosed", sharePhoto);
Once the user takes a picture the sharePhoto function will be passed with the request object that contains the path to the image.
What is required is the ability to share the photo with all the share targets available on the BlackBerry 10 device, but not before seeing the preview of it. This is achieve using another card: the photo previewer.
We need first to ensure we have the permission to access the file we have just generated with the camera card. We can do so by specifying we want access to the shared files in the
config.xml
.
<rim:permissions>
        <rim:permit>access_shared</rim:permit>
    </rim:permissions>
</widget>
Now let’s populate the sharePhoto function in the index.html!
function sharePhoto(request){
    	blackberry.invoke.invoke({
        action: "bb.action.VIEW",
        uri : "file://"+request.data,
        file_transfer_mode : blackberry.invoke.FILE_TRANSFER_COPY_RO
    	}, onInvokeSuccess, onInvokeError);
}
The URI attribute is the file path to the photo that has been returned by the camera card. Once the photo previewer opens you will be able to either hit “back” and take another photo or use the integrated share functionality to bring up all available targets the photo can be shared with.
Stage 8: Package and sign the app
The app is ready, so it’s time to package and sign it.
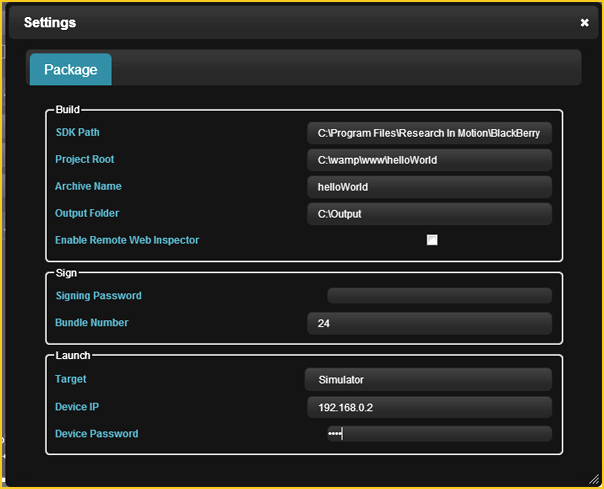
- If you don’t have a BlackBerry 10 (or Dev Alpha) device, you can deploy it on the simulator. The process is straight forward, just use the “Package and Launch” functionality in Ripple.
Download the simulator here. - If you have a BlackBerry 10 device you can sign your application with “Package and Sign”, but before you do so please ensure you have valid signing keys and you have followed the instructions on how to install them. Request signing keys here; read up on signing your app here.
Make sure you have Ripple Services running when you hit “Package and Sign” or “Package and Launch”.

Figure 4: Packaging your BlackBerry 10 app.
Stage 9: testing the app
Now it is time to play with your new BlackBerry 10 application. Take a picture and share it via BBM.
Did you notice that whichever action you perform you haven’t left the application? That’s the power of cards: users effortlessly switch between app functionality and native system features.
N.B. We have just been scratching the surface here. There is much more native functionality that your app can hook into, including playing videos, using the BlackBerry Hub for notifications, accessing the email composer, calendar and contacts, using push notifications etc… If you want to know more about the capability of the BlackBerry WebWorks framework on BlackBerry 10 check out the documentation and download the sample apps from the Github repository.
Further reading:
• HTML5 for mobile developers.
Main image: Blackberry falling into water. © Jag_cz , via www.shutterstock.com
.


Leave a Reply