


Unless you have been hiding in the caves for the past couple of months, by now you must have heard of the mobile platform from Google that everyone is talking about. Yes, that’s right, I am talking about Android. Android is an open source mobile operating system that is based on the Linux kernel. Using Android, device manufacturers can customize the OS to suit their particular hardware design, thereby allowing them to innovate without limitations. For developers, Android programming uses the Java programming language, and familiarity with the language immediately opens the platform to every Java programmer in the world.
In this inaugural article of the Android series, I will get you started with Android development without requiring you to wade through pages of technical documentation. At the end of this article, you will have written a simple Android application and you will be able to deploy the application onto an emulator or a real Android device.
So, what are you waiting for? Strap on your seat belt and let the fun begin!
What you need to develop for Android?
Developing for Android is not expensive. All you need is a Mac, or a PC that runs Windows or Linux. For this article, I will use a PC running Windows XP.
The Android SDK is available for free at: http://developer.android.com/sdk/1.1_r1/index.html. At the time of writing, the latest version of the Android SDK is Version 1.1 Release 1. The Android SDK comes with all the tools and APIs you need to write and debug your Android applications. It also includes the Android Emulator, allowing you to test most of your applications without needing a real device. Obviously, for some applications (such as those using the hardware of an Android device like camera, Bluetooth, etc) you would need a real device and the emulator will not fit the bill. As far as real devices are concerned, for developers outside the US the only choice at the moment is to buy the Android Dev Phone 1 (see http://code.google.com/android/dev-devices.html), which costs US$399 (plus a US$25 registration fee for the Android Market).
For developing Android applications, you can use the Eclipse IDE (download free here). Once the Eclipse IDE is installed, you need to install a custom plug-in called the Android Development Tools (ADT). This tool adds Android project support in Eclipse and should be downloaded and installed by all Android developers. For detailed instructions on how to obtain and configure the ADT plug-in in Eclipse, see http://developer.android.com/sdk/1.1_r1/installing.html.
So, here is the summary of the steps you need to perform in order to start developing Android applications:
- Download and setup the Eclipse IDE
- Download the Android SDK and then expand the content of the zip file into a folder
- Install the ADT plug-in in Eclipse
- Configure Eclipse to point to the Android SDK
Your First Android Application
With all the tools and SDKs setup, you are now ready to embark on the journey to Android nirvana! With Eclipse powered up, let’s create a new Android application.
In Eclipse, create a new Android project and name it as shown in Figure 1.
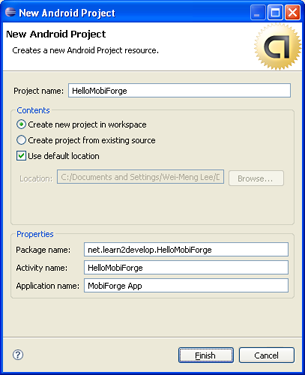
Figure 1 Creating a new Android project
Take note of the various fields you need to supply when you create a new Android project:
- Project name – the name of the project
- Package name – the name of the package. This name will be used as the package name in your Java files. Package name must be fully qualified. The convention is to use your company’s domain name in reverse order
- Activity name – the name of the activity in your Android application. In Android, think of an activity as a screen containing some actions, hence the name “activity”
- Application name – the user-friendly name of the application that will be displayed in the Applications tab of the Android UI
When the project is created, the Package Explorer in Eclipse will show the project and its components (see Figure 2).
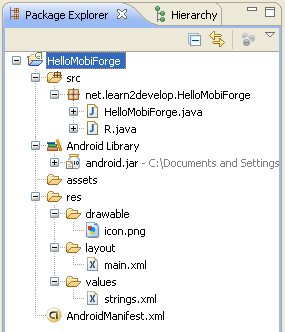
Figure 2 The content of the Android project
Don’t let the number of items in the project scare you – they are actually very straight forward.
First, the src folder contains your Java source files. The HelloMobiForge.java file is the source file for the HelloMobiForge activity you specified when you created the project earlier. The R.java file is a special file generated by the ADT to keep track of all the names of views, constants, etc, used in your Android project. You should not modify the content of this file as its content is generated automatically by the ADT.
The Android Library contains a file named android.jar. This file contains all the classes that you would use to program an Android application.
The res folder contains all the resources used by your Android application. For example, the drawable folder contains a png image file that is used as the icon for your application. The layout folder contains an XML file used to represent the user interface of your Android application. The values folder contains an XML file used to store a list of string constants.
The AndroidManifest.xml file is an application configuration file that contains detailed information about your application, such as the number of activities you have in your application, the types of permissions your application needs, the version information of your application, and so on.
Modifying the UI of the Application
Let’s now modify the UI of our application so that you can do some useful work. Recall earlier that you had an activity named HelloMobiForge? Double-click on the HelloMobiForge.java file in the Package Explorer to view its content. You should see the following:
|
1 2 3 4 5 6 7 8 9 10 11 12 13 |
package net.learn2develop.HelloMobiForge; import android.app.Activity; import android.os.Bundle; public class HelloMobiForge extends Activity { /** Called when the activity is first created. */ @Override public void onCreate(Bundle savedInstanceState) { super.onCreate(savedInstanceState); setContentView(R.layout.main); } } |
Notice that the HelloMobiForge class extends the Activity class. When the activity is loaded, the onCreate() event handler is called. The activity loads its UI from the XML file named main.xml. This is represented by the constant named R.layout.main (generated automatically by the Eclipse as you save your project). If you examine the main.xml file located in the res/layout folder, you should see the figure shown in Figure 3.
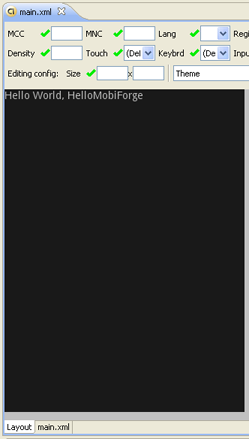
Figure 3 The UI displayed graphically
If you click in the main.xml tab located at the bottom, you will see the following:
|
1 2 3 4 5 6 7 8 9 10 11 12 |
<?xml version="1.0" encoding="utf-8"?> <LinearLayout xmlns:android="http://schemas.android.com/apk/res/android" android:orientation="vertical" android:layout_width="fill_parent" android:layout_height="fill_parent" > <TextView android:layout_width="fill_parent" android:layout_height="wrap_content" android:text="@string/hello" /> </LinearLayout> |
In Android, the UI of each activity is represented using various objects known as Views. You can create a view using code, or more simply through the use of an XML file. In this case, the UI Is represented using an XML file. The android:text with its value set to “@string/hello“. The @string/hello refers to the string named hello defined in the strings.xml file in the res/values folder. If you examine the strings.xml file, you should see the following (click on the strings.xml tab at the bottom of the screen):
|
1 2 3 4 5 |
<?xml version="1.0" encoding="utf-8"?> <resources> <string name="hello">Hello World, HelloMobiForge</string> <string name="app_name">MobiForge App</string> </resources> |
Let’s now modify the main.xml file a little just to have a feel of programming Android. Add the following element:
|
1 2 3 4 5 6 7 8 9 10 11 12 13 14 15 16 17 18 |
<?xml version="1.0" encoding="utf-8"?> <LinearLayout xmlns:android="http://schemas.android.com/apk/res/android" android:orientation="vertical" android:layout_width="fill_parent" android:layout_height="fill_parent" > <TextView android:layout_width="fill_parent" android:layout_height="wrap_content" android:text="@string/hello" /> <Button android:id="@+id/btnClickMe" android:layout_width="fill_parent" android:layout_height="wrap_content" android:text="Click Me!" /> </LinearLayout> |
This basically adds a button view to the UI. If you switch to the Layout mode, you should see the button as shown in Figure 4.
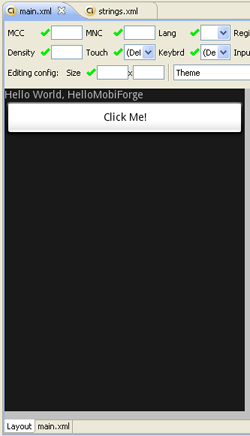
Figure 4 Viewing the UI in Layout mode
Having the button by itself is not very useful – it should do something useful when it is clicked. Hence, you will modify the HelloMobiForge.java file so that when the button is clicked, it will do something:
|
1 2 3 4 5 6 7 8 9 10 11 12 13 14 15 16 17 18 19 20 21 22 23 24 25 26 27 28 29 30 31 32 |
package net.learn2develop.HelloMobiForge; import android.app.Activity; import android.os.Bundle; import android.view.View; import android.view.View.OnClickListener; import android.widget.Button; import android.widget.Toast; public class HelloMobiForge extends Activity { /** Called when the activity is first created. */ @Override public void onCreate(Bundle savedInstanceState) { super.onCreate(savedInstanceState); setContentView(R.layout.main); //---the button is wired to an event handler--- Button btn1 = (Button)findViewById(R.id.btnClickMe); btn1.setOnClickListener(btnListener); } //---create an anonymous class to act as a button click listener--- private OnClickListener btnListener = new OnClickListener() { public void onClick(View v) { Toast.makeText(getBaseContext(), "Hello, readers of MobiForge!", Toast.LENGTH_LONG).show(); } }; } |
In the above code, when the Button view is clicked, it will display a message using the Toast class. The Toast class is a helper class that displays a message box on the screen.
Testing the Application
To test the application, press F11 in Eclipse. The first time you do so, you should see an error message. Press F11 again and you should see the dialog shown in Figure 5. Select the Android Application option and click OK.
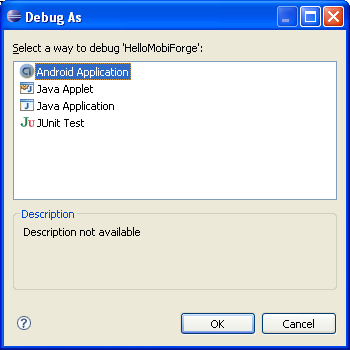
Figure 5 Selecting the ways to debug the application
By default, if there is no real Android device connected to your computer, Eclipse will start the Android Emulator and deploy the application onto the emulator.
After a while, you should see the application on the emulator. Click on the Click Me! button and observe what happens (see Figure 6).
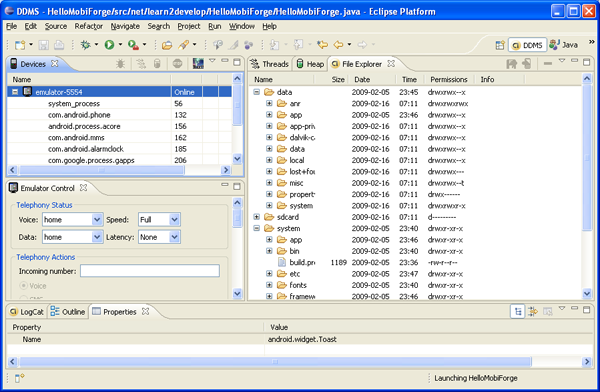
Figure 6 Testing the application on the Android emulator
The ADT plug-in in Eclipse provides some useful tools to control your Android Emulator. In Eclipse, click on the Open Perspective button and select DDMS (see Figure 7).
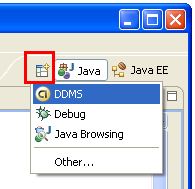
Figure 7 Opening the DDMS Perspective
This opens the DDMS Perspective (see Figure 8). From here you can view the processes currently running on the emulator (or device), view the files on the emulator (or device), as well as emulate voice calls, SMS messages as well as GPS functionalities.
Figure 8 The different tools in DDMS
Figure 9 shows that the application that you have just deployed are stored in the /data/app/ folder of the emulator. The .apk extension of an Android application stands for “Android Package”.
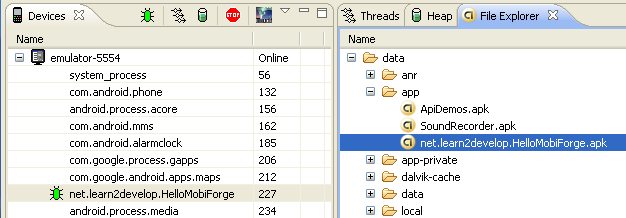
Figure 9 Viewing the apk file on the emulator
If you have a real Android device, simply connect it to the computer running Eclipse. Eclipse will recognize your device and display it in the Devices tab of the DDMS perspective (see Figure 10).
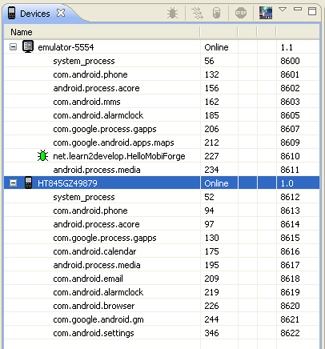
Figure 10 An Android Emulator and a real Android device connected to the computer
If you now press F11 in Eclipse, Eclipse will prompt you to select the target device for debugging (see Figure 11).
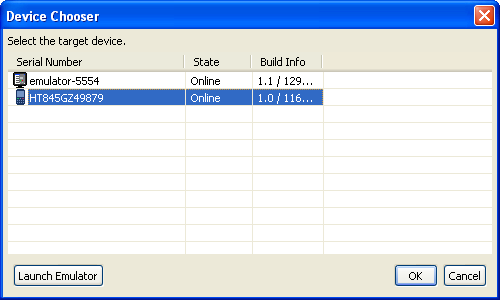
Figure 11 Selecting a device for deployment
You can use the Screen Capture button in DDMS to capture a screen shot of the application running on the real device. Figure 12 shows a screen grab of the application running on the Android device.
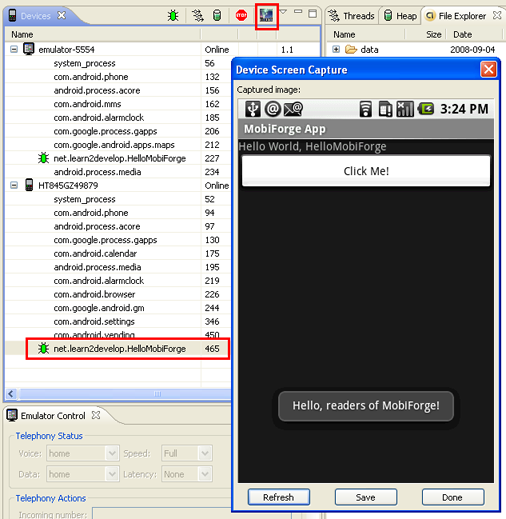
Figure 12 Capturing a screen shot from the device
In the Android emulator (or real device), clicking the Applications tab (see Figure 13) will show that the application has been installed on the emulator (or device). Note the user-friendly name of the application that you have specified earlier when you created the project.
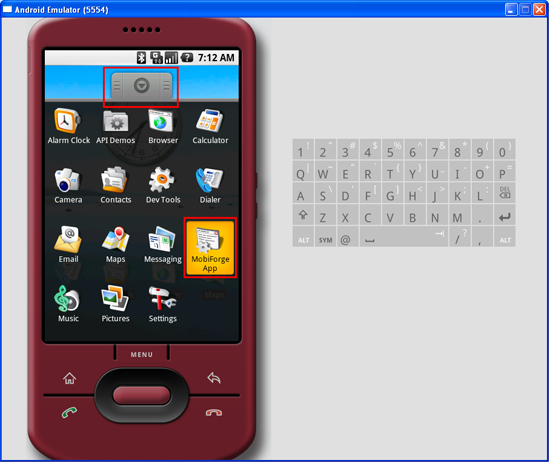
Figure 13 Locating the application you just installed.
Summary
In this article, you’ve had a whirlwind tour of how to develop an Android application. While the application that you had created does not do much, it does allow you to get a feel for Android programming. Give it a try and let us know how it works for you. Leave your comments below, or contact the author. If you are ready for more Android programming, watch out for the next article in this series, where we will discuss activities in more details. See you then!


18 Comments
thank u. it is a useful article…
Yes, I am also getting the error “create field id, or constant as id” Not sure what to make of this as I am very very new to the Android SDK
This is a really nice share…!
CX
Thanks Great tutorial, now my confident level is increased, I hope I may soon become a Mobile App developer. Since I am newbie to this Mobile world.
really awesome…
Hi,
i need an advice. I’m not a program developer. I just know some programming languages with basic level. (c, html..)
I saw your article and i wonder that, can i learn and develop a basic android application? I just want to do a basic guide for tourists who are coming to cyprus. There will be some advice, tips and location informations.
What do you think? Should i know java language to do it? Or can i do it with reading some articles like this one? (when i read this article, i’m so comfortable about do it :)) )
Great tutorial it helped me a lot..
I am developing first time android application and i have got a very nice guidelin.
Thanks a lot
I bet this is really good if and when it works, but there has to be an easier way to code a simple Android App?
Unfortunately Eclipse refuses to accept the Android SDK on my netbook so I’m stuck until I’m back at my regular computer. =/
It feels kind of overkill to spend days just to get the development environment up and running and even then it has a tendency to crash pretty often. Does anyone know a better way to develop that doesn’t include downloading and installing tons of buggy applications, programs, connectors, add-ons etc?
Excellent tutorial, do you know where can I find more like this?