


We’ve recently written about the effect UX has on conversions. One place that has always had a lot of friction is the checkout process, particularly the manual entry of billing information on handheld devices. There have been several drives to reduce such friction in recent years, including Apple Pay, Android Pay, and Samsung Pay, to name a few. The goal is to reduce billing friction by eliminating checkout forms: lower friction means more conversions! The Payment Request API is an HTML5 specification that aims to provide frictionless payments on the open web.
Payment Request API browser support today
Payments on the web have always been tricky, usually involving inputting a lot of data, making it inconvenient, to third parties of variable or unknown trustworthiness, making it insecure. Some intermediary solutions like PayPal aimed to solve the problem by providing a single touch point for payments. The Payment Request API potentially offers an even better solution, that doesn’t require you to share your billing information with a third-party like PayPal.
The API is not yet finalised, and there is much activity in the working group behind it. It’s already available to use in some browsers. Chrome for Android added support in version 53, and it can be enabled via experimental flags in Edge, Opera, and Chrome Desktop too.
On iOS, there’s Apple Pay. This alternative and proprietary payment system has been available on Apple Devices since September 2014, but has only come to the web this year. Given this, it’s probably unlikely Apple will bring the Payment Request API to Safari in the very near future.
Getting started with the Payment Request API
The first time using the Payment Request API was one of those magical, “Aha!” moments, where the cogs start spinning in your brain, going “wait a minute, how did it…” as you work out what happened. When building the example for this article, the first time I clicked the ‘Pay now’ button was one of these moments.
This said, as the name suggests, this is just an API for payment requests. It does not process payments. You will still need a traditional (or not so traditional) payment gateway to actually make payments.
The idea is to make mobile payments seamless. The W3C specification for this API describes it as:
an API that allows [browsers] to act as an intermediary between the three key parties in every transaction: the merchant (e.g., an online web store), the buyer (e.g., the user buying from the online web store), and the Payment Method (e.g., credit card). Information necessary to process and confirm a transaction is passed between the Payment Method and the merchant via the [browser] with the buyer confirming and authorizing as necessary across the flow.
In this article we’ll build out a basic example showing how to get up and running with the Payment Request API. We’ll hook it up to a simulated payment provider, that is, we’ll return a success or fail for the payment processing step to show how the API will handle these situations, but we won’t actually integrate with any particular payment provider.
One point to note before trying to work through this example, is that, as you would expect for an API handling sensitive data, the Payment Request API is only available for secure contexts (i.e. HTTPS). There are some options for testing locally near the end of the article.
The payment page
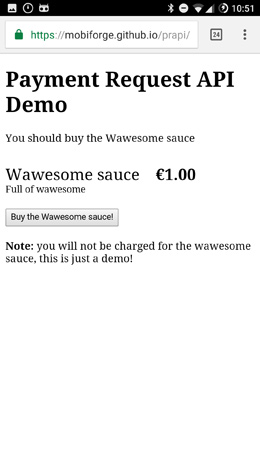
First, we’ll build the web page that will make the payment request:
<!doctype html>
<html >
<meta charset="utf8" />
<meta name=viewport content="width=device-width, initial-scale=1">
  <title>Payment Request API Demo</title>
  <body>
    <h1>Payment Request API Demo</h1>
    <div>
      <div>Wawesome sauce</div>
      <div>Full of wawesome</div>
      <div>€1.00</div>
      <button id"btn-pay">Buy the wawesone sauce!</button>
      <div></div>
    </div>
    <script src="js/prapi.js"></script>
  </body>
</html>
There’s not too much going on here. The main things to note are:
- The pay now button: we’ll be attaching a
clickhandler to this - The included JavaScript near the bottom: this is where the magic happens
The rest of the page here is really just about presenting product or purchase details to the user, in whatever way you like.
Attach a payment request click handler
The next thing we need to do is invoke a payment function whenever the Pay now! button is clicked. So we target the button by its id to call a function, makePayment, that we’ll write shortly:
document.addEventListener('DOMContentLoaded',function(e){
  document.getElementById('btn-pay').addEventListener('click', makePayment);
});
Check for Payment Request API support in browser
Before we try to use the API, check for support using window.PaymentRequest:
  //Check for support
  if (!window.PaymentRequest) {
    document.getElementById('status').innerHTML = "Sorry, Payment Request API not supported on this browser";
    return;
  }
In this example, we simply report that the API is not supported. In a real application, you should display a traditional checkout/billing form if the API is not supported, rather than turning down payments.
Setting up the payment request details
The Payment Request API provides the PaymentRequest object for making payment requests.
The PaymentRequest follows these state transitions:
![]()
(Source: W3C)
The payment request object can be set up like this:
var paymentRequest = new PaymentRequest(methodData, details, options);
Let’s see what the methodData, details, and options parameters are.
methodData
The methodData parameter contains a list of supported payment methods, e.g.
var methodData = [{supportedMethods: ["visa", "mastercard"]}];
details
The details parameter provides information about the payment itself, such as the total sale amount and any line items, including product prices, discounts, delivery costs and so on. In our example we provide the following details:
  //Set some details
  var details = {
    total: {label: 'Wawesome sauce', amount: {currency: 'EUR', value: '1.23'}},
    displayItems: [
      {
        label: '1 x Wawesome sauce',
        amount: {currency: 'EUR', value: '1.00'}
      },
      {
        label: 'VAT 23%',
        amount: {currency: 'EUR', value: '0.23'}
      }
    ]
  };
An important point to note is that the Payment Request API doesn’t do any arithmetic validation of your data. That is, if the values in your displayItems do not add up the value in your total, the API is not going to tell you. It doesn’t care what numbers appear here, so it’s the responsibility of your application to ensure that the numbers are correct.
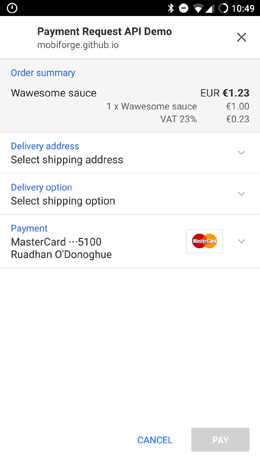
With this data, the payment request order summary UI will look something like this:
options
The options parameter allows you to further configure UI items to be displayed to the user. For instance, we can request user email and phone number, but not shipping data, like this:
  var options = {
    requestShipping: false,
    requestPayerEmail: true,
    requestPayerPhone: true
  }
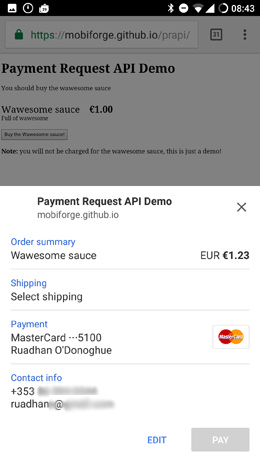
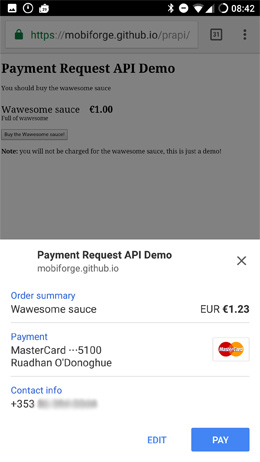
You can see the effect these options have of the payment UI in the images below, the first image shows all three options set, while the second shows just requestPayerPhone:
Make the request
Now it’s time to build the request object. We saw this earlier:
var paymentRequest = new PaymentRequest(methodData, details, options);
payment.show()
At this point we can call payment.show(). This will show the payment request UI to the user, and the user can add or amend details, and ultimately accept or reject the payment.
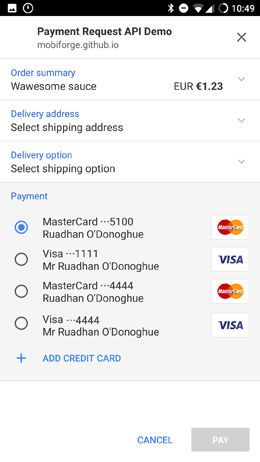
Note in particular that it has magically pulled in the credit cards stored on my phone (more on this later), and presented them in a clean and user-friendly interface, ready to be selected without having to manually enter any details into a form.
Process the payment response
However, we’re not done yet: we need to add handlers to specify what happens with the payment after the user has approved, or rejected, the payment request. When this happens, we need to handle the user supplied details and pass the payment onto the payment processor. This all happens in the promise returned by the payment.show() function:
  paymentRequest.show().then(function(paymentResponse) {
  ...
After the user has chosen a payment method and indicated approval of the request, the response from the API contains a PaymentResponse object. This object contains details about the payment such as the payment method chosen by the user (e.g. Mastercard) and details of the payment, such as the credit card number, billing address, and CVC where appropriate. If any of shipping address (requestShipping), email address (requestPayerEmail), or phone number (requestPayerPhone) were set in the options of the payment request, then these items will also be returned with the response object. You can see what details are returned if you log the PaymentResponse object to the developer console:
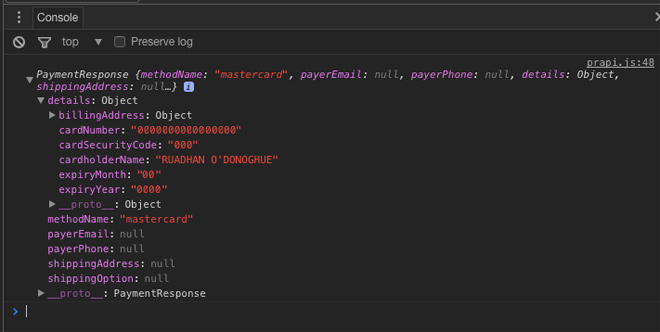
The properties of this object are explained below:
methodNamestring identifier for payment method chosen by userdetailsA JSON serialisable description of the paymentshippingAddressIfrequestShippingwas set in the request options, this will be the address chosen by the usershippingOptionIfrequestShippingwas set in the request options, this will be the shipping option chosen by the userpayerEmailIfrequestPayerEmailwas set in the request options, this will be the email address chosen by the userpayerPhoneIfrequestPayerPhonewas set in the request options, this will be the phone number chosen by the user
Next we want to take those details and prepare to send them to the payment gateway. We grab the details like this:
  //Get the payment details
  let paymentInfo = {
    methodName: paymentResponse.methodName,
    details:    paymentResponse.details
  }

  //Prepare payment gateway request
  let params = {
    method: 'POST',
    credentials: 'include',
    headers: {
      'Content-Type': 'application/json'
    },
    body: JSON.stringify(paymentInfo)
  };
Now we’re ready to try to put the payment through. Depending on the response from the payment gateway, success or failure, we’ll want to do something different. We use the paymentResponse.complete() method to close the Payment Request UI. This method takes a string argument of success, fail, or "" (i.e. empty). In the case of success or fail, the API specification says that a success or fail UI may be shown. However, where the case of the empty string, the web page didn’t indicate a success or a fail result, and so neither a success nor a fail UI should be displayed.
In this example, our we simulate a payment gateway with a simple local page that always returns an HTTP 200 OK code. That is, it always comes back successful.
  return fetch('process-payment.html', params).then(function(response) {
    if(response.status == 200) {
      return paymentResponse.complete('success');
    }
    else {
      return paymentResponse.complete('fail');
    }
  });
Finally, we can catch any unexpected errors too, and report a fail in this case.
So the full code for showing the payment request UI, and handling the payment would be:
  paymentRequest.show().then(function(paymentResponse) {
    // Get payment info
    var paymentInfo = {
      methodName: paymentResponse.methodName,
      details:    paymentResponse.details
    }
    console.log(paymentInfo);

    // Send to payment gateway or processor
    //Simulate this for now, our page will always return a 200 response
    var params = {
      method: 'POST',
      credentials: 'include',
      headers: {
        'Content-Type': 'application/json'
      },
      body: JSON.stringify(paymentInfo)
    };


    return fetch('process-payment.html', params).then(function(response) {
      if(response.status == 200) {
        return paymentResponse.complete('success');
      }
      else {
        return paymentResponse.complete('fail');
      }
    }).then(function() {
        document.getElementById('status').innerHTML = 'Order complete!';
    }).catch(function(err) {
      return paymentResponse.complete('fail');
    });

  }).catch(function(err) {
    document.getElementById('status').innerHTML = 'Could not complete purchase at this time';
  });
So that completes the first part of the example, and you might agree that the API is relatively easy to use and intuitive. But our example was somewhat simplified, in that it didn’t really look at shipping, and we accepted orders from any address. This won’t be practical in many cases. Thankfully the API lets us define multiple shipping methods that will be available for different locations.
Shipping options
The API should be able to handle most typical shipping scenarios. The details object of the request can include shipping options, that the payment request UI will present to the user. Simply add shipping options to the details like this:
  var details = {
    total: {label: 'Wawesome sauce', amount: {currency: 'EUR', value: '123.00'}},
    displayItems: [
      {
        label: '1 x Wawesome sauce',
        amount: {currency: 'EUR', value: '100.00'}
      },
      {
        label: 'VAT 23%',
        amount: {currency: 'EUR', value: '23.00'}
      }
    ],
    shippingOptions: [
      {
        id: 'standard',
        label: 'Standard shipping',
        amount: {currency: 'EUR', value: '5.00'},
        selected: true
      },
      {
        id: 'express',
        label: 'Express shipping',
        amount: {currency: 'EUR', value: '15.00'}
      }
    ];
  }
Note that before the shipping options you add here will be displayed by the payment UI, you will need to set the request shipping flag in the options object that we send with the payment request. So your options will now look like this:
  var options = {
    requestShipping: true,
    requestPayerEmail: false,
    requestPayerPhone: false
  }
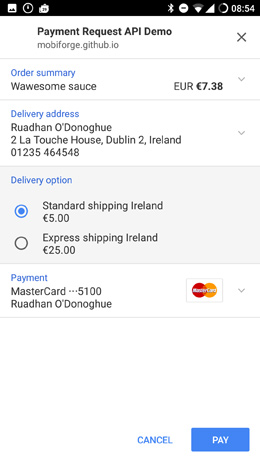
As with the choice of credit cards payment options, the payment UI presents the shipping options in a simple and user-friendly choice.
But what happens when the user selects a different shipping address or delivery option? You’ll need to do a couple of things when this happens:
- Check if you can deliver to the address
- Present shipping options that are available for that address
- Update the order summary to reflect any changes to line items or costs
To facilitate this, the API provides a couple of events that are triggered when the user makes changes to shipping details. These events provide a mechanism for the application to reconfigure the order based on different shipping requirements. The events are:
shippingaddresschangeThis occurs when the user provides a new shipping addressshippingoptionchangeThis occurs when the user chooses a new shipping option
In the case of shipping address change or change of shipping option by user, you might want to set a different cost for shipping, and calculate a new total. You could do something like this:
  //Handle shipping address choice
  paymentRequest.addEventListener("shippingaddresschange", function (changeEvent) {
    changeEvent.updateWith(new Promise(function(resolve, reject) {
      handleAddressChange(details, request.shippingAddress, resolve, reject);
    }));
  });

  //Handle shipping options choice
  paymentRequest.addEventListener("shippingoptionchange", function (changeEvent) {
    changeEvent.updateWith(new Promise(function(resolve, reject) {
      handleOptionChange(details, request.shippingOption, resolve, reject);
    }));
  });
Note that we now make use of the updateWith method in both cases. This is a method provided by the API that should be used to update the payment request, and it should return a promise that resolves with updated details. The updated details should then be presented to the user. So in this example, we write two functions handleAddressChange and handleOptionChange to achieve this.
However, before we get to these functions, the API gets a little unintuitive here. There are a couple of things to watch out for.
-
The
shippingaddresschangeevent won’t be fired if theshippingOptionsproperty of the request is not empty or undefined, which seems kind of odd.This means that if you want to have different options available or prices calculated based on location or country, then you don’t pass them in with the request like we did just a minute ago, but build them instead in the event handling code. In our example, we’ll provide Standard and Express options, and each will have a different cost based on country (Ireland vs international). So we’ll have four delivery options, two for each location.
-
To have the UI display reject an address (i.e. an address you can’t deliver to) and display an Address unsupported message, the
shippingOptionsproperty should be assigned an empty value
So, taking these two things into account, we can build the example. For the purposes of demonstration, our Irish based business will have the following shipping setup:
- For Irish addresses, we’ll have Irish standard shipping for €5, and Irish express shipping for €15
- We won’t ship to the US (let’s imagine our Wawesome sauce is perishable; you’ll have to come visit to try it)
- For all other addresses we offer International standard shipping for €25, and International express shipping for €55
(OK, so it doesn’t completely make sense, why could we ship anywhere except for the US? Well the point is to show different options for different places, and to have some place that we don’t ship to at all)
To support these options, our payment request options and event handlers will look like this:
  var details = {
    total: {label: 'Wawesome sauce', amount: {currency: 'EUR', value: '123.00'}},
    displayItems: [
      {
        label: '1 x Wawesome sauce',
        amount: {currency: 'EUR', value: '100.00'}
      },
      {
        label: 'VAT 23%',
        amount: {currency: 'EUR', value: '23.00'}
      }
    ]
  }
Note that we’ve removed the shippingOptions from the request details this time around. As mentioned above, if we don’t do this, then the shippingaddresschange event won’t fire. So let’s handle this event:
  function handleAddressChange(details, shippingAddress, resolve, reject) {
      if (shippingAddress.country === 'IE') {
        var shippingStandard = {
          id: 'IE Standard',
          label: 'Standard shipping Ireland',
          amount: {currency: 'EUR', value: '5.00'},
          selected: true
        };
        var shippingExpress = {
          id: 'IE Express',
          label: 'Express shipping Ireland',
          amount: {currency: 'EUR', value: '25.00'},
          selected: false
        };
      }
      else if(shippingAddress.country === 'US') {
        var unsupportedAddress = true;
      }
      else {
        var shippingStandard = {
          id: 'International Standard',
          label: 'Standard shipping International',
          amount: {currency: 'EUR', value: '15.00'},
          selected: true
        };
        var shippingExpress = {
          id: 'International Express',
          label: 'Express shipping International',
          amount: {currency: 'EUR', value: '45.00'},
          selected: false
        };
      }

      //Now set available shipping options for the chosen address
      if(unsupportedAddress) {
        // Set to empty for unsupported address
        details.shippingOptions =[];
      }
      else {
        details.shippingOptions = [shippingStandard, shippingExpress];

        //Update the order summary, display standard shipping by default
        details.displayItems.splice(1, 1, shippingStandard);
        details = updateDetails(details);
      }
    resolve(details);
  }
The code above should explain itself: we define two shipping options for Irish addresses, two options for the rest of the world, and no options for the US. We then set the default shipping option to standard shipping, and update the order summary (displayItems).
At this point, we also want to update the costs of the order. To do this, we want to add up all items in the order, including shipping and calculate tax and the total. We do this in another function updateDetails. It calculates tax and total amount:
  function updateDetails(details) {
    //Remove last display item (tax)
    if(details.displayItems.length>2) details.displayItems.pop();

    //Update the order summary, recalculate totals
    var tax = calculateTax(details.displayItems, 23);

    //Display the new tax value
    details.displayItems.push({label: "VAT 23%", amount: {currency:"EUR", value: tax}});

    //Display the new total
    details.total.amount.value = calculateTotal(details.displayItems);
    return details;
  }
We use these helper functions to loop over the order items and get a total (in a real application it would probably be a better idea to pull prices from your data model, rather than using the Payment Request API order representation, but this will do the job for us here):
function calculateTax(items, rate) {
  var total = 0;
  for(var i=0;i < items.length;i++) {
    if(items[i].amount.label!='VAT 23%') {
      total+=Number(items[i].amount.value);
    }
  }
  var tax = total*rate/100;
  return tax.toFixed(2);
}

function calculateTotal(items) {
  var total = 0;
  for(var i=0;i < items.length;i++) {
    total+=Number(items[i].amount.value);
  }
  return total.toFixed(2);
}
Now’s a good time to come up for some air and see where we are. At this point, we can handle the event when the user changes address, we’ve recalculated the total order cost based on shipping costs, and recalculated tax, we’ve updated the items displayed in the order summary based on these new costs, and we’ve displayed the shipping options available for the chosen address, if any.
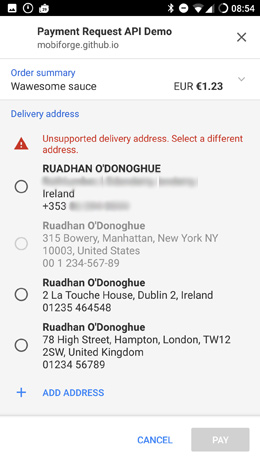
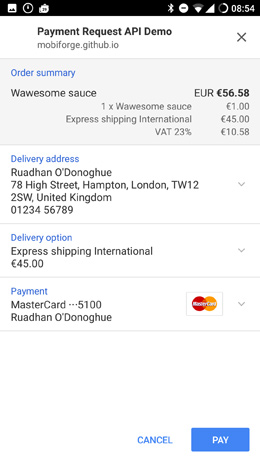
In the images below we can see the default UI for an unsupported address: this happens when we choose the US address that we don’t deliver to. We also see the result of choosing a supported address, with the default shipping method added to the summary, and the costs recalculated.
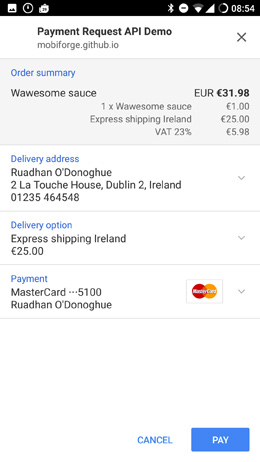
In the next pair of images, we see the appropriate shipping options are loaded for the selected address, and, again, the order totals are recalculated:

So we still have to handle the situation when the user selects a different shipping option, Standard vs Express for Irish or International orders.
This happens in the handleOptionChange function:
function handleOptionChange(details, shippingOption, resolve, reject) {
  //remove tax & shipping from our display items
  while(details.displayItems.length>1) details.displayItems.pop();

  //Match the shipping option
  for(var i=0;i < details.shippingOptions.length;i++) {
    if(shippingOption == details.shippingOptions[i].id) {
      details.shippingOptions[i].selected = true;
      details.displayItems.push(details.shippingOptions[i]);
    }
    else {
      details.shippingOptions[i].selected = false;
    }
  }

  details = updateDetails(details);
  resolve(details);
}
In this example, we only have one actual product in the order, the other items are shipping and tax. So we remove everything from the order apart from the product, and then we match the correct shipping option, and add that back to the order. Then we call the updateDetails function that we saw earlier. This function will then calculate the tax and totals and we’re done!
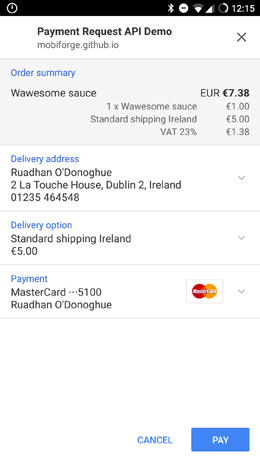
So now we can choose an address, and then choose a delivery option available for that address, and our order summary will be updated as described:
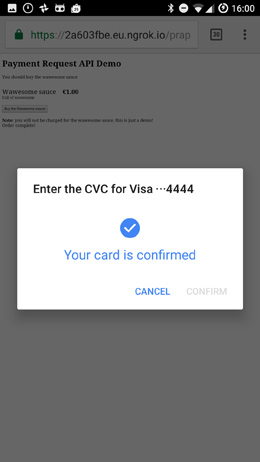
Finally, we can click the Pay button. When this happens, the Payment Request API will prompt for CVC number and attempt to validate the card.
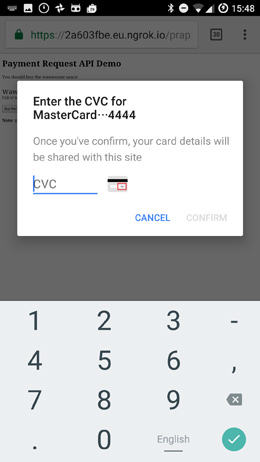
We then PaymentResponse details to the payment gateway provider as described earlier. If this is successful, we display a success message to the user. This happens in the code we showed earlier in the article, repeated here for clarity:
  paymentRequest.show().then(function(paymentResponse) {
    // Get payment info
    var paymentInfo = {
      methodName: paymentResponse.methodName,
      details:    paymentResponse.details
    }

    //Send to payment gatway or processer
    //Simulate this for now, our page will always return a 200 response
    var params = {
      method: 'POST',
      credentials: 'include',
      headers: {
        'Content-Type': 'application/json'
      },
      body: JSON.stringify(paymentInfo)
    };

    return fetch('process-payment.html', params).then(function(response) {
      if(response.status == 200) {
        return paymentResponse.complete('success');
      }
      else {
        return paymentResponse.complete('fail');
      }
    }).then(function() {
        document.getElementById('status').innerHTML = 'Order complete!';
    }).catch(function(err) {
      return paymentResponse.complete('fail');
    });

  }).catch(function(err) {
    document.getElementById('status').innerHTML = 'Could not complete purchase at this time';
  });
And that’s it! You can view the demo here, and you can find all the code on github here.
Development and testing
Right now the Payment Request API is only supported in Chrome for Android (even Chrome for desktop not yet supported). Right now the Payment Request API is officially shipped in Chrome for Android, and Samsung Internet browsers. It’s also currently under development in Firefox, Opera and Microsoft Edge, and is available to preview in Edge, Opera, and Chrome Desktop browsers via experimental flag.
Unless you are developing only for MS Edge or Chrome Desktop, then you’ll need to test on a mobile device. If you’re developing and deploying to your local server, ngrok is indispensable, giving you a tunnel through to your local machine. It supports HTTPS, so anything requiring a secure origin, such as this API, can be tested.
Additionally, using Chrome dev tools remote device debugging is very handy for this (and any other) mobile web development.
So, where did it pull my credit card details from anyway?
Early on in this article I mentioned there was an “Aha!” moment, when my billing details magically appeared in the payment UI, and my brain slowly worked out the possibilities of where the data actually came from. There were two main possibilities that came to mind:
-
My Google account: I’m logged into Google on my device, and in Chrome. My credit card is attached to that account, so if Google Play can access my card, why not Chrome too? Seems plausible!
-
Chrome’s auto-fill feature I checked this on two different devices, and indeed my card and shipping address were stored under auto-fill settings in Chrome.
So where did the API pull the data from? Well it turns out from both places! I performed several tests on two different devices. I was logged in with my Google account on both devices and in both browsers. On one device however, there were no cards stored in the auto-fill section. On this device the Payment Request API did not have any payment methods to choose from, the only option was to add a credit card.
After adding a card to auto-fill, the Payment Request API did indeed find this card. This would appear to indicate that the card was being pulled from the browser auto-fill feature. However, subsequently disabling auto-fill had no effect on the APIs ability to find the card. I would have expected that the card should not be found if auto-fill was disabled. I’m not sure if this is a bug or not!
I also decided to try to add a card directly via the Payment Request API UI, via the ‘Save card to device’ checkbox, rather than adding the card via auto-fill UI. After adding the card via the API, checking back in auto-fill confirmed that this is where the card was saved. So it does appear that auto-fill is where the card is being saved, and that auto-fill is definitely being leveraged by the API.
Finally, reviewing the auto-fill settings on the other device revealed that one card was tagged with “Google Payments”. So my Google account card was pulled into auto-fill, and the Payment Request API was able to access it there. This card was not editable via the auto-fill interface, while the others were!
Security concerns
Security is an understandable concern given the nature of this API. As with many new advanced HTML5 features, this API is only available over secure contexts.
But even more with this API people might ask what happens if their phone is lost or stolen? Will unauthorised access to a user’s device provide unauthorised access to their credit cards and other payment methods? Since one or more credit cards are accessible via the device, should these cards be reported as lost?
Thinking through various scenarios, it would seem that having on-device Payment Request API support, or even browser auto-fill functionality, is no less secure than carrying a credit card around in your pocket. Perhaps it is even a little more secure, since the API will prompt for the CVC number during transactions, whereas this information is printed directly on the back of a card. On the other hand, a credit card does not include shipping information on its back, whereas this information can be accessed from the device.
If I want to change the credit card details associated with my Android account, I need to provide a password. Even to view the details, I need a password. This doesn’t seem to be the case with the Payment Request API: I can pick up my device, and go to the Chrome auto-fill settings and browse the credit cards registered there. But perhaps this is more an issue with the use of Chrome’s auto-fill rather than with the API itself.
These concerns aside, this API provides a streamlined and mostly frictionless way to facilitate mobile payments. It’s relatively easy to implement, and is certainly user-friendly. Whether or not users will have to call their credit card company when their phone is stolen is unclear to me, although I’m sure the W3C team behind this API have given more thought to security issues than I have.
Useful articles
Get the example code
- See the demo here: https://mobiforge.github.io/prapi/
- Get the code on github here
Main image: Jason Howie
Updated 04/01/2017: Updated to reflect progress in browser support for Payment Request API
Published 03/11/2016


Leave a Reply